Batteries, Bulbs And Schematic Diagrams
advertisement
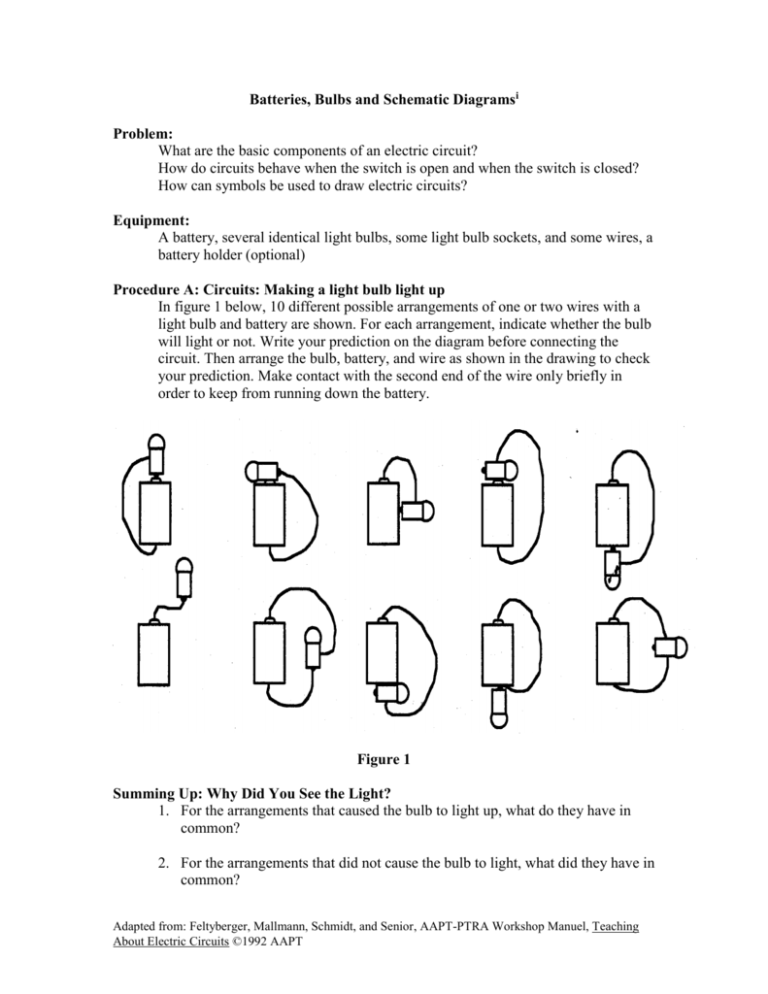
Batteries, Bulbs and Schematic Diagramsi Problem: What are the basic components of an electric circuit? How do circuits behave when the switch is open and when the switch is closed? How can symbols be used to draw electric circuits? Equipment: A battery, several identical light bulbs, some light bulb sockets, and some wires, a battery holder (optional) Procedure A: Circuits: Making a light bulb light up In figure 1 below, 10 different possible arrangements of one or two wires with a light bulb and battery are shown. For each arrangement, indicate whether the bulb will light or not. Write your prediction on the diagram before connecting the circuit. Then arrange the bulb, battery, and wire as shown in the drawing to check your prediction. Make contact with the second end of the wire only briefly in order to keep from running down the battery. Figure 1 Summing Up: Why Did You See the Light? 1. For the arrangements that caused the bulb to light up, what do they have in common? 2. For the arrangements that did not cause the bulb to light, what did they have in common? Adapted from: Feltyberger, Mallmann, Schmidt, and Senior, AAPT-PTRA Workshop Manuel, Teaching About Electric Circuits ©1992 AAPT 3. How do they differ from the ones that caused the bulb to light? 4. Insert the bulb into the bulb socket. (This is just a more convenient way to hold the bulb so wires can be attached without having to hold them in place yourself.) Inspect the construction of the socket. Based on your knowledge from the above exercise, does the socket construction make sense for making the bulb light? Explain. Procedure B: Battery. Bulb, and a Switch Predict whether the bulb in diagram 1 of Figure 2 will light with the switch open or with the switch closed. Connect the bulb (in the socket), battery (in a battery holder if you like), and a switch as shown in the upper left of figure 2. Was your prediction correct? For circuits 2 through 6 in Figure 2, predict whether the bulb will light with the switch open or with the switch closed. Build the circuits to check your predictions. Note that Figure 5 shows the switch closed but do so only briefly! For each of these arrangements close switch only momentarily, for some arrangements, keeping the switch closed can cause the battery to explode. 1. 2. 3. 4. 5. 6. Switch Open Switch Closed Figure 2 Adapted from: Feltyberger, Mallmann, Schmidt, and Senior, AAPT-PTRA Workshop Manuel, Teaching About Electric Circuits ©1992 AAPT Procedure C: Using Symbols for the Circuits When we draw circuits on paper, it is not convenient to draw an actual picture of each element, so we must use symbols instead. These symbols are shown in Figure 3. Figure 3 Use the symbols in Figure 3 to draw the arrangements shown in Figure 2. For example, the first circuit shown in Figure 2 is drawn in figure 4 below. Figure 4 Note that this is the same circuit as diagram 1 in Figure 2 so you have already built this circuit. Adapted from: Feltyberger, Mallmann, Schmidt, and Senior, AAPT-PTRA Workshop Manuel, Teaching About Electric Circuits ©1992 AAPT Procedure C: Circuits with Two Light Bulbs Build the circuit shown in Figure 5. Figure 5 1. How do the light bulbs behave when you close the switch in this circuit? 2. How does the brightness of each bulb compare with the bulb in Figure 4? 3. With the switch closed, unscrew each light bulb, and then replace it. What happens? 4. Can you explain these behaviors? This circuit is called a series circuit. Now construct the two circuits diagrammed in Figure 6. 4. Do these circuits behave the same as the circuit in Figure 5? 5. Does it matter where the switch is placed in a series circuit? Figure 6 Adapted from: Feltyberger, Mallmann, Schmidt, and Senior, AAPT-PTRA Workshop Manuel, Teaching About Electric Circuits ©1992 AAPT Now build the circuits in Figure 7, one at a time. As you test each circuit, ask yourself the following questions: 6. How does closing the switch affect the bulbs? 7. In each circuit with the switch closed, remove each bulb and then replace it. What happens? 8. How bright are the bulbs as compared with the bulb in Figure 4? 9. How do you explain your observations about the switches and the brightness of the bulbs? Figure 7 All three circuits in figure 7 are examples of parallel circuits Adapted from: Feltyberger, Mallmann, Schmidt, and Senior, AAPT-PTRA Workshop Manuel, Teaching About Electric Circuits ©1992 AAPT Batteries, Bulbs and Schematic Diagrams Teacher Notes This experiment gives students an introduction to the construction of circuits. This is a confidence-building activity that provides immediate feedback to students and also gives students an opportunity to make their own discoveries about the design and construction of both bulbs and batteries. In addition, this activity also provides students with an introduction to circuit diagrams. It is appropriate that students should practice and develop the skills of both drawing and reading circuit diagrams since circuit diagrams will be used throughout the study of electric circuits. This experiment also exposes students to the use of switches in circuits and the idea of series and parallel wiring. If teachers wish to emphasize the mathematical details of series and parallel circuits, they are urged to wait until after resistors and the use of meters are introduced. The resistance of bulbs changes with temperature so they are unsuitable for experiments in which resistance is assumed to be constant. D batteries and 1.5 volt bulbs are excellent for this experiment since they are familiar devices. Solid or stranded copper wires with stripped ends work well. Using wires with alligator clips sometimes distracts students from the experiment itself. The students tend to play with the clips or somehow believe that the clips are special devices that are responsible for the operation of the circuit. A cross section view of a light bulb should be given students so they can see the connections between the outer parts of the light bulb and its filament. i This activity is a modified version of an experiment from the Department of Physics and Astronomy at Dickinson College, Carlisle, PA. These activities are part of the Workshop Physics 111-112 course and were written by John Luetzelschwab Adapted from: Feltyberger, Mallmann, Schmidt, and Senior, AAPT-PTRA Workshop Manuel, Teaching About Electric Circuits ©1992 AAPT
