SECTION 2.1 POCT Summary Sheet
advertisement
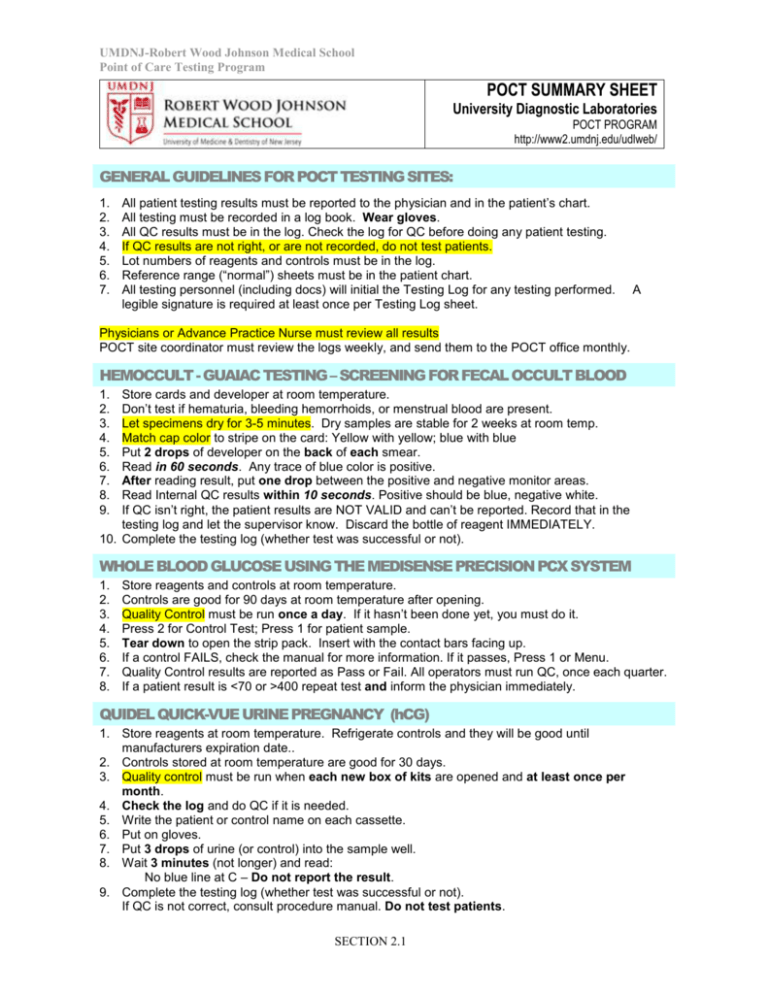
UMDNJ-Robert Wood Johnson Medical School Point of Care Testing Program POCT SUMMARY SHEET University Diagnostic Laboratories POCT PROGRAM http://www2.umdnj.edu/udlweb/ GENERAL GUIDELINES FOR POCT TESTING SITES: 1. 2. 3. 4. 5. 6. 7. All patient testing results must be reported to the physician and in the patient’s chart. All testing must be recorded in a log book. Wear gloves. All QC results must be in the log. Check the log for QC before doing any patient testing. If QC results are not right, or are not recorded, do not test patients. Lot numbers of reagents and controls must be in the log. Reference range (“normal”) sheets must be in the patient chart. All testing personnel (including docs) will initial the Testing Log for any testing performed. legible signature is required at least once per Testing Log sheet. A Physicians or Advance Practice Nurse must review all results POCT site coordinator must review the logs weekly, and send them to the POCT office monthly. HEMOCCULT - GUAIAC TESTING – SCREENING FOR FECAL OCCULT BLOOD 1. 2. 3. 4. 5. 6. 7. 8. 9. Store cards and developer at room temperature. Don’t test if hematuria, bleeding hemorrhoids, or menstrual blood are present. Let specimens dry for 3-5 minutes. Dry samples are stable for 2 weeks at room temp. Match cap color to stripe on the card: Yellow with yellow; blue with blue Put 2 drops of developer on the back of each smear. Read in 60 seconds. Any trace of blue color is positive. After reading result, put one drop between the positive and negative monitor areas. Read Internal QC results within 10 seconds. Positive should be blue, negative white. If QC isn’t right, the patient results are NOT VALID and can’t be reported. Record that in the testing log and let the supervisor know. Discard the bottle of reagent IMMEDIATELY. 10. Complete the testing log (whether test was successful or not). WHOLE BLOOD GLUCOSE USING THE MEDISENSE PRECISION PCX SYSTEM 1. 2. 3. 4. 5. 6. 7. 8. Store reagents and controls at room temperature. Controls are good for 90 days at room temperature after opening. Quality Control must be run once a day. If it hasn’t been done yet, you must do it. Press 2 for Control Test; Press 1 for patient sample. Tear down to open the strip pack. Insert with the contact bars facing up. If a control FAILS, check the manual for more information. If it passes, Press 1 or Menu. Quality Control results are reported as Pass or Fail. All operators must run QC, once each quarter. If a patient result is <70 or >400 repeat test and inform the physician immediately. QUIDEL QUICK-VUE URINE PREGNANCY (hCG) 1. Store reagents at room temperature. Refrigerate controls and they will be good until manufacturers expiration date.. 2. Controls stored at room temperature are good for 30 days. 3. Quality control must be run when each new box of kits are opened and at least once per month. 4. Check the log and do QC if it is needed. 5. Write the patient or control name on each cassette. 6. Put on gloves. 7. Put 3 drops of urine (or control) into the sample well. 8. Wait 3 minutes (not longer) and read: No blue line at C – Do not report the result. 9. Complete the testing log (whether test was successful or not). If QC is not correct, consult procedure manual. Do not test patients. SECTION 2.1 UMDNJ-Robert Wood Johnson Medical School Point of Care Testing Program URINALYSIS DIPSTICK - BAYER MULTISTIX /CLINITEK 50/STATUS Label the container before giving it to the patient, or have the patient label it. Refrigerate urine if not tested within an hour. The reagent strip bottle must be closed tightly. 1. Store reagent strips at room temperature. Refrigerate controls. 2. Controls are good for 30 days at room temperature. 3. Quality control must be run once per day. Check the log and do QC if it wasn’t done yet. 4. Wear gloves when testing patients. 5. Mix urine or control well immediately before testing. 6. Remove one strip from bottle and replace cap tightly. 7. Push the Clinitek 50 button when you immerse the strip. Don't wait. 8. Remove excess urine from strip, along the edge. Do not blot the pads. 9. Proper read time is critical for optimal results. Read starting from the end nearest the handle. Read times are listed on the bottle. 10. Complete the testing log (whether test was successful or not). 11. If QC is not correct, consult procedure manual. Do not test patients. QUIDEL RAPID STREP TESTING ON THROAT SWABS 1. Quality control must be run when each new kit is opened and at least once per month. Check the log and do QC if it wasn’t done yet. 2. Collect specimen from patient with swab provided by kit. 3. Remove test cassette from foil and place on clean level surface. 4. Insert throat swab completely into test cassette. 5. Squeeze to crush the glass ampule inside the extraction solution bottle. 6. Vigorously shake the bottle five minutes to mix the solution. Solution will turn green, use immediately. 7. Remove cap. Quickly fill the chamber to the rim. ( approx. 10 drops) 8. Begin timing. 9. If liquid has not moved across the results window in 1 minute completely remove the swab and reinsert. 10. Do not moved the test cassette until test is completed 11. Read results at 5 minutes. NO LONGER QUICKVUE IN-LINE STREP A TESTING ON THROAT SWABS 1. Run Controls when each new kit is opened or each 30 days whichever is shorter, 2. Remove the Positive or Negative Control Swab from it’s container and insert it completely into the QuickVue In-Line StrepA Test Cassette Swab Chamber. 3. Squeeze ONCE to break the glass ampule inside the extraction solution bottle. 4. Vigorously shake the bottle five times to mix the solutions. The solutions should turn green after the ampule is broken. Solution should be used immediately. 5. Remove the cap. Quickly fill the chamber to the rim (approximately 10 drops). 6. Begin timing. If liquid has not moved across the Result Window in one minute, completely remove the swab and re-insert. If liquid still does not move across, retest with new Control, Test Cassette and Extraction Bottle. The test cassette should not be moved until the assay is complete. 7. Read the result at five minutes. SECTION 2.1 UMDNJ-Robert Wood Johnson Medical School Point of Care Testing Program GENZYME RAPID STREP TESTING ON THROAT SWABS 1. 2. 3. 4. 5. 6. 7. 8. 9. 10. Run Controls when each new kit is opened or each 30 days whichever is shorter, Put 3 drops of Reagent 1 to the Test Tube. It should be pink. Add 3 drops of Reagent 2 to the tube. It should turn light yellow. For controls, mix vigorously and put one drop into the tube. Immediately put the patient’s swab into the tube. (Use a clean swab for the control.) Mix vigorously; rotate swab at least ten times against the side of the tube. Let stand for 2 minute. Squeeze liquid from swab and discard it. Put absorbent end of LabStrip into the Tube. (Recap strip bottle) Read the result after five minutes: If the red Control is not visible, the test result is not valid. If background color is present, the test result is not valid A blue Test Line, and a red Control Line, is a positive result (even before 5 minutes). A red Control line with no blue Test Line at 5 minutes is a negative result. 11. Record result (or that result is not valid) on the log. SECTION 2.1
