Context > A Fizzy Rock > Teaching and Learning Approaches > Strength of sand and cement
mixes
STUDENT ACTIVITY: Strength of sand and cement mixes
Activity idea
In this activity, students mix different combinations of sand and cement with water. Small tiles
of these combinations will be fashioned, left aside to cure and then tested for bending or
flexural strength.
By
the end of this activity, students should be able to:
describe the link between calcium carbonate and cement production
appreciate the role water plays in hydrating the cement
explain how the sand, cement and water ingredients combine to produce, after curing, a
hard end-product
recall a simple procedure that can be applied to test the bending or flexural strength of a
cement tile
recommend a combination of ingredients that gives maximum strength to the tile.
Introduction/background notes
What you need
What to do
Student handout: Testing concrete mixtures
Introduction/background
Portland cement is made by heating limestone, clay and sand in rotating kilns at a temperature
of 1450°C. The limestone is converted to lime, which combines with the iron and aluminium
silicates present in clay and sand to form the fine grey powder known as cement.
The main ingredients present in cement powder are dicalcium silicate, tricalcium silicate,
tricalcium aluminate and calcium oxide.
Cement is a key ingredient of concrete, huge volumes of which are poured each day to serve as
roading, foundations, structural beams and columns. Concrete is a hardened material that
forms when a mixture of cement, sand, crushed stone and water is poured into moulds or
formwork and allowed to cure or harden.
The setting and hardening processes require water. It is the slow hydration of the compounds
present in the cement powder and the crystallisation of these hydrates that locks the sand
grains into a strong, hard end-product.
Both the hydration and crystallisation steps can be influenced by the addition of other
chemicals, and the presence of impurities in the ingredients can interfere with the hardness
and strength of the end-product.
In this experiment, different combinations of sand and cement are mixed with water. Small
‘tiles’ of these combinations are fashioned, left aside to cure and then tested for bending or
flexural strength.
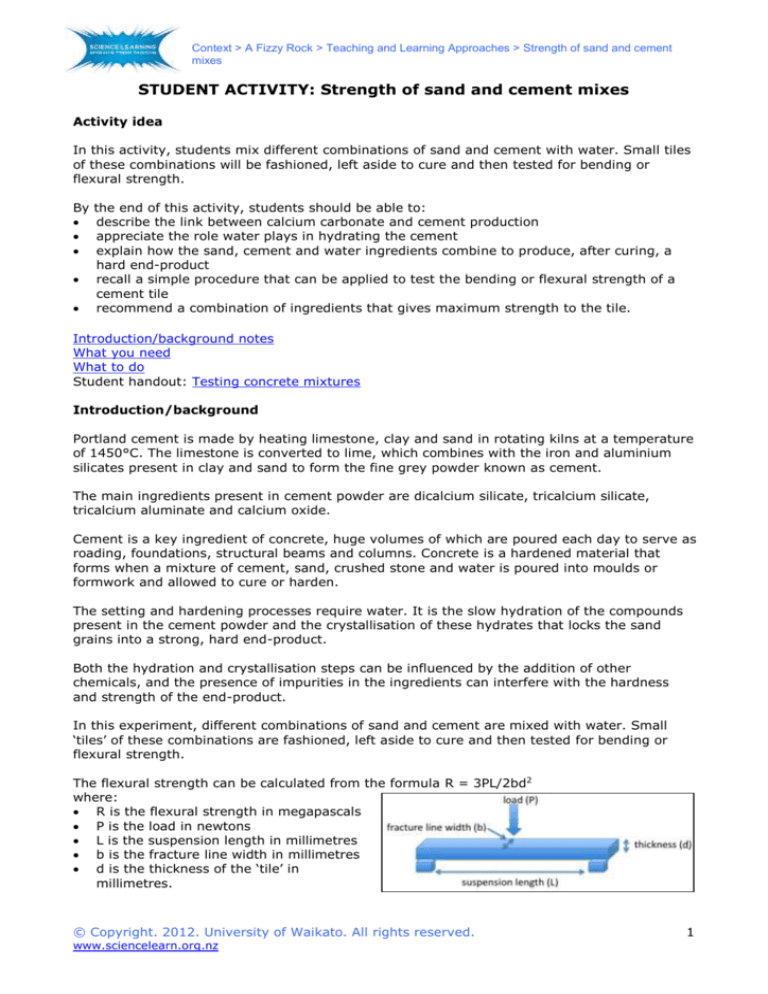
The flexural strength can be calculated from the formula R = 3PL/2bd2
where:
R is the flexural strength in megapascals
P is the load in newtons
L is the suspension length in millimetres
b is the fracture line width in millimetres
d is the thickness of the ‘tile’ in
millimetres.
© Copyright. 2012. University of Waikato. All rights reserved.
www.sciencelearn.org.nz
1
Context > A Fizzy Rock > Teaching and Learning Approaches > Strength of sand and cement
mixes
For example, a typical concrete-based pathway paver has an R-value of about 4.3 MPa. This
means that a paver of length 230 mm, width 115 mm and thickness 40 mm can take a
bending load of:
P = 2bd2R/3L
= 2 x 115 x 402 x 4.3/3 x 230
= 2293.3 N
This equates to a load of about 230 kg.
For a small tile that this experiment investigates, the load needed to break the tile should be
about 5–10 kg. This can be achieved by hanging a 10 L bucket from the centre of the
suspended tile and adding half-litre loads (500 g) of water to the bucket until the tile breaks.
This is a small-scale activity. Upscaling is possible, but the load needed to cause the tile to fail
will require the use of heavy weights. (The load needed to cause the tile to fail is directly
proportional to the square of the tile thickness.)
Creating a tile mould
The tile mould can be constructed from 12 mm square wooden beading attached to a thin
wooden base as per the photos shown below.
Cement mould components
Completed mould
Safety
Care needs to be taken when handling cement powder. The use of disposable gloves and the
wearing of protective eyewear are recommended.
What you need
Clean dry sand – ¼ full 4 L ice-cream container
Dry cement powder – ¼ full 4 L ice-cream container
Clean, empty 4 L ice-cream container
Disposable plastic gloves and safety eyewear
50 mL measuring cylinder
500 mL beaker
Graduated 100 mL beaker x 2 (one for sand and one for cement)
Spatula or teaspoon
Tile moulds each of dimension 140 x 30 x 10 mm (see above)
75 mm nail
Strong nylon string
10 L bucket or weights to give a loading up to 10 kg
What to do
1. Hand out copies of the student handout Testing concrete mixtures and discuss. Assist
students to carry out the experiment and discuss their findings.
© Copyright. 2012. University of Waikato. All rights reserved.
www.sciencelearn.org.nz
2
Context > A Fizzy Rock > Teaching and Learning Approaches > Strength of sand and cement
mixes
Student handout: Testing concrete mixtures
1. Using a 100 mL graduated beaker, measure out 50 mL of clean dry sand and empty into
the clean dry plastic ice cream container (4 L).
2. Using a 100 mL graduated beaker, measure out 50 mL of dry cement powder and empty
into the clean dry plastic ice cream container (4 L).
3. Mix the contents thoroughly.
4. Measure out 20 mL of water and add to the mix.
5. Mix the contents thoroughly until a stiff mix is obtained (a small amount of extra water can
be added to ensure the mix is workable). The amount of water added is important with
regards to the final strength of the tile. If the mix is crumbly and dry, add slightly more
water. The final mix that is placed in the mould should be stiff but workable.
6. Scoop out the cement/sand/water mix and place in the
preformed tile mould. Ensure that the mix is packed
down and takes up the shape of the mould. Any surplus
mix should be set aside for disposal. Label the tile as a
1:1 S to C mix.
7. Repeat these steps but adjust the quantities of the
ingredients as indicated in the table. Five tiles need to
be prepared.
Mix ratio S:C
1:1
3:7
2:3
3:2
1:4
Sand (S)
50 mL
30 mL
40 mL
60 mL
20 mL
Cement (C)
50 mL
70 mL
60 mL
40 mL
80 mL
Water
20 mL
70 mL
60 mL
40 mL
80 mL
Label as
1:1 S to C
3:7 S to C
2:3 S to C
3:2 S to C
1:4 S to C
8. Set the tiles aside for a 2-week period to allow them to cure and harden.
9. Carefully remove each of the tiles from their moulds and
ready them for the flexural strength test as follows:
Suspend the tile between the ends of two closely butted
classroom tables or benches.
Place a 75 mm nail across the central width of the tile
and attach strong string to each end of the nail.
Attach the loose ends of the string to the handle of a
10 L plastic bucket so the bucket is freely suspended.
Add 0.5 L measures of water (equates to ~0.5 kg) to
the bucket until the tile fractures and fails to support
the load.
Note the total mass of water added.
10. Graph your results with ‘failure load’ in L on the vertical
axis (in kg) and ‘mix’ (1:1, 3:7 etc) on the horizontal axis.
11. Of the tile mixes investigated, which one provides the
greatest flexural strength?
© Copyright. 2012. University of Waikato. All rights reserved.
www.sciencelearn.org.nz
3

