ABS Genetic Manager User`s Guide
advertisement
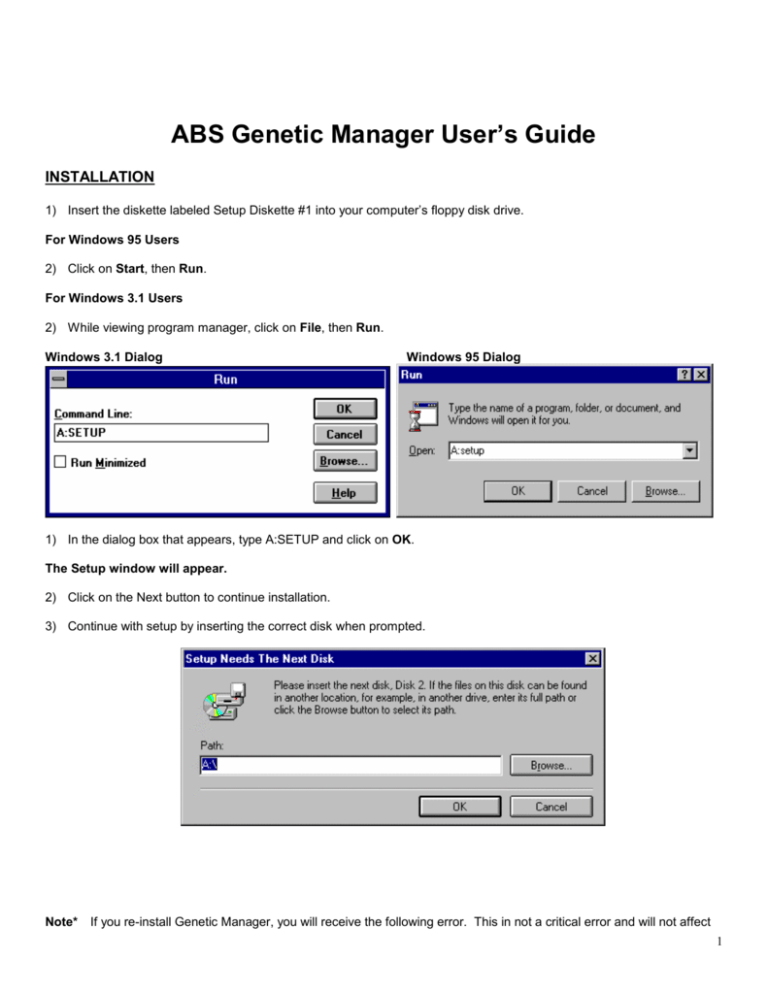
ABS Genetic Manager User’s Guide INSTALLATION 1) Insert the diskette labeled Setup Diskette #1 into your computer’s floppy disk drive. For Windows 95 Users 2) Click on Start, then Run. For Windows 3.1 Users 2) While viewing program manager, click on File, then Run. Windows 3.1 Dialog Windows 95 Dialog 1) In the dialog box that appears, type A:SETUP and click on OK. The Setup window will appear. 2) Click on the Next button to continue installation. 3) Continue with setup by inserting the correct disk when prompted. Note* If you re-install Genetic Manager, you will receive the following error. This in not a critical error and will not affect 1 program performance. 4) After all disks are read, the following dialog will appear. Check in the appropriate check box to run the program immediately after installation is complete. After a successful installation, a new program folder will be created for you. You are ready to begin using ABS Genetic Manager. 5) To learn how to begin using Genetic Manager, double-click on the ABS Genetic Manager User’s Guide Icon. 6) To use Genetic Manager immediately, double-click on the ABS Genetic Manager icon. 2 PROGRAM OVERVIEW The ABS Genetic Manager is a computerized mating program designed to allow breeders to quickly and easily make comprehensive mating decisions using all available information and your specific breeding objectives. In addition to user’s individual mating targets and criteria, the program utilizes Sire and Dam EPDs, ABS’ Genetic Type Summary (GTS) data and pedigree information in the mating process. Breeders can control the mating process and tailor Genetic Manager to their individual program in three ways. Mating Targets Design Progeny Targets Bull Selection Import/Add Bulls Sort/Filter Bulls Lookup Bull Data Print Bull Lists Cow Selection Import/Add Cows Sort/Filter Cows Evaluate Cow Data Establish Mating Criteria Print Cow Lists Process Matings Program Flow View Mating Profiles Finalize Mating Decisions Print Mating Profiles Print Breeding Lists MATING TARGETS This module allows you to establish targets or parameters that matings (or progeny) must fit within. When applied to individual cows, sires that produce matings that miss the targets are not recommended. BULL SELECTION In addition to serving as an electronic sire directory, the Bull Selection module functions much like the Angus Sire Sort program, allowing you to determine which bulls are eligible for the mating process. COW SELECTION In the Cow Selection module, you can identify specific mating criteria for each female in addition to applying various mating targets. The end result after the matings have been processed is individual sire recommendations for each cow based on her strengths and weaknesses and your overall objectives. 3 A BASIC EXAMPLE For this basic example we will use a predesigned MATING TARGET and BULL SET allowing us to move straight to the COW SELECTION MODULE. Choose Cow Selection from the main program menu. This will take you to the Cow Selection/Mating Module Screen. From the File menu choose Open Cow Set For this exercise we will be working with one of the preloaded cow files. Select the testcows.db database from the available files. This database includes a generic RAINMAKER, MAX and EXT daughter. From the Edit menu choose Edit Cow or click on the View/Edit Cow button. This will take you to the individual cow screen for the first cow. This screen displays the background information for each cow including pedigree and EPDs. The easiest way to access any female is to simply double click anywhere on her data line in the Cow Selection/ Mating Module Screen. In standard operating mode, EPD values that would rank in the top 25% of active sires are displayed in green while EPD values that would rank in the bottom 25% of active sires are displayed in red. This feature can be turned off through the Options menu. The Mating Criteria section of this screen is where you design the specific mating criteria for each cow based on what you know about the cows individual strengths and weaknesses, both from an EPD and phenotype standpoint. With the Auto Trait (High to Low) Weighting button selected, building a selection index is as easy as pointing to the box behind the desired trait and clicking your left mouse button. In this mode the program assigns predetermined weights for the traits based on the order in which you choose them. Just remember to select the traits in relative order of importance with the most important trait first. Automatic weightings are as follows: 1 trait 2 traits 3 traits 4 traits 5 traits 100% 60% 50% 40% 30% 40% 30% 30% 25% 20% 20% 20% 10% 15% 10% Which traits you select is totally up to you and will be determined by your knowledge of your cows. The color coding of the EPDs can give you suggestions for traits that may need improvement. This highlighting feature can also be turned off through the Options menu. Lets start with the RAINMAKER daughter and for this example emphasize the following traits. With the Auto Trait (High to Low) Weighting button selected, click on the following traits in order. Increase Yearling Weight Increase Scrotal Circumference Increase Capacity Increase Rib Eye Area and Reduce Birth Weight As the final step for this cow, we can select a mating target. Since this is a RAINMAKER daughter let’s assume that our goal is to produce calving ease bulls. In the Mating Target drop down box select Calving Ease. Bulls that produce matings that miss this target will be excluded from consideration. 4 Click the Save button and move to the next cow by clicking the Next button. Auto Trait Weighting (Equal) is a new option that allows you to automatically put equal weighting on up to five traits by simply clicking on the individual traits. For the MAX daughter try the Manual Weighting option by checking Manual Trait Weighting in the weighting box. In manual mode you can assign the exact weighting that you want for each trait up to a total of 100% and a total of five traits. In the manual mode you must first click on the desired trait, then type in the weighting that you choose for each trait. For this example use the following traits and weightings. Increase Milk 30% Reduce Birth Weight 30% Decrease Stature 20% Improve Udder Composite 10% and Increase Marbling 10% In this case leave the Mating Target undefined by leaving it blank or choosing None. Click Save and Next to move to the next cow. Design you own mating criteria for this EXT daughter. You may select up to five traits. Click Save and Close to return to the main Cow Selection/Mating Module screen. By selecting the Mating Criteria button at the bottom of the screen, you can review the mating criteria and mating targets for all three cows. The last step before processing the matings is to choose which Bull Set the cows will be mated to. For this example we will use the ABS Active bull set which is one of the predefined bull sets and includes all active ABS sires. From the File menu choose Select Bull Set. Select the absactiv.db database from the available files. After choosing the bull set, start the mating process by clicking the Process Matings button or choosing Actions then Mate All Cows. The program will calculate a mating index for each cow against every eligible bull based on your mating criteria. The top five choices will be displayed in a table format. To view the detailed mating recommendations and finalize your mating list, double click on any bull name in the table. Double click on the first recommendation for the RAINMAKER daughter to take you to the Mating Profile Screen for the RAINMAKER cow. The Mating Profile Screen is the key screen in the Genetic Manager program. It provides you with comprehensive information about recommended and other possible matings and allows you to determine the final mating list. The top 5 recommendations for each cow and their relative index value are listed in the top left-hand corner. Three generation pedigrees and unofficial Parent Average EPDs are provided for the first recommended mating along with pedigree estimate GTS values in graphic format. 5 To view the mating profile for the other recommended sires, click on their name under Mating Sire Choices. To view mating profiles for sires that do not appear in the Mating Sire Choices, type their name in the Optional box and click the Show button. You determine the final mating list by moving bulls up and down in the Mating Sire Choices using the Up and Down buttons. You can also move bulls that are displayed in the Optional box by clicking on the bull that you want to replace in the Mating Sire Choices and clicking on Replace. After finalizing your mating list check the Mating Approved box as a bookmark. Click on Next to move to the next cow. After approving the final cow, you are ready to print a Mating Summary Report. Click on the Print button and choose Print Mating Summary Report. At this point you can also print individual mating profiles. ADDING YOUR COWS TO THE PROGRAM EPD and pedigree information for your cow herd can be added to the program in several ways. ENTERING DATA MANUALLY New cows can be manually entered into any open cow set by selecting New Cow from the Edit menu of the Cow Selection/Mating Module. IMPORTING DATA ON DISKETTE FROM THE AMERICAN ANGUS ASSOCIATION You can request your cow herd data on diskette from the American Angus Association. Just call the AHIR department and ask for your cow herd information in the “ABS Genetic Manager format”. You will need your member code number. The current charge for this service is $25. To import this data go to the Cow Selection module Choose File and New Cow Set. Choose Actions and Import Cows. The Import Cows screen will confirm the number of cows that have been imported. Click Close. You can now sort, filter or edit your cows. When you are satisfied with your cow set, select File then Close Cow Set or Exit. Or use the Close button. You will be asked to save and name your cow set. 6 IMPORTING COW DATA FROM ANGUS INFORMATION MANAGEMENT SOFTWARE (AIMS) PROGRAM If you are already using the Angus Association’s AIMS program, you can export pens or files from AIMS into Genetic Manager. You must have the Crystal Reports program that comes with AIMS loaded for this file transfer to work. STEP ONE In File Manager or Windows Explorer locate the file named Genmgr.rpt in the C:\Absgnmgr directory. This is a report template that will allow you to export data from AIMS to Genetic Manager. Copy the file named Genmgr.rpt into the C:\Aims20\AnimalReports\Custom directory. Once this file has been transferred, you will be able to skip step one in the future. Exit File Manager or Windows Explorer STEP TWO Start your AIMS program. Open the pen that you want to export to the Genetic Manager program. From the Reports menu, select Custom Reports. Then double click on Genmgr.rpt. This will generate a custom AIMS report on the screen. (The report is used to transfer data and is not legible on the screen) To export the data, click on the “envelope” button at the top of the screen. At the next screen choose Comma-separated values (CSV) under the format option and Disk file under the destination option. Then click OK. Click OK at the next screen At the Choose Export File dialog box, give the file a name and choose where you would like to send this file. Either a disk in A or any directory in C, just remember where so that you can locate it for import into Genetic Manager later. At this point you can exit the AIMS program. STEP THREE From the Cow Selection module in the Genetic Manager program choose File and New Cow Set. Choose Actions and Import Cows. At this point select the file name and location (drive and folder) that you exported your AIMS report to. The Import Cows screen will confirm the number of cows that have been imported. Click Close. You can now sort, filter or edit your cows. When you are satisfied with your cow set, select File then Close Cow Set or Exit. Or use the Close 7 button. You will be asked to save and name your cow set. To move other files, you will have to repeat steps two and three. USING TYPICAL COW FILES TO REPRESENT COMMERCIAL FEMALES If you have commercial or unregistered cows with no EPDs you can utilize cows from the typical cow files to build approximate representatives of your herd. The Genetic Manager program comes loaded with two typical cow files. The first named typical.db, includes profiles of typical daughters of popular current and former ABS sires. The second named other.db includes profiles of typical daughters of popular non-ABS sires. These typical cow profiles have been derived by calculating pedigree estimate EPDs for the mating of given sires to breed average cows. Copy and edit these cows to build a cow set that represents your commercial herd. MATING TARGETS Mating targets are a set of minimum and/or maximum values that all resulting matings must fit within. They provide a safety net allowing you to be more open in your sire selection criteria while avoiding calves that don’t meet your objectives. Sires that don’t produce matings that fit within the target or window are excluded from the mating process on an individual cow basis. Different targets may be established and applied to individual females. For example a Calving Ease target for heifers and a Growth and Maternal or Carcass target for mature cows. A typical Calving Ease target might include the following values.... BW EPD < +3.0, WW EPD > +25, YW EPD > +45, Milk EPD > +10 and < +20, Marb. EPD > +.00 Stature > -1.0 and < +1.0, Capacity > +0.0, Muscle > +0.0 (Remember Mating Targets are not Sire Selection criteria. They define the outer ranges or safety net for your matings. They will likely be used in conjunction with your sire selection criteria so be careful not to make them too restrictive.) ESTABLISHING MATING TARGETS Select Mating Targets from the main program menu. Choose the New Target button. Enter a short name and description for your target. Enter the minimum and/or maximum values that you want to apply to this specific target. When you have finished choose the Close button. You will then be asked if you want to Save changes to Target? Choose Yes Repeat the process to establish other targets. 8 BULL SELECTION The bull selection module allows you to control the mating process by determining which bulls will be competing in the mating process. It functions very much like the Angus Sire Evaluation Sort program. In addition to their EPDs, bulls can be sorted or filtered by any piece of data including individual performance, pedigree and semen price. Any resulting bull lists can be saved as BULL SETS for future use. The Genetic Manager comes preloaded with all ABS active bulls and several preselected BULL SETS including: ABS Active Calving Ease Curvebender Maternal Growth Carcass absactiv.db e_zcalve.db curvbndr.db maternal.db growth.db carcass.db Includes all active ABS sires (< or = to +2.5 BW EPD) (< or = to +3.0 BW) and (> or = to +75 YW) (> or = to +10 Milk) and (> or = to +.00 SC) (> or = to +40 WW) and (> or = to +75 YW) (> or = to +.00 %IMF) You can add your own additional bulls to these lists or use the sort and filter functions to build custom BULL SETS. IMPORTING ADDITIONAL BULLS FROM AIMS (New Feature) It’s now possible to import additional bulls into Genetic Manager from the Angus Information Software program. After establishing your pen of bulls in AIMS, follow the directions outlined for importing cows above. BUILDING CUSTOM BULL SETS Select Bull Selection from the main program menu. Choose New Bull Set from the File menu. An empty bull database will appear. From the Actions menu select Copy Bulls. Click on the Choose Source Set button. You can now select any of the established bull sets as the source for your custom bull set. At this point you can use the Filter button to filter and eliminate bulls from your bull set or choose the OK button to load these bulls into your new bull set or database. Once the bulls have been loaded into the database you can use the Actions menu to Copy Bulls from other bull sets or Filter, Sort or Locate Bulls. Through the Edit menu, you can also: add new bulls - New Bull This can be used to enter pedigree and EPD information on herd bulls or other A.I. sires. delete bulls - Cut Bull This feature allows you to start with large BULL SETS and customize them by quickly deleting individual bulls. and edit bull information - Edit Bull. When you are satisfied with your custom bull set, choose File then Exit You will then be asked if you want to Save New Bull Set? Choose Yes 9 Give your bull set a name of 8 characters or less. *** See the on-line help system for more information about using the BULL SELECTION MODULE and printing bull sets. WHAT IF FEW OR NO BULLS ARE RECOMMENDED RE-EXAMINE YOUR MATING TARGETS If you are using one or more MATING TARGETS, re-examine them. They are likely too restrictive. Remember that MATING TARGETS define the outer boundary or limits for potential matings. In some cases “you can’t get there from here” if your target or destination is too difficult. While you may think that your individual criteria are not very restrictive, together they may eliminate all potential sires. Remember that in the Fall 1997 Angus Sire Summary, only 9 bulls are above average in all traits. EXPAND YOUR BULL SET You may need to start with more bulls to meet all of your mating objectives. YOU ONLY WANT TO USE A SMALL NUMBER OF BULLS IN YOUR BREEDING PROGRAM If you use a Bull Set with a large number of bulls in the mating process, Genetic Manager may recommend numerous different bulls as possible mating sires. You can limit your final number of mating sires and still ensure that you are making the best matings possible in a couple of ways. REDUCE THE SIZE OF THE INITIAL BULL SET USED You may want to limit the bulls up front to a certain number of bulls that fit your preferences. In this manner, the Genetic Manager is helping you to utilize your preferred bulls in the best way possible but it is not helping you to find other bulls that meet your objectives. PROCESS MATINGS TWICE Run the program “wide open” the first time. Utilize the biggest bull set possible in your first mating calculations to identify all bulls that meet your objectives. (10-20 different bulls may be recommended) Analyze the mating recommendations and determine which bulls are recommended the most and best fit your preferences. Then build a new BULL SET that includes only those bulls. (You can limit this group of bulls to 4 or 5 or however many you choose.) Re-mate your cows using the new BULL SET. This is as simple as choosing another bull set under Select Bull Set from the File menu of the Cow Selection/Mating Module and then clicking the Process Matings button. This will ensure that you are utilizing a smaller number of bulls but in the most effective way possible. UPDATING YOUR PROGRAM You will want to update your Genetic Manager program before each new breeding season with new genetic parameters and bull data from ABS and new cow data from the American Angus Association. Updated bull information and new typical cow files will be available from ABS after each sire summary. Updated genetic parameters needed to run the program will also be included. To receive these updates on diskette call 1-800-ABS-STUD. Look for an announcement soon about accessing bull updates from 10 the ABS Global website. Updated cow EPDs can be obtained from the American Angus Association or imported from the AHMS Program. See the ADDING YOUR COWS TO THE PROGRAM section of this manual for more information. HOW MATING RECOMMENDATIONS ARE DETERMINED Mating recommendations are determined based on your mating criteria for each cow. A mating profile is calculated including unofficial parent average EPDs and GTS pedigree estimates for each cow and every eligible sire. Unofficial parent average EPDs are simply the average EPDs of the sire and the dam while GTS pedigree estimates are the weighted average of the Sire, Maternal Grand Sire and Great Grand Sire of each mating. (The GTS pedigree estimates are backed by data on over 900 of the most popular bulls in the Angus breed including ABS and non-ABS bulls.) The sire of any mating that does not meet the selected MATING TARGET for a given cow is eliminated from consideration. In addition, the sire of each cow and any paternal brothers to a given cow are also eliminated from consideration. A mating index is then calculated for each cow and every remaining eligible sire based on the standardized values of the mating profiles and the mating criteria trait weightings that you selected for each cow. The five highest indexing bulls are then listed for each cow on the Mate Results screen that appears after the mating process is completed. In addition, the top 5 bulls and their index values are listed in the upper left hand corner of the MATING PROFILE screen for each cow. Mating indexes cannot be compared from one cow to another because each cow has her own mating criteria and therefore a different index calculation. Seventy five percent of the final mating index calculation is based on your mating criteria while twenty five percent is based on a balanced trait customer survey weighting. This underlying index provides a safety net to avoid bulls that may be extremely weak in traits beyond the maximum of five that you have chosen in your mating criteria. The weightings for the underlying index are as follows: reduced BW EPD increased WW EPD increased YW EPD increased Milk EPD increased %IMF EPD increased REA EPD increased %RP EPD increased SC EPD 15% 10% 15% 10% 10% 4% 3% 5% moderate stature STA increased capacity STA increased muscle STA ideal rear leg STA udder composite STA 5% 6% 5% 5% 7% HOW TO GET HELP USER’S GUIDE This User’s Guide provides installation instructions and basic information about the program as well as a walk through example of mating a small group of cows. ON-LINE HELP The on-line help system provides detailed information about the program and its features. 11 TECHNICAL ASSISTANCE For installation or software technical support issues contact Profit$ource Software: Voice Fax (715) 536-7159 (715) 536-2696 Email Internet profits@pcpros.net http://ariel.pcpros.net/profitsource/ 12
