HeNe LASER
advertisement

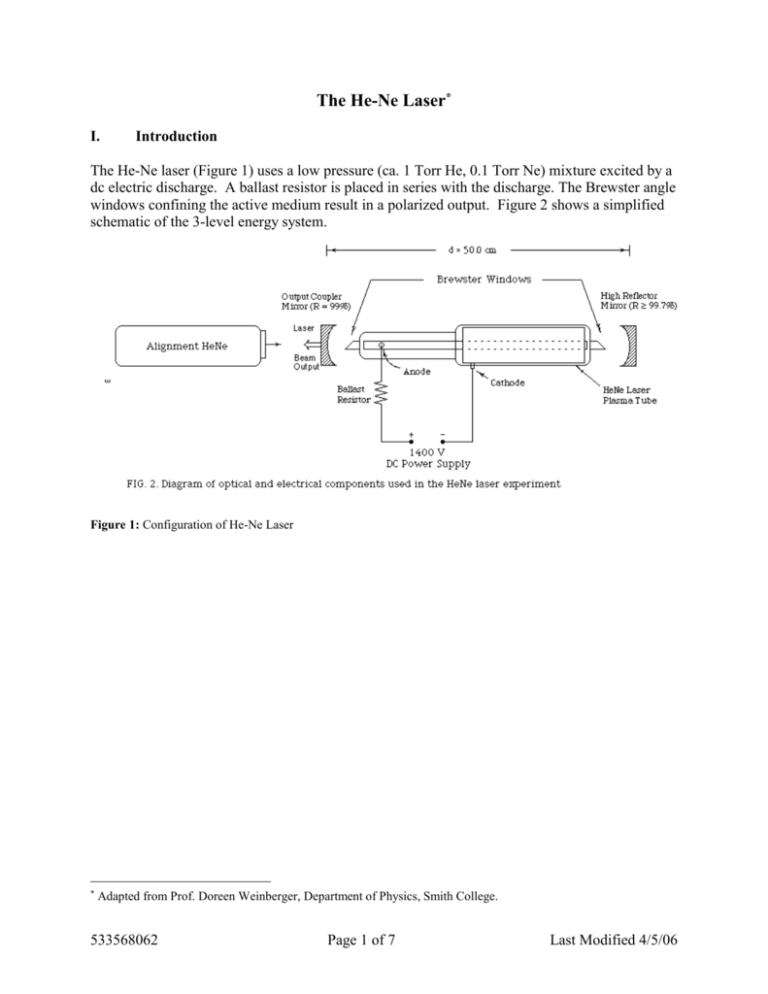
The He-Ne Laser* I. Introduction The He-Ne laser (Figure 1) uses a low pressure (ca. 1 Torr He, 0.1 Torr Ne) mixture excited by a dc electric discharge. A ballast resistor is placed in series with the discharge. The Brewster angle windows confining the active medium result in a polarized output. Figure 2 shows a simplified schematic of the 3-level energy system. Figure 1: Configuration of He-Ne Laser * Adapted from Prof. Doreen Weinberger, Department of Physics, Smith College. 533568062 Page 1 of 7 Last Modified 4/5/06 Figure 2: Three level energy diagram of the He-Ne laser transition. One of the goals of this laboratory is to observe several transverse modes of the laser. Manipulation of the cavity reflectors during lasing can induce appearance of the various transverse electric modes (TEMs) as shown in Figure 3. 533568062 Page 2 of 7 Last Modified 4/5/06 Figure 3: Examples of transverse Gaussian laser modes. II. Objectives The objectives of this lab are to 533568062 Page 3 of 7 Last Modified 4/5/06 1) Align the cavity and achieve lasing. SAFETY: Avoid looking down the long axis of the laser, especially when trying to achieve lasing!! 2) Observe and identify as many distinct transverse TEM modes as possible. 3) Observe the Polarization properties of the laser. 4) Determine the effect of an aperture in the laser cavity. 5) Observe the longitudinal laser modes. III. Achieve Lasing Use a working He-Ne laser as an alignment tool. Using two mirrors to reflect the alignment laser beam through the laser tube. IT IS IMPORTANT THAT YOU take care in aligning the laser. Read the instructions carefully and ask your instructor to check your setup to make sure that all of the alignment nuances have been followed. 1) You may find that its easier to due the alignment with the He-Ne laser tube off. Place the tube in its mounts on the optical table. Make sure that you adjust the mounts so that the tube is parallel to the table top. Use the two mirrors to direct and align a separate He-Ne laser beam down the axis of the laser tube. At this point, the two cavity mirrors should not be present. Make sure that the alignment beam is centered on the Brewster windows. You should see scattered light from the alignment beam passing through the Brewster windows. This will aid you in determining if the alignment beam is centered. (Turning the room lights off might help you see the scattered light). 2) Place the high reflector mirror in the cavity such that it the alignment beam hits the mirror at its center. Adjust the tilt of the mirror until the reflected alignment laser beam reflects DIRECTLY back on itself. 3) Place the output coupler mirror in the cavity. The spacing between the two cavity mirrors should be 60cm with the laser tube centered at the mid-point between the mirrors. Adjust the position of the output couple so that the alignment beam hits the center of the mirror. Adjust tilt of the output coupler until the alignment laser beam is reflected back on itself. At this point, if you block the alignment laser beam, the laser cavity should lase on its own. Observe the output light on a white surface. If the cavity does not lase, adjust the cavity mirrors to get lasing. It is sometimes helpful to observe the reflected alignment laser from the mirrors as you make small tilting adjustments. As you get closer to achieving lasing, the reflected light spot that you see on the mirrors will get brighter. Iteratively tilt both cavity mirrors to optimize the brightness of this reflection spot on the mirror. Instructor's Note: If the tubes have not been used recently, they should be run for several hours to eliminate the build up of moisture on the internal Brewster faces of the tube. If the tube will not lase, clean the Brewster windows and mirrors with methanol and acetone. The tubes should be turned on every few months for an hour to remove moisture from the laser tube. The tube and mirrors are stored on an optical rail. It is easiest to align the laser with the laser 533568062 Page 4 of 7 Last Modified 4/5/06 tube mounted directly to the optical table: the optical rail restricts the lateral alignment of the mirrors. IV. Observation of TEMs 1) Set up a CCD camera interfaced to a computer. Make sure the interface program is active and “talking” to the CCD. 2) Pass the test laser output beam through a lens to expand it. Use a beam-splitter to split the beam into two parts: one part is incident on the CCD camera while the other is directed to a white screen. Move the white surface to observe a reasonably large image. You may need to attenuate the laser light on the CCD camera so that the camera does not saturate. 3) Carefully adjust one cavity reflector to generate various TEMs while maintaining lasing. Do NOT over-adjust! Using the CCD camera software, capture the image of the transverse mode structure. Identify as many TEMs as you can. V. Polarization Properties 1) Using a polarizer, determine the output polarization of the laser. 2) Explain WHY the polarization is the orientation you observed. HINT: How does a Brewster window work? VI. Effect of Spatial Aperture 1) Inside of the laser cavity, place an aperture in an x-y-z stage. 2) With the aperture completely open, adjust the laser such that you have a higher order TEM mode lasing. 3) Slowly close the aperture and observe the effect of the laser output. Keep the laser lasing by adjusting the cavity mirrors. 4) With the aperture closed as much as possible but still lasing, what kind of mode pattern do you see? Can you adjust the laser for higher order modes? Please explain WHY in your lab report. Use sketches of transverse mode pattern beam paths in the laser cavity to justify your answer. You may also use the results of the Homework from this section of course to explain your results. VII. Measurement of Longitudinal Modes of Lasing (if time permits) 1) Align the laser for the TEM00 mode. 2) Remove the lens and CCD camera. In its place, place the Fabry-Perot interferometer. This optical instrument can measure the frequency width of very narrowly spaced laser lines. Ask 533568062 Page 5 of 7 Last Modified 4/5/06 your instructor for directions on setup and calibration. The electronic output of the interferometer should be connected to the oscilloscope. 3) Adjust the resolution of the Fabry-Perot until you can resolve many narrowly spaced laser lines. Using the instructor supplied LABVIEW program, digitize the data from the interferometer and save for later analysis. Make sure that you record the CALIBRATION for the instrument – in particular, what is the calibration for frequency per unit time for the oscilloscope trace. More Questions for Discussion 1) What TEMs did you identify? Were some easier to distinguish than others? Speculate why or why not. 2) Did the spectrum of the cavity output change from the non-lasing to lasing states? Explain. 3) The energy level structure of the gain medium determines the laser wavelength. The gain medium as determines the degree of monochromaticity of the laser radiation or “bandwidth” . Recall that the wavelength and frequency of a photon are related by c / . Differentiate this relationship to show that the factional bandwidth of a laser is the same whether expressed in wavelength or frequency units: . For the He-Ne laser, =632.8nm and the bandwidth is usually expressed in frequency units: gain = 1.5 GHz. Calculated the corresponding bandwidth in nm. Based on your answer, would you consider the laser to be monochromatic? Why or why not? 4) What is the Q of such a laser? Recall that Q of any resonant device is defined as Q o / o / 5) The pair of mirrors which form the optical resonator or cavity “trap” the photons of light between the mirrors and the multiple retro-reflections allow the laser beam to quickly become amplified as the photons pass back and forth through the gain medium. Another important effect of the laser mirrors is to force the light wave to be a standing wave in the region between the mirrors. That is, only a half-integral number of laser wavelengths can fit between the mirrors. Use this fact to show that the possible laser frequencies must be given by m m c 2L where L is the length of the laser cavity (distance between the mirrors) and m is the number (an integer) of half-wavelengths fitting between the mirrors. Use this equation to calculate the 533568062 Page 6 of 7 Last Modified 4/5/06 approximate value of m for your laser. (This will remind you just how small the wavelength of light is!) 4) So you see that the actual laser output is a set of very closely spaced frequencies (or wavelengths), so-called laser modes, whose separation is n (c / 2L) . Use Eq. (2) to calculate m for your laser. Is this measure frequency difference consistent with the measured data of Part VII. Then use the He-Ne laser bandwidth gain to calculate haw many modes your laser should have. These modes are called axial or longitudinal laser modes. In addition, there are transverse modes (such as shown on page 2 of this manual). 5) Assume your He-Ne laser produces 3mW of output power. (Or you can actually measure the output power with an optical power meter.) Using the current and voltage ratings of the laser power supply (ie. the current and voltage), estimate the electrical power consumed by the laser and compute the efficiency for converting electrical energy to red laser light energy: optical power out . electrical power in Are you surprised at your value for ? Where is the rest of the energy going? References Hecht, Optics Yariv, Optical Electronics. 533568062 Page 7 of 7 Last Modified 4/5/06


