CRIS Radiology System User Manual - Navigation & Modes
advertisement
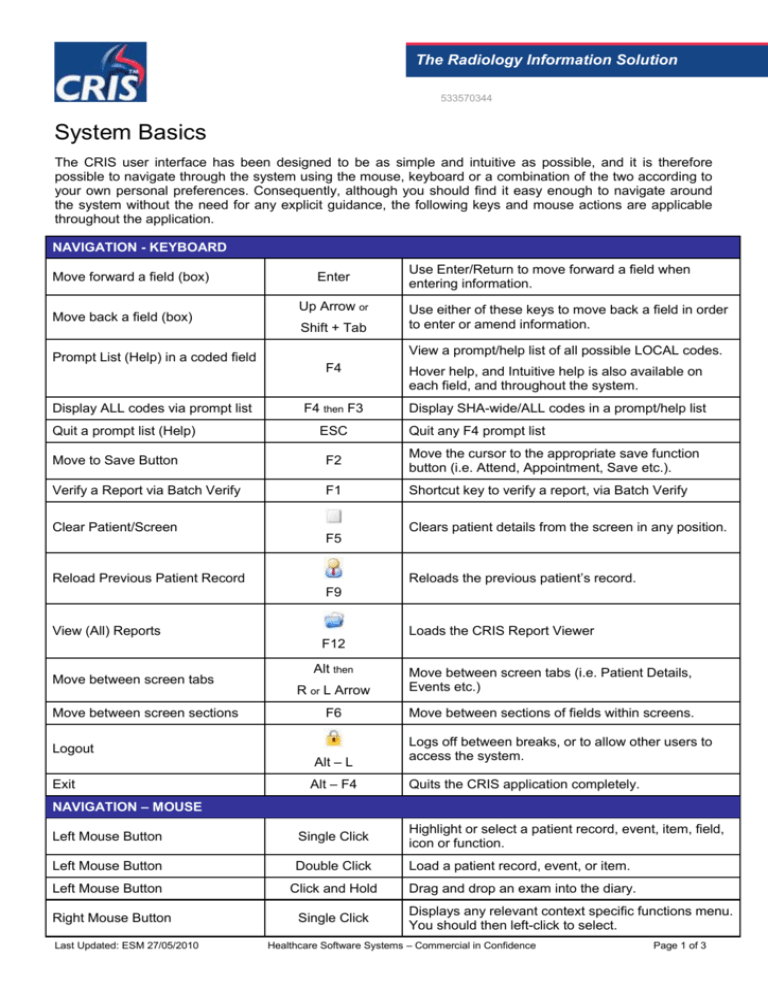
The Radiology Information System The Radiology Information Solution 533570344 System Basics The CRIS user interface has been designed to be as simple and intuitive as possible, and it is therefore possible to navigate through the system using the mouse, keyboard or a combination of the two according to your own personal preferences. Consequently, although you should find it easy enough to navigate around the system without the need for any explicit guidance, the following keys and mouse actions are applicable throughout the application. NAVIGATION - KEYBOARD Move forward a field (box) Move back a field (box) Prompt List (Help) in a coded field Display ALL codes via prompt list Quit a prompt list (Help) Enter Up Arrow or Shift + Tab Use Enter/Return to move forward a field when entering information. Use either of these keys to move back a field in order to enter or amend information. View a prompt/help list of all possible LOCAL codes. F4 Hover help, and Intuitive help is also available on each field, and throughout the system. F4 then F3 Display SHA-wide/ALL codes in a prompt/help list ESC Quit any F4 prompt list Move to Save Button F2 Move the cursor to the appropriate save function button (i.e. Attend, Appointment, Save etc.). Verify a Report via Batch Verify F1 Shortcut key to verify a report, via Batch Verify Clear Patient/Screen F5 Clears patient details from the screen in any position. Reloads the previous patient’s record. Reload Previous Patient Record F9 View (All) Reports Loads the CRIS Report Viewer F12 Move between screen tabs Move between screen sections Logout Exit Alt then R or L Arrow Move between screen tabs (i.e. Patient Details, Events etc.) F6 Move between sections of fields within screens. Alt – L Alt – F4 Logs off between breaks, or to allow other users to access the system. Quits the CRIS application completely. NAVIGATION – MOUSE Left Mouse Button Single Click Highlight or select a patient record, event, item, field, icon or function. Left Mouse Button Double Click Load a patient record, event, or item. Left Mouse Button Click and Hold Drag and drop an exam into the diary. Right Mouse Button Last Updated: ESM 27/05/2010 Single Click Displays any relevant context specific functions menu. You should then left-click to select. Healthcare Software Systems – Commercial in Confidence Page 1 of 3 SYSTEM MODES The CRIS (Computerised Radiology Information) System has been developed to accurately reflect and facilitate the needs of those who use it. As a result, the system incorporates a number of Context Specific 'MODES', designed to mirror workflow patterns, and display or highlight the most appropriate screens and buttons, therefore allowing you to control the way the system appears and behaves in relation to whatever task you are currently undertaking. As a result, after logging in for the first time you must select a MODE via the OPTIONS MENU, which is most appropriate to the task you are currently undertaking. It will then only be necessary to change your mode if the task you are undertaking changes, and you would like the CRIS system workflow to reflect this. The current mode is always displayed in the CRIS menu-bar for reference. Please Note: All CRIS modes are ultimately designed to facilitate workflow, therefore although it is possible to perform most functions via any mode (i.e. It is not necessary to change your mode to perform one off tasks) default navigation and screens/views will remain appropriate to the mode selected. Type of Mode Reception Appointments Direct Appointments Description Designed for use when booking in/attending patients throughout the department, or as a query facility for nurses/assistants in order to view patient history/reports. Designed for use when making, changing or cancelling existing appointments, as well as placing requests onto waiting lists and rebooking blocks of appointments in the event that a room is closed, or a session is cancelled – This mode makes use of the graphical CRIS Diary Viewer. Designed for use when making appointments which have already been assigned on paper, or which require a specific date, time and room – does not use the CRIS Diary Viewer. This mode is also most suited to placing requests/patients onto a waiting or pending list. Please Note: We only advise Direct appointments be used for the appointments go live as it can cause confusion when multiple users are using this mode for booking into the diary as there is no graphical diary available in this mode. Post Processing Dictation Reporting Film Tracking Pulling List Outcome Entry Sonographer Vetting - New Designed for use by Radiographers and Sonographer in order to complete postexamination details (room, dosage etc.) throughout the department during working hours, and during on-call work where it is also necessary to attend the patient prior to undertaking the examination. Designed for use in conjunction with CRIS digital dictation (if installed) by Radiologists or any other reporting clinician wishing to dictate reports. Designed for use by Secretaries, and Reporting Clinicians (Sonographers, radiologists, radiographers etc.) providing comprehensive reporting functionality for both typing and authorising/verifying reports. (including Voice Recognition) Designed for use in Film Filing, Sorting and Medical Records where users require almost exclusive access to tracking and merging temporary and main film packets. When using this mode the system automatically defaults to menus and options appropriate to locating and tracking Film Packets in and out of the department. Designed for use when adding patients to/editing ‘External Clinic Pulling Lists’, if required. Designed for completing pregnancy outcome forms in conjunction with the CRIS Fetal Anomaly Module. Using this mode the system will default to the Pregnancy Episodes screen upon loading a patient record. Only applicable if the Trust has purchased the Fetal Anomaly Module. Designed for use exclusively by Sonographers, in order to complete postexamination details (room, dosage etc.), before proceeding directly to the CRIS reporting module as necessary. Designed for use in conjunction with the CRIS vetting module, in order to facilitate vetting of multiple requests. The CRIS system has also been designed to automatically default to whichever MODE was in use at the time of your last login, therefore you will only need to assign an appropriate mode when logging into CRIS for the first time, or when changing to a different task. Last Updated: ESM 27/05/2010 Healthcare Software Systems – Commercial in Confidence Page 2 of 3 The Radiology Information System The Radiology Information Solution 533570344 Document Control Title Author File Ref. 2.09.10 System Basics Date Created David Costin RIS_CRIB263_02.09.10_System_Basics_v1.0.doc Approval Sign-off Owner 27/05/2010 Role Method of approval Date David Costin Trainer / Application Specialist Verbal 01/09/2009 Approver Role Method of approval Date Emma Savage-Mady Training / Documentation Manager Verbal 27/05/2010 Change History Issue Date 1.0 01/09/2009 1.1 27/05/2010 Author / Editor DC ESM Review Date 27/05/2010 Last Updated: ESM 27/05/2010 Details of Change First Issue Amendments based on inclusion of new vetting mode. Healthcare Software Systems – Commercial in Confidence Page 3 of 3
