Bulk Micromachining Process Procedure
advertisement
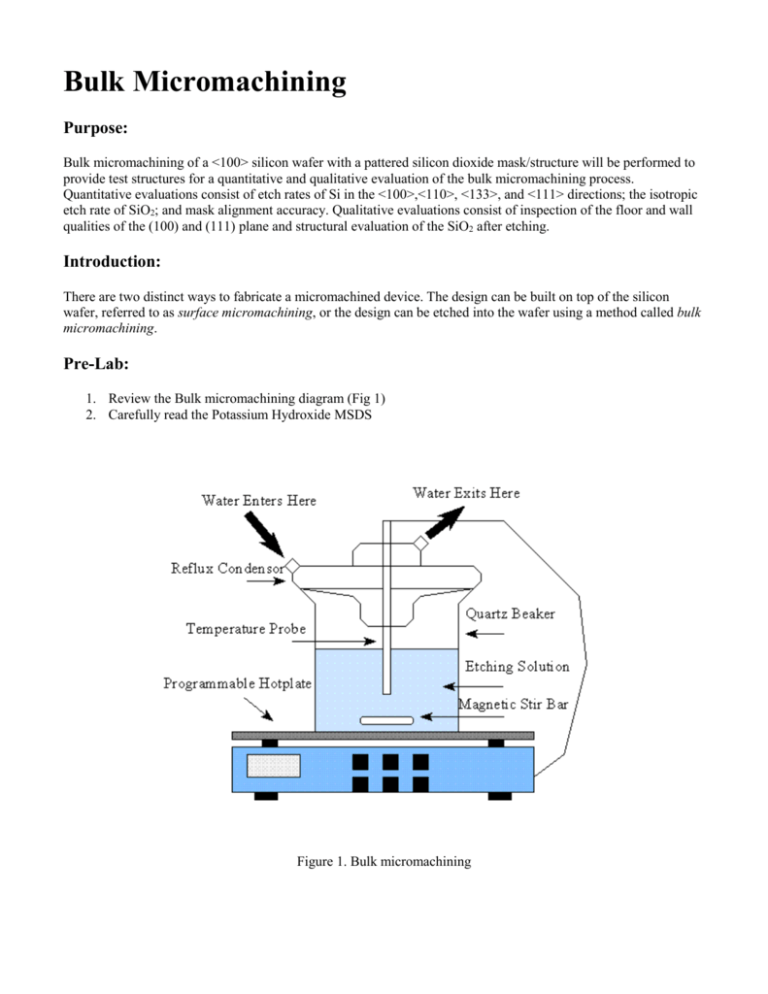
Bulk Micromachining Purpose: Bulk micromachining of a <100> silicon wafer with a pattered silicon dioxide mask/structure will be performed to provide test structures for a quantitative and qualitative evaluation of the bulk micromachining process. Quantitative evaluations consist of etch rates of Si in the <100>,<110>, <133>, and <111> directions; the isotropic etch rate of SiO2; and mask alignment accuracy. Qualitative evaluations consist of inspection of the floor and wall qualities of the (100) and (111) plane and structural evaluation of the SiO2 after etching. Introduction: There are two distinct ways to fabricate a micromachined device. The design can be built on top of the silicon wafer, referred to as surface micromachining, or the design can be etched into the wafer using a method called bulk micromachining. Pre-Lab: 1. Review the Bulk micromachining diagram (Fig 1) 2. Carefully read the Potassium Hydroxide MSDS Figure 1. Bulk micromachining Textbook Material: Read Section 2-2 of INTRODUCTION to MICROELECTRONIC FABRICATION by R. Jaeger : 2.2 Etching Techniques 2.2.1 Wet Chemical Etching 2.2.2 Dry Etching 2.2.3 Photoresist Removal Equipment: 1. 2. 3. 4. Programmable Hot plate with Temperature probe Control Reflux Condenser Quartz Beaker Magnetic Stir Bar and Cage Materials and Supplies: 1. 45% Solution Potassium Hydroxide (KOH) Lab Procedures: 1. Place magnetic stir bar into the quartz beaker, followed by the magnetic stir bar cage. 2. Pour the 45% concentration of KOH into the quartz beaker past the level required to cover the samples. Take into consideration the vortex which will occur during stirring. 3. Place the beaker onto the programmable hot plate and seat the reflux condenser onto the top of the beaker. 4. Connect the reflux water supply/return tubing to the condenser, water supply, and drain into the sink. Water should enter the reflux condenser through the side port and exit through the upper port. Be sure to turn on the water flow before turning on the hot plate. 5. The temperature probe should be inserted through the top of the reflux condenser so that the tip of the probe is submerged 2"-3" in the KOH solution. 6. The KOH solution will need to be heated to a steady specific temperature for a particular Si etch rate. 0.744 µm/min @ 85°C 0.356 µm/min @ 75°C 0.243 µm/min @ 65°C 7. Set the programmable hot plate to the desired temperature using the temperature probe as the thermostatic controller. The magnetic stir bar should be set to 400 rpm. 8. Once the temperature has reached steady state the samples, now in a basket, can be placed into the KOH solution. It is important to note the time the process started, and that the samples are completely submerged in the KOH solution. Generally the solution will start to form a haze, due to the reaction between the KOH and Si. Bulk Micromachining Process Procedure: A 45% solution of Potassium Hydroxide (KOH) is used to perform the Bulk micromachining. With a standardized solution, etch rate can be adjusted by solution temperature. Past etch rates of Si in the <100> direction are given above in lab procedure 6. Constant stirring of the solution will provide a homogeneous solution temperature, help promote consistent etch rates across the wafer, and minimize variation due to feature size. A programmable hot plate with temperature probe feedback and stirrer speed control is used to provide consistent results. Each student will have a wafer segment to be etched for a predetermined amount of time. With this information, a composite of etch rates can be gathered. Guideline to Bulk Micromachining Evaluation: (1) Prior to KOH etch take 3 measurements of SiO2 thickness with the profilometer. (2) KOH the wafer for the process time assigned and record process parameters. (3) Evaluate the KOH etch of the SiO2 by measuring the new diameter of your SiO2 wagon wheel. (4) Select the SiO2 square island structure (that has 4 convex or outside corners) and examine it after KOH etching. Take a picture of it, and then measure its SiO2 and Si features. Make sure you measure the undercut, µ, at the edge of the SiO2 corner. Make as many measurements as possible. (4a) Repeat above procedure on the Corner Compensated Square. (5) The Si etch rate of the (100) plane can be evaluated with the profilometer, by measuring from the "flat" surface of square etched window up the wall created by the (111) plane on to the surface of the SiO2 mask. Confirm yur profilometer results by measuring the etch depth with the focus of the high power microscope. (6) Visually examine several of the SiO2 micromachined structures and comment about their structural integrity. (i.e. Are the SiO2 bridges broken? Are they deformed or buckled? Are the SiO2 cantilever beams intact? Are they straight?) (7) Determine the alignment accuracy of the SiO2 mask to the wafer by measuring the Si undercut at the corner of a squared feature. What is the misalignment angle? (8) (DO THIS LAST!!!) Measure the SiO2 etch rate by painting parts of your wafer with photoresist, baking, BOE etching and measuring with the profilometer. How does this compare to your measurement in part (3)? Write Up: Present your process parameters in a short paragraph. Show your calculations; include figures and descriptions in the calculations. Note: Adapted for use from http://mitghmr.spd.louisville.edu/course/exp12.html
