PT Activity 3.3.4: Configuring VLANs and Trunks (Instructor Version)
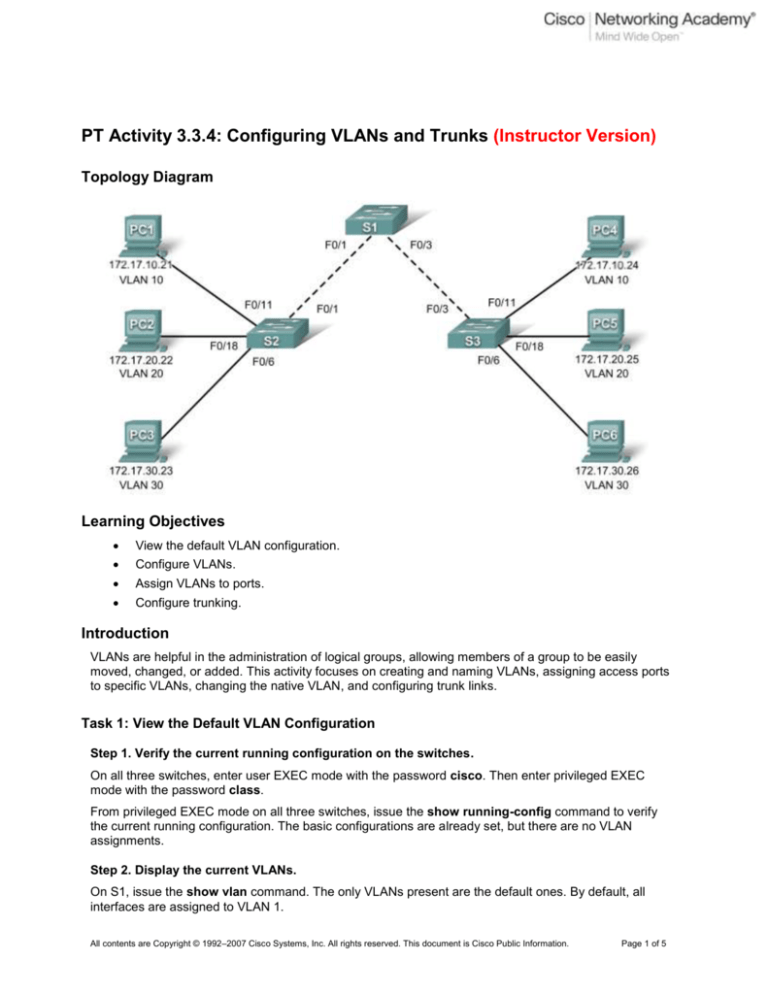
Topology Diagram
Learning Objectives
View the default VLAN configuration.
Configure VLANs.
Assign VLANs to ports.
Configure trunking.
Introduction
VLANs are helpful in the administration of logical groups, allowing members of a group to be easily
moved, changed, or added. This activity focuses on creating and naming VLANs, assigning access ports
to specific VLANs, changing the native VLAN, and configuring trunk links.
Task 1: View the Default VLAN Configuration
Step 1. Verify the current running configuration on the switches.
On all three switches, enter user EXEC mode with the password cisco. Then enter privileged EXEC
mode with the password class.
From privileged EXEC mode on all three switches, issue the show running-config command to verify
the current running configuration. The basic configurations are already set, but there are no VLAN
assignments.
Step 2. Display the current VLANs.
On S1, issue the show vlan command. The only VLANs present are the default ones. By default, all
interfaces are assigned to VLAN 1.
All contents are Copyright © 1992–2007 Cisco Systems, Inc. All rights reserved. This document is Cisco Public Information.
Page 1 of 5
CCNA Exploration
LAN Switching and Wireless: VLANs
PT Activity 3.3.4: Configuring VLANs and Trunks
Step 3. Verify connectivity between PCs on the same network.
Notice that each PC can ping the other PC that shares the same network:
PC1 can ping PC4
PC2 can ping PC5
PC3 can ping PC6
Pings to PCs in other networks fail.
What benefit will configuring VLANs provide to the current configuration?
Currently, all broadcast traffic is sent out all ports on the switch, except for the port on which the
broadcast was received. This greatly increases the traffic on all access and trunk links as well as
increases CPU usage on the switches and PCs. VLANs contain the broadcasts within each VLAN.
Task 2: Configure VLANs
Step 1. Create VLANs on S1.
The command vlan vlan-id creates a VLAN. Use the name vlan-name command to name a VLAN.
On S1, create four VLANs using the vlan-ids and the names shown below:
S1(config)#vlan 10
S1(config-vlan)#name
S1(config-vlan)#vlan
S1(config-vlan)#name
S1(config-vlan)#vlan
S1(config-vlan)#name
S1(config-vlan)#vlan
S1(config-vlan)#name
Prijmeni1
20
Prijmeni2
30
Prijmeni3(Default)
99
Prijmeni4Manag&Nat
Step 2. Verify the VLAN configuration.
After creating the VLANs, return to privileged EXEC and issue the show vlan brief command to verify the
creation of the new VLANs.
S1#show vlan brief
VLAN Name
Status
Ports
---- ------------------------------ --------- ------------------------------1
default
active
Fa0/1, Fa0/2, Fa0/3, Fa0/4
Fa0/5, Fa0/6, Fa0/7, Fa0/8
Fa0/9, Fa0/10, Fa0/11, Fa0/12
Fa0/13, Fa0/14, Fa0/15, Fa0/16
Fa0/17, Fa0/18, Fa0/19, Fa0/20
Fa0/21, Fa0/22, Fa0/23, Fa0/24
Gig1/1, Gig1/2
10
Faculty/Staff
active
20
Students
active
30
Guest(Default)
active
99
Management&Native
active
1002 fddi-default
active
1003 token-ring-default
active
1004 fddinet-default
active
1005 trnet-default
active
S1#
All contents are Copyright © 1992–2007 Cisco Systems, Inc. All rights reserved. This document is Cisco Public Information.
Page 2 of 5
CCNA Exploration
LAN Switching and Wireless: VLANs
PT Activity 3.3.4: Configuring VLANs and Trunks
Step 3. Create the VLANs on S2 and S3.
On S2 and S3, use the same commands you used on S1 to create and name the VLANs.
Step 4. Verify the VLAN configuration.
Use the show vlan brief command to verify all VLANs are configured and named.
Step 5. Check results.
Your completion percentage should be 38%. If not, click Check Results to see which required
components are not yet completed.
Task 3: Assign VLANs to Ports
The range command greatly reduces the amount of repetitive commands you must enter when
configuring the same commands on multiple ports. However, Packet Tracer does not support the range
command. So only the active interfaces are graded for the switchport mode access command.
Step 1. Assign VLANs to the active ports on S2.
The switchport mode access command configures the interface as an access port. The switchport
access vlan vlan-id command assigns a VLAN to the port. An access port can only be assigned one
access VLAN. Enter the following commands on S2.
S2(config)#interface fastEthernet 0/6
S2(config-if)#switchport mode access
S2(config-if)#switchport access vlan 30
S2(config-if)#interface fastEthernet 0/11
S2(config-if)#switchport mode access
S2(config-if)#switchport access vlan 10
S2(config-if)#interface fastEthernet 0/18
S2(config-if)#switchport mode access
S2(config-if)#switchport access vlan 20
Step 2. Assign VLANs to the active ports on S3.
Assign VLANs to the active ports on S3. S3 uses the same VLAN access port assignments that you
configured on S2.
Step 3. Verify loss of connectivity.
Previously, PCs that shared the same network could ping each other successfully. Try pinging between
PC1 and PC4. Although the access ports are assigned to the appropriate VLANs, the ping fails. Why?
____________________________________________________________________________________
____________________________________________________________________________________
____________________________________________________________________________________
The interfaces between S2 and S1 and between S3 and S1 are not yet configured as trunks. Nor are
these interfaces configured as access links for the VLAN assigned to PC1 and PC4. S2 and S3,
therefore, do not forward VLAN 10 traffic (traffic from PC1 and PC4) out the interface to S1.
Step 4. Check results.
Your completion percentage should be 75%. If not, click Check Results to see which required
components are not yet completed.
All contents are Copyright © 1992–2007 Cisco Systems, Inc. All rights reserved. This document is Cisco Public Information.
Page 3 of 5
CCNA Exploration
LAN Switching and Wireless: VLANs
PT Activity 3.3.4: Configuring VLANs and Trunks
Task 4: Configure Trunking
Step 1. Configure S1 Fa0/1 and Fa0/3 for trunking and to use VLAN 99 as the native VLAN.
S1(config)#interface FastEthernet 0/1
S1(config-if)#switchport mode trunk
S1(config-if)#switchport trunk native vlan 99
S1(config-if)#interface FastEthernet 0/3
S1(config-if)#switchport mode trunk
S1(config-if)#switchport trunk native vlan 99
The trunk port takes about a minute to become active again. You can switch between Realtime and
Simulation modes three or four times to quickly bring the port back up.
Then, the ports on S2 and S3 that connect to S1 become inactive. Again, switch between Realtime and
Simulation modes three or four times to quickly bring the ports back up.
Once the ports become active, you periodically receive the following syslog messages:
%CDP-4-NATIVE_VLAN_MISMATCH: Native VLAN mismatch discovered on
FastEthernet0/1 (99), with S2 FastEthernet0/1 (1).
%CDP-4-NATIVE_VLAN_MISMATCH: Native VLAN mismatch discovered on
FastEthernet0/3 (99), with S3 FastEthernet0/3 (1).
You configured the native VLAN on S1 to be VLAN 99. However, the native VLAN on S2 and S3 is set to
the default VLAN 1.
Step 2. Verify connectivity between devices on the same VLAN.
Although there is currently a native VLAN mismatch, pings between PCs on the same VLAN are now
successful. Why?
____________________________________________________________________________________
____________________________________________________________________________________
____________________________________________________________________________________
Pings are successful because trunking has been enabled on S1. DTP has automatically negotiated the
other side of the trunk links. In this case, S2 and S3 have now automatically configured the ports attached
to S1 as trunking ports.
Step 3. Verify trunking is enabled on S2 and configure VLAN 99 as the native VLAN.
Dynamic Trunking Protocol (DTP) has automatically enabled the Fast Ethernet 0/1 port on S2 for
trunking. Once you configured the mode to trunking on S1, DTP messages sent from S1 to S2
automatically informed S1 to move the state of Fa0/1 to trunking. This can be verified with the following
command on S1:
S2#show interface fastEthernet 0/1 switchport
Name: Fa0/1
Switchport: Enabled
Administrative Mode: dynamic auto
Operational Mode: trunk
Administrative Trunking Encapsulation: dot1q
Operational Trunking Encapsulation: dot1q
Negotiation of Trunking: On
Access Mode VLAN: 1 (default)
Trunking Native Mode VLAN: 1 (default)
<output omitted>
S2#
All contents are Copyright © 1992–2007 Cisco Systems, Inc. All rights reserved. This document is Cisco Public Information.
Page 4 of 5
CCNA Exploration
LAN Switching and Wireless: VLANs
PT Activity 3.3.4: Configuring VLANs and Trunks
Notice that the administrative mode is set to dynamic auto. This is the default state of all ports on a
Cisco IOS switch. However, DTP has negotiated trunking, so the operation mode is trunk, resulting in a
native VLAN mismatch.
As a best practice, configure the administrative mode of the trunking interface to be in trunk mode. This
ensures that the interface is statically configured as a trunk port and never negotiates a different mode.
S2(config)#interface FastEthernet 0/1
S2(config-if)#switchport mode trunk
To correct the native VLAN mismatch, configure the trunking port with the switchport trunk native vlan
99 command.
S2(config-if)#switchport trunk native vlan 99
Step 4. Verify trunking is enabled on S3 and configure VLAN 99 as the native VLAN.
DTP has also successfully negotiated a trunk between S1 and S3.
S3#show interfaces fastEthernet 0/3 switchport
Name: Fa0/3
Switchport: Enabled
Administrative Mode: dynamic auto
Operational Mode: trunk
Administrative Trunking Encapsulation: dot1q
Operational Trunking Encapsulation: dot1q
Negotiation of Trunking: On
Access Mode VLAN: 1 (default)
Trunking Native Mode VLAN: 1 (default)
<output omitted>
S3#
Configure the administrative mode of the trunking interface to be in trunk mode, and correct the native
VLAN mismatch with the switchport trunk native vlan 99 command.
Step 5. Check results.
Your completion percentage should be 100%. If not, click Check Results to see which required
components are not yet completed.
All contents are Copyright © 1992–2007 Cisco Systems, Inc. All rights reserved. This document is Cisco Public Information.
Page 5 of 5

