Outlook
2003
DeskCard
Microsoft®
©
Outlook 2003 Screen At A Glance
DeskCardHints
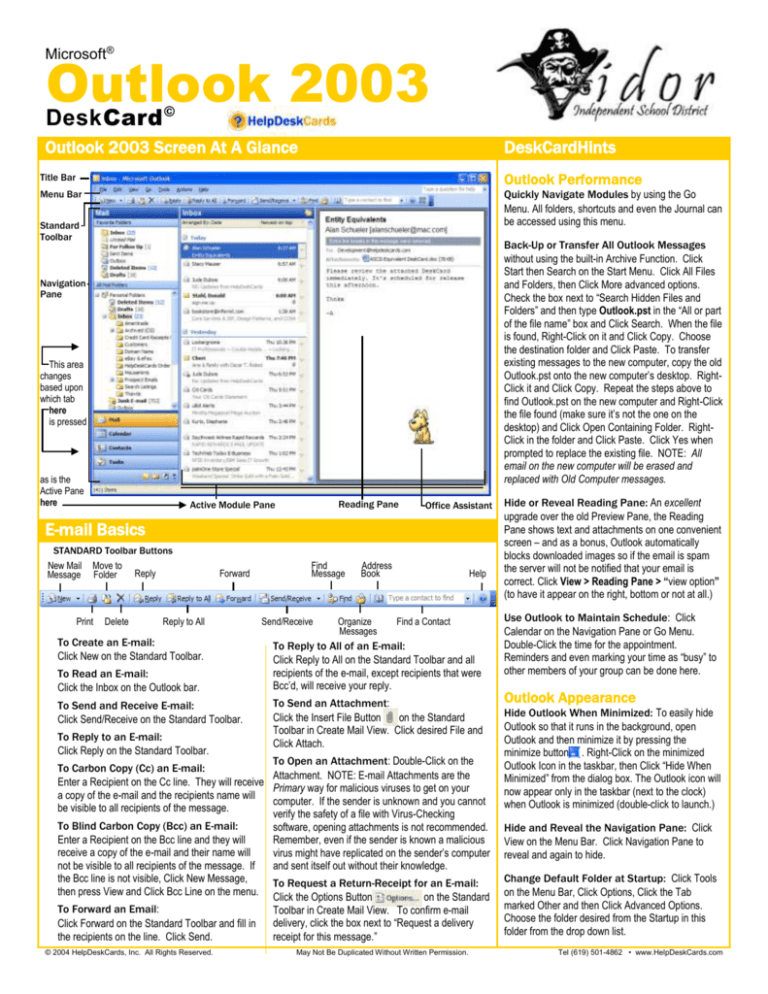
Title Bar
Outlook Performance
Menu Bar
Quickly Navigate Modules by using the Go
Menu. All folders, shortcuts and even the Journal can
be accessed using this menu.
Standard
Toolbar
Back-Up or Transfer All Outlook Messages
without using the built-in Archive Function. Click
Start then Search on the Start Menu. Click All Files
and Folders, then Click More advanced options.
Check the box next to “Search Hidden Files and
Folders” and then type Outlook.pst in the “All or part
of the file name” box and Click Search. When the file
is found, Right-Click on it and Click Copy. Choose
the destination folder and Click Paste. To transfer
existing messages to the new computer, copy the old
Outlook.pst onto the new computer’s desktop. RightClick it and Click Copy. Repeat the steps above to
find Outlook.pst on the new computer and Right-Click
the file found (make sure it’s not the one on the
desktop) and Click Open Containing Folder. RightClick in the folder and Click Paste. Click Yes when
prompted to replace the existing file. NOTE: All
email on the new computer will be erased and
replaced with Old Computer messages.
Navigation
Pane
This area
changes
based upon
which tab
here
is pressed
as is the
Active Pane
here
Reading Pane
Active Module Pane
Office Assistant
E-mail Basics
STANDARD Toolbar Buttons
New Mail
Message
Move to
Folder
Print
Delete
Reply
Forward
Reply to All
To Create an E-mail:
Click New on the Standard Toolbar.
To Read an E-mail:
Click the Inbox on the Outlook bar.
To Send and Receive E-mail:
Click Send/Receive on the Standard Toolbar.
To Reply to an E-mail:
Click Reply on the Standard Toolbar.
Find
Message
Send/Receive
Address
Book
Organize
Messages
Help
Find a Contact
To Reply to All of an E-mail:
Click Reply to All on the Standard Toolbar and all
recipients of the e-mail, except recipients that were
Bcc’d, will receive your reply.
To Send an Attachment:
Click the Insert File Button
on the Standard
Toolbar in Create Mail View. Click desired File and
Click Attach.
To Open an Attachment: Double-Click on the
To Carbon Copy (Cc) an E-mail:
Attachment. NOTE: E-mail Attachments are the
Enter a Recipient on the Cc line. They will receive
Primary way for malicious viruses to get on your
a copy of the e-mail and the recipients name will
computer. If the sender is unknown and you cannot
be visible to all recipients of the message.
verify the safety of a file with Virus-Checking
To Blind Carbon Copy (Bcc) an E-mail:
software, opening attachments is not recommended.
Enter a Recipient on the Bcc line and they will
Remember, even if the sender is known a malicious
receive a copy of the e-mail and their name will
virus might have replicated on the sender’s computer
not be visible to all recipients of the message. If
and sent itself out without their knowledge.
the Bcc line is not visible, Click New Message,
To Request a Return-Receipt for an E-mail:
then press View and Click Bcc Line on the menu.
Click the Options Button
on the Standard
To Forward an Email:
Toolbar in Create Mail View. To confirm e-mail
delivery, click the box next to “Request a delivery
Click Forward on the Standard Toolbar and fill in
the recipients on the line. Click Send.
receipt for this message.”
© 2004 HelpDeskCards, Inc. All Rights Reserved.
May Not Be Duplicated Without Written Permission.
Hide or Reveal Reading Pane: An excellent
upgrade over the old Preview Pane, the Reading
Pane shows text and attachments on one convenient
screen – and as a bonus, Outlook automatically
blocks downloaded images so if the email is spam
the server will not be notified that your email is
correct. Click View > Reading Pane > “view option”
(to have it appear on the right, bottom or not at all.)
Use Outlook to Maintain Schedule: Click
Calendar on the Navigation Pane or Go Menu.
Double-Click the time for the appointment.
Reminders and even marking your time as “busy” to
other members of your group can be done here.
Outlook Appearance
Hide Outlook When Minimized: To easily hide
Outlook so that it runs in the background, open
Outlook and then minimize it by pressing the
minimize button . Right-Click on the minimized
Outlook Icon in the taskbar, then Click “Hide When
Minimized” from the dialog box. The Outlook icon will
now appear only in the taskbar (next to the clock)
when Outlook is minimized (double-click to launch.)
Hide and Reveal the Navigation Pane: Click
View on the Menu Bar. Click Navigation Pane to
reveal and again to hide.
Change Default Folder at Startup: Click Tools
on the Menu Bar, Click Options, Click the Tab
marked Other and then Click Advanced Options.
Choose the folder desired from the Startup in this
folder from the drop down list.
Tel (619) 501-4862 • www.HelpDeskCards.com
Keyboard Shortcuts (Editing and General)
Save Message (Draft)
<Ctrl> + <S>
Spell Check
<F7>
Print Message
<Ctrl> + <P>
Switch to Weekly View
<Alt> + <->
Cut
<Ctrl> + <X>
Toggle Navigation Pane
<Alt> + <F1>
Copy
<Ctrl> + <C>
Navigation Pane
Paste
<Ctrl> + <V>
Undo Typing
<Ctrl> + <Z>
Send/Receive Mail
<F5>
Save, Close and Send
<Alt> + <S>
Reply to Message
<Ctrl> + <R>
Reply to All
<Alt> + <L>
Help
<F1>
Show Address Book
<Ctrl> + <Shift> +
<B>
New Message
<Ctrl> + <Shift> +
<M>
New Appointment
<Ctrl> + <Shift> +
<A>
New Contact
<Ctrl> + <Shift> +
<C>
New Note
<Ctrl> + <Shift> +
<N>
New Task
<Ctrl> + <Shift> +
<K>
Send, receive and save
messages. Contains the
Inbox, Outbox and Sent
items folders.
View and schedule
appointments, meetings
and events. View by day,
week or month.
Keep track of e-mail and
street addresses and
phone numbers. Create
Distribution lists.
Organize your to-do list.
Prioritize and assign
tasks to others. View
free time using timeline.
“Sticky” reminder notes.
Handy for jotting down
thoughts or reminders.
Color-code to organize.
View and organize your
incoming and saved
messages. Manage all
folders and subfolders.
Create, delete and
manage shortcuts to
Outlook and usercreated folders.
Outlook Tips
Using E-mail Signatures
To Automatically Insert a Signature in an email, Click Tools on the Menu Bar, Click on Options
and then the Mail Format Tab. Under the Signatures
box choose the signatures to use for new messages
and replies and forwards. If no signatures are
present, Click the “Signatures” button and then “New”
in the dialog box to create a new signature.
Use Different Signatures for New E-mails and
Replies by creating more than one signature and
setting the preferred settings by Clicking Tools on the
Menu Bar, Click on Options and then the Mail Format
Tab. Click the drop-down menu for which e-mail
account you’d like to manage first, then Click on the
drop-down menu for Signature for new messages to
set the new e-mail preferred signature and Signature
for replies and forwards to set those. Click OK.
Using The Address Book
To Quickly Add A Contact to the Address
book, open the message and Right-Click on the
Sender’s Name (or Right-Click on the sender in the
Reading Pane.) Click Add to Outlook Contacts in the
menu. Only the sender’s name and e-mail address
will be automatically entered.
To Manage Contact Lists, Click Contacts on
the Outlook Bar or on the Folder List. Double-Click
on the Name to edit or delete and adjust preferences.
To Add A New Contact Press <Ctrl> + <N> in
Contacts View or <Ctrl> + <Shift> + <C> in message
view.
“Contact” a Contact: in Contacts, Right-Click on
Contact’s name and choose method for contacting.
TheHelpDesk
Activate the Out-of-Office Assistant by Clicking
Tools > Out of Office Assistant. This feature requires
Microsoft Exchange in order to be available.
Use the Rules Wizard to Block Messages
from a particular sender or with certain defined rules
in the subject line. To set preferences, Click Tools
on the Menu Bar, Click Rules and Alerts and then
Click New. The Rules Wizard will launch.
To Offer Voting Options for Messages such as
requesting meetings or voting for solutions, Click the
Options Button on the Toolbar in New Message
View and Check the Use voting buttons and choose
the responses from the drop down list. Custom
buttons can be created by deleting default button
names and typing new names separated by a
semicolon (e.g. Monday; Wednesday; Friday).
Create a Rule for a Sender: If you want your
bosses emails to go to your “management” folder
automatically, Right-Click on her name in From and
choose “Create Rule”. Choosing a folder to store the
message in, playing a sound upon receipt of future
messages and more can be controlled here.
Automatically Check Spelling of Outgoing
messages by Clicking Tools on the Menu Bar. Click
Options and then the Spelling Tab. Check the Box
next to Always check spelling before sending and
Click OK.
Change Options on a Message by Clicking the
Options button on the Toolbar in New Message
View. Messages Importance, Return Receipt,
Reply-to Address and more can be adjusted.
View Web Pages Within Outlook to make
viewing pages quicker. Click View > Toolbars >
Web to add the Web toolbar. The address box will
show the current Outlook folder in it (e.g.
outlook:Inbox.) In the Address box, type the
address of a website (e.g. www.helpdeskcards.com)
and press <Enter>.
Save a Message in the Draft Folder: Write
message and Click on the Save Icon on the
Standard Toolbar. To retrieve or edit message,
Click the Drafts Folder and Open the message.
Make a Distribution List to Quickly Send
E-mails to typically-grouped recipients (such as all
members of a Study Group or Sales Managers.)
Click File on the Menu Bar, Point to New and then
Point to Distribution List. Name the list and then
Click on the desired Group’s Member Names from
the Address. Click Save and Close. To send to the
Distribution List, Click the To… button
in
the New Message Box and choose the new list.
Screen shots reprinted by permission from Microsoft Corporation
HelpDeskCards, DeskCard, TheHelpDesk and DeskCardHints©
Use Notes For Quick Reminders like a “sticky”
note to jot questions, ideas and reminders quickly.
Click Go > Notes to bring up the Notes Pane and set
Notes Options.
Change The Rules List to Control How Inbox
messages are handled. Go to the Inbox and Click
Tools on the Menu Bar and Click Rules and Alerts.
Click New and Select the Type of Rules desired.
Click the first line (contacts/distributions lists/etc.)
and define where you’d like Outlook to place the
message on receipt (the second criteria). Click OK.
Arrange E-mails by Size to free
space if mailbox is near size limit.
From the Inbox, Right-Click on the
“Arrange By”
button and choose Size from the
drop-down menu, then Click on the
box to the right (which will either
show smallest or largest on top.)
Archive or delete larger messages
that are no longer needed.
Messages may also be arranged
by conversation, sender, subject,
attachments, importance, followups and several other arranging
options here.
Tel (619) 501-4862 • www.HelpDeskCards.com


