N. Sci. 2 – Biological Science
EXPLORING MICROSCOPY
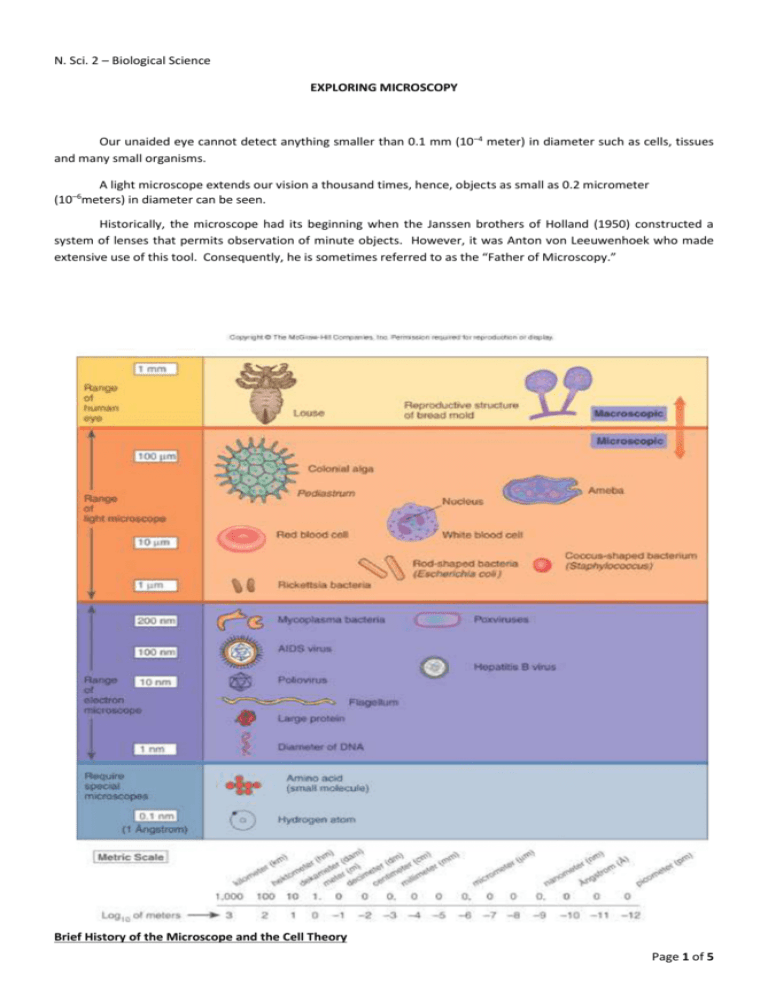
Our unaided eye cannot detect anything smaller than 0.1 mm (10–4 meter) in diameter such as cells, tissues
and many small organisms.
A light microscope extends our vision a thousand times, hence, objects as small as 0.2 micrometer
(10–6meters) in diameter can be seen.
Historically, the microscope had its beginning when the Janssen brothers of Holland (1950) constructed a
system of lenses that permits observation of minute objects. However, it was Anton von Leeuwenhoek who made
extensive use of this tool. Consequently, he is sometimes referred to as the “Father of Microscopy.”
Brief History of the Microscope and the Cell Theory
Page 1 of 5
The 20th century concept of the cell reflects five centuries of instrument development, exacting technology
and persuasive synthesis. The two most pervasive biological theories emerged almost simultaneously in a definite
form during the 19th century. The theory of evolution was heralded with considerable ceremony and controversy. It
reflected the works of two great minds – Charles Darwin and Alfred Russel Wallace. The cell theory generated less
excitement and provoked almost no controversy. The rationale for the cell theory mirrored the painstaking work of
the several generations of scientists, technicians, and hobbyists. The existence of a theory of evolution was
macroscopic while the evidence for a cell theory was microscopic.
The average diameter of a cell is 10µ (microns). Man’s eye, however, could resolve objects with diameter of
only about 100µ. Therefore, before man could effectively study the cell, his power to resolve had to be improved by
a factor of 10. It is not surprising that the problem would be solved by two eyeglasses makers, Jans and Zacharias
Janssen. In 1590, they combined a convex objective lens with a concave eyepiece to produce the first compound
microscope. There is little doubt that the resolution was poor.
A mathematician, Johannes Kepler, suggested but never developed an improved microscope using a convex
lens for both the object lens and ocular lens. This was the basic microscope model that experienced constant
improvement.
Robert Hooke (c. 1670) used an improved compound microscope and dark field technique to view a thin
section of cork. Without comprehending the nature of what he saw, he unfortunately called the little boxlike cavities
he saw as cellulae (or little room).
Anton von Leeuwenhoek (c. 1678) mastered the art of grinding simple lenses of short focal length. He
turned his microscope on a variety of things but created the greatest stir in the civilized world when he reported the
presence of little beasts in a drop of water. Leeuwenhoek is credited with initiating the microscopic study of living
things.
During the next hundred years, techniques for the preparation of microscopic study of materials were
worked out, and the microscope was applied to the study of tissues of various organisms. An inductive
generalization began to emerge. In 1759, Casper Wolff pointed out the consistency of compositions of globular units
in embryological materials. In 1802, M. de Mirhel expanded Wolff’s generalization to include a cellular nature of
plant cell was becoming generally accepted. Historically, Duthocet in 1824 advanced this inductive generalization to
include all organisms. By 1831, Robert Brown had resolved that the cell had a nucleus. Credit for the pervasive
synthesis of the main ideas of the cell theory traditionally has been given to Matthias Schleiden, 1838, a botanist,
and Theodore Schwann, a zoologist. Certainly Schwann and Schleiden’s work served to advance the idea that the
cell was the unit of organization and the unit of composition of all living things. The structural unity of Rudolph
Virchow on 1958 supplemented the cell doctrine with his principle of biogenesis. He pointed out that all cells come
from pre-existing cells. Since then, the focus of interest in the cell has experienced great change. The cell is currently
recognized as the working area for the complex organelles that abide within its membrane. This reflects the cell’s
role as a unity of physiological activity rather than the ultimate structural unit of living things.
Kinds of Microscope
There are many types of microscopes, the most common is the Compound Light Microscope while Electron
Microscope is presently considered as one of the most powerful microscopes. A compound microscope consists of
two (2) lens system: the objective lens which magnifies and projects a “virtual image” into the body, and the ocular
lens, which magnifies that image further and projects the enlarge image into the eye.
Below are some of the various types of microscopes that have been constructed to achieve better means of
making observations. Microscope types vary depending on how they are used, source of lighting, viewing dimensions
and capacity to magnify the object.
1. Light Microscope – use ordinary or surrounding light where visible light is passed through the specimen and
through glass lenses. The lenses refract the light in such a way that the image is magnified as it is projected
into the eye.
Page 2 of 5
2. Electron Microscope
Transmission Electron Microscope (TEM) – uses electromagnets as lenses to focus and magnify mainly the
internal ultrastructure of cells.
Scanning Electron Microscope (SEM) – useful for detailed study of the surface of the specimen.
3. Dark Field Microscope – the objects are illuminated only from the sides and light is reflected off the object
being observed. The object here appears bright against a black background.
4. Phase Contrast Microscope – takes advantage of slight differences in refractive index by converting these
striking brightness differences in the visible image of the cell.
5. Binocular Dissecting Microscope – there is less magnification of the object, however, a three dimensional
view of the specimen could be observed.
Parts of the Compound Microscope
A. The Mechanical Parts (The Framework)
1. Draw tube – the tubular, upright portion attached at the top of the arm; this is where the ordinary eyepiece or
ocular is inserted.
2. Body tube – it is found immediately below the draw tube, thus, serving as connection between the ocular inside
the draw tube and the objective found at the end of the body tube. The body tube is the carrier of the parts of
the microscope.
3. Revolving nosepiece – it is located at the lower end of the body tube serving for attachment of objectives to
facilitate the shift from the objective to another. When an objective is in proper alignment below the body
tube, there is a faint click.
4. Dust shield – it is a dark metallic disk located just below the revolving nosepiece that is used to prevent dust
from entering the objectives.
5. Arm (or Handle) – the C-shaped pillar rising from the stage or base used for carrying the microscope.
6. Stage – it is a platform attached to the arm where the glass slide containing the specimen is placed.
7. Spring clips – found on stage used for securing the slide in position.
8. Substage – located immediately below the stage containing the diaphragm and the Abbe condenser.
9. Fine adjustment knob – the smallest wheel with milled edges used to see the finer details of the object.
Rotation provides a delicate control of the tube movement.
10. Coarse adjustment knob – the large wheel with milled edges used along with the low power objective (lpo) for
locating the outline of the specimen. Rotation moves the tube upward or downward.
11. Inclination joint – located between the pillar and the arm that enables one to tilt the upper part of the
microscope to a desired position for convenience.
12. Pillar – a very short connection between the base and the rest of the microscope.
13. Base – the U-shaped or horseshoe-shaped iron on which the microscope rests. It supports the entire apparatus.
B. The Illuminating Parts (Parts controlling the light)
1. Mirror – located below the stage to catch the light and direct to the object being studied. The mirror has one
flat or plain surface (used under natural light) and one concave mirror (used under artificial light).
2. Iris diaphragm – with a small lever at one of the condenser which opens and closes a screen of metal plates. It
is used to regulate the amount of light entering the microscope.
3. Abbe condenser – located immediately below the stage. Used to concentrate or focus the light coming from
the diaphragm to the object found on the stage.
C. The Magnifying Parts (For enlargement)
1. Ocular eyepiece – which contains lenses (eye lens and field lens). The eyepiece of most microscope has a
magnification of 10. The eyepiece may contain a small hair, which can be used as a pointer, as it appears as a
black line.
2. Objectives – small tubes containing lenses screwed into the nosepiece, which magnify the object being
examined. A number followed by an X, stamped on the object indicates the magnifying power.
Low Power Objective (LPO) – is the shortest tube stamped 10x affording the lowest ocular magnification.
High Power Objective (HPO) – is the longer tube marked either 43x or 45x, sometimes 40x.
Oil Immersion Objective – same length as the HPO but affording a much higher magnification being stamped
97x or 100x. It needs a special oil to be placed on the object studied.
Page 3 of 5
Factors of Microscopy that Ensure a High Degree of Visualization
1. Magnification – refers to the magnitude of amplification of the image of the specimen by the microscope. The
ocular lens magnifies the object 10x. The objective lenses magnify it independently. Hence, the total magnification
of the object image is equal to the number of times the ocular lens magnifies the image. Actual magnification is
derived by dividing apparent size of specimen by the actual size.
2. Resolution – the resolution or resolving power, is a measure of the smallest object visible under the particular
objective or the ability of the microscope to distinguish two adjacent points as distinct and separate.
3. Numerical Aperture (NA) – this is an index of the light gathering power of the objective. It is inversely
proportional to the limit of resolution. Low power objective (LPO) has a an NA of 0.25, while high power objective
(HPO) has an NA of 0,65.
4. Refractive Index – this refers to the ability of the medium to deflect light. If a microscope has a high refractive
index, more light enters the objective.
5. Working Distance – this refers to the distance between the specimen and the objective lens when focusing the
specimen. Visible working distance for LPO is 5 mm and for HPO is 0.46 mm.
6. Field of Vision – refers to the area visible under the microscope. The LPO has a measurement of 1.5 mm while the
HPO is 0.35 mm in diameter.
7. Depth of Focus – refers to the property of the microscope that tells how deep is the dimension which the
microscope can view at any one time.
Steps in Preparing Specimen for Electron Microscopy and their Importance
1. Fixation. The cells are killed instantly with minimal structure alterations.
2. Washing and dehydration. The tissue is first washed with de-ionized water to remove excess fixative and then
the water is removed so that pure dehydrating agent would replace the water completely.
3. Embedding. This is done to replace the dehydrating agent until it has seeped into the interstices of the tissue.
4. Sectioning. This is done to provide for the ultra thin cuts that would be penetrable to electrons. Two crucial
factors should be noted: proper embedding and sharpness of the cutting edge.
5. Staining. This is done by exposure to salt of heavy metals which have specific affinities to certain cellular
components and which increase the electron-scattering capacity of the components.
Cell Fractionation – a method by which scientists are able to discover the specific functions of the various cell
organelles. This method breaks cell membranes without severely damaging their organelles. During fractionation,
cell organelles become homogenized enabling the scientists to study their specific functions.
ASSIGNMENT: With a partner, answer the following questions in a yellow paper. Observe proper sourcing. Paper is
due on Friday, Dec. 9, 2011.
1.
2.
3.
4.
5.
What are the limitations of a compound light microscope? (10 pts)
What is/are the significance of resolution in microscopy? (10 pts)
What is/are the reason(s) why images under the microscope move in the opposite direction? (10 pts)
Distinguish between the Abbe condenser and the Iris diaphragm. (10 pts)
In what way does a compound light microscope differ from a simple light microscope? (5 pts)
Notes above are adapted from:
Balsicas, Nilda W. and Pereja, Debbie de V. (2002) A Worktext in Natural Science: Biological Science. Lorimar
Publishing Co., Inc., Quezon City. Pp. 16 – 18.
Ma. Salgado, Arnel. (2003) Introductory Principles and Processes of Biology. 1st Edition. Mutya Publishing House.
Valenzuela City. Pp 6 – 9.
Page 4 of 5
Antique Microscopes
Compound microscopes, left and right, use two or more sets of
lenses to produce high magnification. First conceived in the late
16th century, compound microscopes were refined into elegant
instruments in the 17th and 18th centuries.
THE BETTMANN ARCHIVE
Microsoft ® Encarta ® 2009. © 1993-2008 Microsoft
Corporation. All rights reserved.
Hooke’s Microscope
English scientist Robert Hooke built this microscope in the 17th century and
used it to conduct pioneering research. He discovered the cell structure of
plants by observing a thin slice of cork under his microscope.
Cecil Fox/Science Source/Photo Researchers, Inc.
Microsoft ® Encarta ® 2009. © 1993-2008 Microsoft Corporation. All
rights reserved.
Anton Von Leeuwenhoek
1632 – 1723
Robert Hooke
1635 – 1703
Zacharias Janssen
1588 – 1631
The “First” Microscope
Page 5 of 5


