Exercises – Using Lasergene sequence analysis tools EditSeq and
advertisement

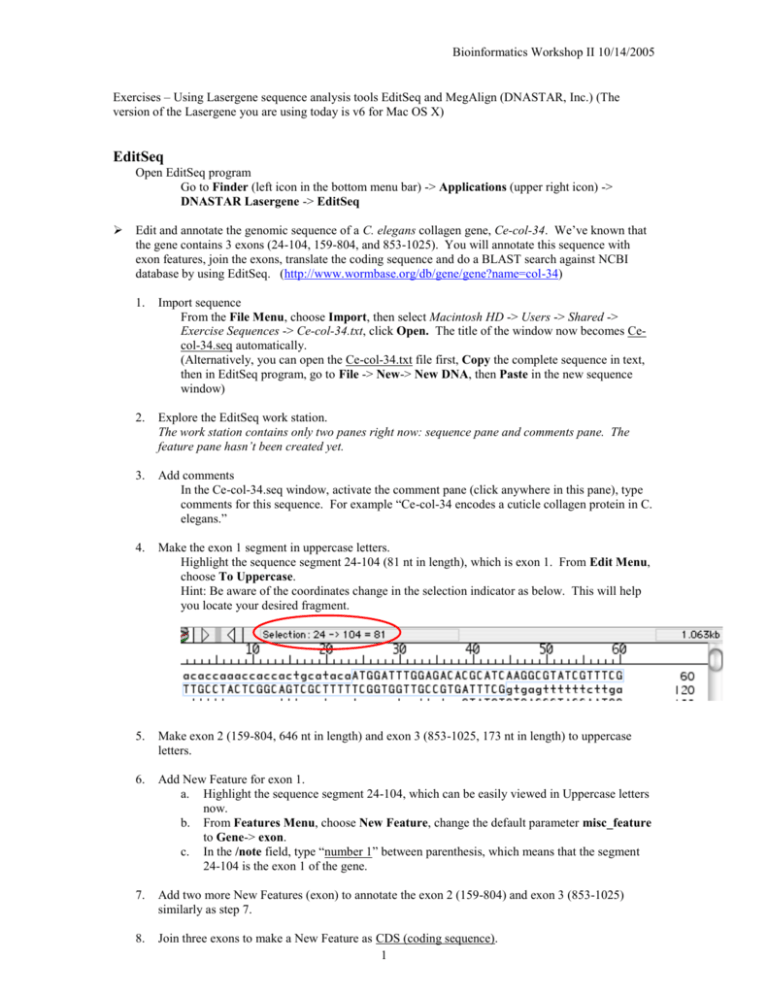
Bioinformatics Workshop II 10/14/2005 Exercises – Using Lasergene sequence analysis tools EditSeq and MegAlign (DNASTAR, Inc.) (The version of the Lasergene you are using today is v6 for Mac OS X) EditSeq Open EditSeq program Go to Finder (left icon in the bottom menu bar) -> Applications (upper right icon) -> DNASTAR Lasergene -> EditSeq Edit and annotate the genomic sequence of a C. elegans collagen gene, Ce-col-34. We’ve known that the gene contains 3 exons (24-104, 159-804, and 853-1025). You will annotate this sequence with exon features, join the exons, translate the coding sequence and do a BLAST search against NCBI database by using EditSeq. (http://www.wormbase.org/db/gene/gene?name=col-34) 1. Import sequence From the File Menu, choose Import, then select Macintosh HD -> Users -> Shared -> Exercise Sequences -> Ce-col-34.txt, click Open. The title of the window now becomes Cecol-34.seq automatically. (Alternatively, you can open the Ce-col-34.txt file first, Copy the complete sequence in text, then in EditSeq program, go to File -> New-> New DNA, then Paste in the new sequence window) 2. Explore the EditSeq work station. The work station contains only two panes right now: sequence pane and comments pane. The feature pane hasn’t been created yet. 3. Add comments In the Ce-col-34.seq window, activate the comment pane (click anywhere in this pane), type comments for this sequence. For example “Ce-col-34 encodes a cuticle collagen protein in C. elegans.” 4. Make the exon 1 segment in uppercase letters. Highlight the sequence segment 24-104 (81 nt in length), which is exon 1. From Edit Menu, choose To Uppercase. Hint: Be aware of the coordinates change in the selection indicator as below. This will help you locate your desired fragment. 5. Make exon 2 (159-804, 646 nt in length) and exon 3 (853-1025, 173 nt in length) to uppercase letters. 6. Add New Feature for exon 1. a. Highlight the sequence segment 24-104, which can be easily viewed in Uppercase letters now. b. From Features Menu, choose New Feature, change the default parameter misc_feature to Gene-> exon. c. In the /note field, type “number 1” between parenthesis, which means that the segment 24-104 is the exon 1 of the gene. 7. Add two more New Features (exon) to annotate the exon 2 (159-804) and exon 3 (853-1025) similarly as step 7. 8. Join three exons to make a New Feature as CDS (coding sequence). 1 Bioinformatics Workshop II 10/14/2005 a. b. c. d. 9. Highlight exon 1 segment, then choose Feature -> New Feature. Change the feature name to All -> CDS or Transcript -> CDS. Highlight exon 2 segment, then from Feature Menu, choose Join Segment. See what happens in the CDS feature box. Highlight exon 3 segment, then from Feature Menu, choose Join Segment. Now, you’ve got the complete coding sequence of the gene Ce-col-34 (900bp). In the /note field, type “Ce-col-34 complete coding sequence” between parenthesis. Create translation of the CDS (coding sequence). Activate the CDS feature by clicking anywhere in this field. From Feature Menu, choose Create New Translation. (See what appears?) 10. Save the annotated Ce-col-34.seq file. a. From File Menu, choose Save. In the following steps, you will create a new DNA sequence file containing the coding sequence only. You’ll translate the coding sequence and do BLAST search by using EditSeq. 11. In the Ce-col-34.seq window, single-click on CDS feature in the feature pane. From Edit Menu, choose Copy Exon. The Copy Exon command allows you to copy only the sequence corresponding to the segment of the selected feature (In this case, the segment you will copy is CDS), rather than the whole region. 12. From File Menu, choose New -> New DNA to open a new file. 13. From Edit Menu, choose Paste to paste the CDS sequence. 14. Save As the file as Ce-col-34 CDS.seq in the folder Macintosh HD -> Users -> Shared -> Exercise Sequence. 15. Highlight the whole sequence (Is it 900 nt in length?). From Goodies Menu, choose Translate DNA. 16. Save the newly created translated sequence as Ce-col-34.pro in the same folder as step 14. 17. In Ce-col-34.pro window, highlight the whole sequence, 18. From Net Search Menu, choose Blast Search. 19. In the Blast Query window, select blastp as Program and nr as Database, then click OK. The blast server at NCBI will process your request. 20. View the blast result. This exercise is optional. You may do it after class. If you know the GenBank accession number of the sequence you are interested, you can download the sequence from NCBI without launching an internet browser (However, you do need internet connection!!!). 1. From File Menu, choose Open Entrez Seq. 2. In the popped window, type P38398 in the Sequence ID or Locus Name field, and choose Protein in the pull-down menu. Click OK. 3. View the result 2 Bioinformatics Workshop II 10/14/2005 MegAlign Open MegAlign program Go to Finder -> Applications -> DNASTAR Lasergene -> MegAlign Do the protein sequence alignment of calmodulins from twenty organisms. 1. From File Menu, choose Enter Sequence. Select the sequences in the folder Macintosh HD -> Users -> Shared -> Exercise Sequence -> Calmodulin Sequences. Click Add Folder, then Done. 2. Explore the MegAlign worktable: Menu, Strength Histogram, Header, Palette Tools, Sequence Names, Pane Divider, Consensus Ruler. 3. Do pairwise a. b. c. d. e. f. g. 4. alignment of Human Calmodulin and Rat Calmodulin. Click Human Calmodulin in the Sequence Name Pane. Hold Shift key, then click Rat Calmodulin in the Sequence Name Pane. From Align Menu, choose One Pair -> By Lipman-Pearson Method. Leave parameters as default. Click OK. View the alignment result. From Align Menu, choose One Pair -> DotPlot. Leave parameters as default. Click OK. View the alignment result. In the DotPlot, each match meeting the specified similarity (Percent Match) within a specific group of residues is displayed as a line on the DotPlot. The color of the line reflects the degree of similarity, taking into account both the percent match and the match length. Blue indicates the weakest matches and red the strongest. You may modify the range of match scores and the line colors displayed using the Filter palette tool. To view a textual alignment for any diagonal line of a DotPlot, double-click on the line. Do you see any differences between using Lipman-Pearson Method and DotPlot Method for pairwise alignment of Human Calmodulin and Rat Calmodulin? Choose another pair of calmodulin sequences from non-close-related organisms, e.g. human and lily, and do pairwise alignment. Do multiple a. b. c. d. e. f. g. alignment of all of the twenty calmodulin. From Align Menu, choose By Juton-Hein Method. Leave parameters as default. Click OK. View the alignment result. From View menu, choose Alignment Report. Are you happy with the report? I’m not happy because it’s hard to see the similarities or differences of the sequences in the alignment. We’ll fix the problem in steps g and h View the Sequence Distances. View the Residue Substitutions. View the Phylogenetic Tree. Try alignment using other methods: ClustalV method and ClustalW method. Customize the alignment report. From Options Menu, choose Alignment Report Contents, check the parameters as following: 3 Bioinformatics Workshop II 10/14/2005 h. From Options Menu, choose New Decoration. Set parameters as following: i. View the alignment report with customized contents and decorations. From View Menu, choose Alignment Report. Compare with the report you see in step b. This is a happy face. Is calmodulin conserved among these organisms? How close are they? PLEASE REMEMBER TO LOGOUT AFTER YOU ARE FINISHED. THANK YOU!!! 4


![Canterbury Dietitians Standard Rates [Word Doc]](http://s3.studylib.net/store/data/006955196_1-df7e6f68e2a9d6ab81ac73b20c96f8b3-300x300.png)
