Drafting a Charles de Blois-style grande assiette upper sleeve
by Tasha D. Kelly, Cottesimple.com
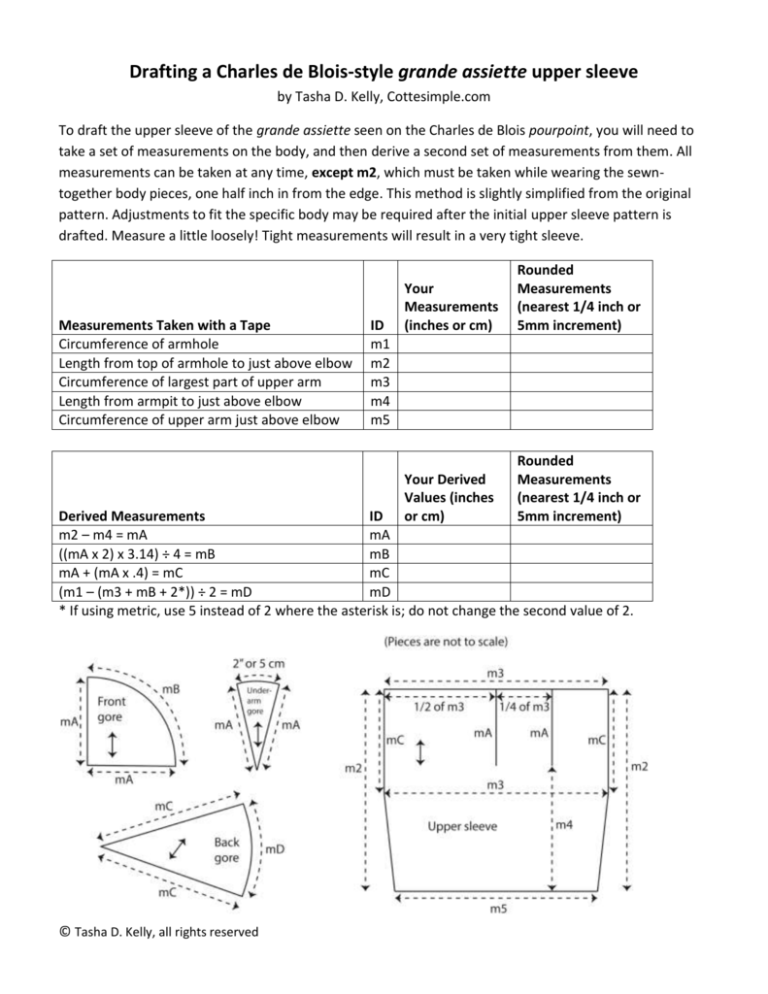
To draft the upper sleeve of the grande assiette seen on the Charles de Blois pourpoint, you will need to
take a set of measurements on the body, and then derive a second set of measurements from them. All
measurements can be taken at any time, except m2, which must be taken while wearing the sewntogether body pieces, one half inch in from the edge. This method is slightly simplified from the original
pattern. Adjustments to fit the specific body may be required after the initial upper sleeve pattern is
drafted. Measure a little loosely! Tight measurements will result in a very tight sleeve.
Measurements Taken with a Tape
Circumference of armhole
Length from top of armhole to just above elbow
Circumference of largest part of upper arm
Length from armpit to just above elbow
Circumference of upper arm just above elbow
ID
m1
m2
m3
m4
m5
Your
Measurements
(inches or cm)
Rounded
Measurements
(nearest 1/4 inch or
5mm increment)
Your Derived
Values (inches
or cm)
Rounded
Measurements
(nearest 1/4 inch or
5mm increment)
Derived Measurements
ID
m2 – m4 = mA
mA
((mA x 2) x 3.14) ÷ 4 = mB
mB
mA + (mA x .4) = mC
mC
(m1 – (m3 + mB + 2*)) ÷ 2 = mD
mD
* If using metric, use 5 instead of 2 where the asterisk is; do not change the second value of 2.
© Tasha D. Kelly, all rights reserved
Following the diagrams on the previous page, draft the shapes on paper using your measurements. Use a
ruler/yard stick/meter stick and a flexible ruler or compass to create smooth lines and circular curves.
When finished, outline your pattern pieces with a 1/2" or 1 cm border for seam allowance.
When cutting your pieces from cheap test fabric, cut two of every shape, except the Back Gore, which
should be cut 4 times. Be sure to lay your pattern pieces on the fabric according to the grain lines shown
on the diagrams on the previous page.
Each sewn-up upper sleeve viewed from the inside should look something like this:
Sew the upper sleeves to the lower sleeves and then sew sleeves into tubes. Before pinning the sleeves to
the armholes, align them by centering the front gore on its respective front piece. The right-angle seam
lines should look like this:
Make sure you pin the sleeve into the armhole along the entire perimeter. Because of the long, curved
edges, the fabric on the body pieces may have stretched. I recommend stay-stitching the edge of the
armholes as soon as they are cut out, to minimize that problem. It might take some fiddling to get your
sleeve to fit into the armhole just right. When finished, try the garment on, and adjust for fit.
© Tasha D. Kelly, all rights reserved

