MVC3 with Windows Identity Foundation and ADFS
Preparing IIS in the test environment
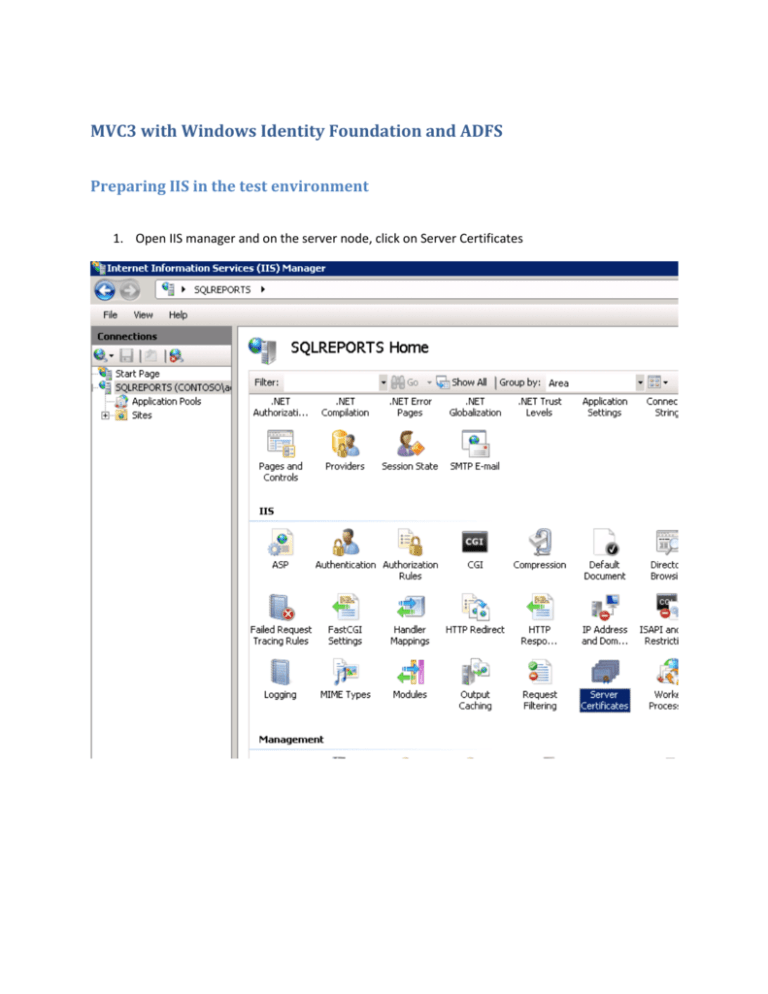
1. Open IIS manager and on the server node, click on Server Certificates
2. On the right side, click on "Create Self-Signed Certificate" and choose a name (eg. MVCCert). If
you already have a valid certificate you do not need to create a new one.
3. If everything worked as expected, you should see the certificate name. Make sute the fully
qualified domain name (FQDN) is in "Issued To" (eg. SQLReports.contoso.com).
4. Go to "Default Web Site" and choose "Bindings" on the right panel.
5. Make sure you add https binding using the self-signed certificate you have just created (or use
an existing one)
6. Still on "Default Web Site", click on "Advanced Settings…" on the right side.
7. Make sure you choose the application pool to match your MVC template,
8. Test the HTTPS binding by typing the FQDN in Internet Explorer (do not use https://localhost).
9. If the Service Principal Name is not set yet, add the appropriate HTTPS entry
Creating the MVC3 Application for .NET 4.0
1. If you do not have MVC3 installed, please refer to these links below and make sure you have it
installed before staring Visual Studio.
http://www.microsoft.com/web/gallery/install.aspx?appid=MVC3
http://www.microsoft.com/en-us/download/details.aspx?id=1491
2. Open Visual Studio, Choose File | New | Project
3. Choose "ASP.NET MVC 3 Web Application" template under Visual C# | Web (the order may vary
depending on your profile).
4. Choose "Internet Application" as template and Razor as View engine (any other template would
work too).
5. After the project is created, chose Build | Publish <project>
6. Choose File System as Publish Method and click the button on Target Location.
7. Choose "Default Web Site" and make sure "Use Secure Sockets Layer" is selected
8. Change target location to reflect the FQDN of the server and the click "Publish"
9. Open IE to navigate to the site that you have just published to check if it is working
Making the MVC3 Application Claims Aware
1. In Visual Studio main menu, choose Tools | Add STS reference…
2. In the first part of the Wizard, change the Application URI to point to the IIS Application URI and
click next
3. Choose "Use an existing STS" and type in the URI of your ADFS 2.0 server. Click Next. It may take
some time to discover and retrieve the metadata.
4. As we are in development environment, choose "Disable certificate chain validation". Click Next.
5. Choose "Enable encryption" of the security token. If you do not have an encryption certificate
already, choose "Generate a default certificate". Otherwise, use button "Select Certificate" an
existing one. Click Next.
6. The Wizard will then show you all claims offered by ADFS 2.0. Click Next.
7. Verify your settings and click Finish.
8. Publish your project again to copy the changes to the site
Testing Application to verify if the STS settings are correct
1. Use IE to navigate to the FQDN URI of your application. If the configuration is correct so far, the
logon box should show ADFS server requesting credentials, not the IIS server running the
application.
2. Enter the appropriate credentials and click OK.
3. It will fail as we have not configured ADFS to accept us as RP
4. To test the metadata, add /FederationMetadata/2007-06/FederationMetadata.xml to the FQDN
URI of your MVC3 application (eg. https://sqlreports.contoso.com//FederationMetadata/200706/FederationMetadata.xml). As you have a non-trusted self-signed certificate you will see a
warning. Choose "Continue to this website (not recommended).
5. If things are correct you should see the federation metadata of your application. This
information will tell ADFS how to configure the application as RP.
6. If you click on "Certificate Error" in IE, it will tell you that the certificate is not trusted. Click on
"View Certificates"
7. It will show our self-signed certificate. Click "Install Certificate". This will stop the warnings.
8. Click Next.
9. Choose "Place all certificates in the following store" and click Browse.
10. Add to "Trusted Root Certification Authorities". Click Ok and then Next.
11. Review settings and click Finish
12. You will see the warning. Click Yes.
13. Close IE. Reopen and navigate to the metadata Xml again. You should not see warnings.
Configuring the MVC Application Relying Party Trust in ADFS
1. Go to ADFS 2.0 Server and open ADFS Manager. Expand "Trust Relationships", right-click on
"Relying Party Trusts" and choose "Add Relying Party Trust…".
2. Click Next on the Welcome Page.
3. Since you have configured the metadata for your application you can simply import it (add
/FederationMetadata/2007-06/FederationMetadata.xml to you application URI) and click Next:
4. Make sure you have a display name that makes sense and click Next.
5. Choose "Permit all users to access this relying party" and click Next.
6. Verify if the endpoint is matching (if it is not, your application metadata was not created
correctly). Click Next.
7. Click Close.
8. The claims rule editor will show, choose "Add Rule…".
9. Choose "Send LDAP Attribute as Claims" and click Next1:
1
Send LDAP Attributes as Claims template takes an incoming Windows Account Name claim and looks up the
corresponding user account in AD DS or AD LDS by comparing it against the LDAP attribute samAccountname.
Therefore, this rule requires a Windows Account Name claim to be present in the input claim set of the rules.
10. Choose a rule name. Attribute store must be "Active Directory". Map SAM-Account-Name to
Name and Token-Groups - Qualified Domain Name to Role. Click Finish.
11. The new rule will now show. Click Ok.
Making the final adjustments in the MVC3 Application
1. Move back to your test server. Try to login again using Federation. After providing logon
information you should see this error.
2. In your MVC3 Application web.config, anywhere under <system.web>, add:
<httpRuntime requestValidationType="SampleRequestValidator" />
3. In Solution Explorer, right click on the Project, choose Add | Class to add
SampleRequestValidator class:
4. Make sure the name is SampleRequestValidator. Click Add.
5. Replace the full code with (this code is part of WIF templates):
//----------------------------------------------------------------------------//
// THIS CODE AND INFORMATION IS PROVIDED "AS IS" WITHOUT WARRANTY OF
// ANY KIND, EITHER EXPRESSED OR IMPLIED, INCLUDING BUT NOT LIMITED TO
// THE IMPLIED WARRANTIES OF MERCHANTABILITY AND/OR FITNESS FOR A
// PARTICULAR PURPOSE.
//
// Copyright (c) Microsoft Corporation. All rights reserved.
//
//
//----------------------------------------------------------------------------using System;
using System.Web;
using System.Web.Util;
using Microsoft.IdentityModel.Protocols.WSFederation;
///
///
///
///
///
///
<summary>
This SampleRequestValidator validates the wresult parameter of the
WS-Federation passive protocol by checking for a SignInResponse message
in the form post. The SignInResponse message contents are verified later by
the WSFederationPassiveAuthenticationModule or the WIF signin controls.
</summary>
public class SampleRequestValidator : RequestValidator
{
protected override bool IsValidRequestString( HttpContext context, string value,
RequestValidationSource requestValidationSource, string collectionKey, out int
validationFailureIndex )
{
validationFailureIndex = 0;
if ( requestValidationSource == RequestValidationSource.Form &&
collectionKey.Equals( WSFederationConstants.Parameters.Result, StringComparison.Ordinal )
)
{
SignInResponseMessage message = WSFederationMessage.CreateFromFormPost(
context.Request ) as SignInResponseMessage;
if ( message != null )
{
return true;
}
}
return base.IsValidRequestString( context, value, requestValidationSource,
collectionKey, out validationFailureIndex );
}
}
return base.IsValidRequestString( context, value, requestValidationSource,
collectionKey, out validationFailureIndex );
}
}
6. In Solution Explorer, right-click on References and add a reference to Microsoft.IdentityModel (if
you don't the project will not build). Build and Publish the Application again.
7. In IE, navigate to the application again. You may see an error related to data protection as the
one below.
8. If you see the error, go to IIS Manager.; click on Application Pools; select the application pool for
the MVC3 Application, click on Advanced Settings on the right side and make sure "Load User
Profile" is set to true. Be sure you recycle the application pool or do an IIS reset afterwards.
9. Now you should see this in IE:
10. Let’s add some code to show the claims. Change HomeController.cs to show the claims:
using
using
using
using
using
System;
System.Collections.Generic;
System.Linq;
System.Web;
System.Web.Mvc;
using Microsoft.IdentityModel.Claims;
namespace mvcwif.Controllers
{
public class HomeController : Controller
{
public ActionResult Index()
{
IClaimsPrincipal claimsPrincipal = User as IClaimsPrincipal;
IClaimsIdentity claimsIdentity = (IClaimsIdentity)claimsPrincipal.Identity;
// The code below shows claims found in the IClaimsIdentity.
// TODO: Change code below to do your processing using claims.
ViewBag.Message = "Welcome to ASP.NET MVC!\n\n";
ViewBag.Message += "Claim Type / Claim Value\n";
foreach (Claim claim in claimsIdentity.Claims)
{
ViewBag.Message += String.Format("{0}={1}\n", claim.ClaimType,
claim.Value);
}
return View();
}
public ActionResult About()
{
return View();
}
}
}
11. Try the application in IE again. Not so appealing, but the claims are being passed:
Performing Log Off
1. Locate method LogOff in AccountController.cs and make sure your cursor is over the method
name
2. Right click on the method name and choose Add View
3. If everything is all right you should see the dialog box with LogOff already populated in View
Name. Click Add.
4. Changethe full content of LogOff.cshtml to:
@{
ViewBag.Title = "LogOff";
}
<h2>LogOff</h2>
<p>
Please close the browser to completely log off.
</p>
<input type="button" value="Click Here To Close" onclick="return self.close();" />
5. Back in AccountController.cs, change the code of method log off to look like this:
public ActionResult LogOff()
{
if (HttpContext.Request.IsAuthenticated)
{
try
{
FederatedAuthentication.SessionAuthenticationModule.DeleteSessionTokenCookie();
FormsAuthentication.SignOut();
}
finally
{
WSFederationAuthenticationModule mod =
Microsoft.IdentityModel.Web.FederatedAuthentication.WSFederationAuthenticationModule;
WSFederationAuthenticationModule.FederatedSignOut(new
Uri(mod.Issuer), HttpContext.Request.Url);
}
}
return View();
}
6. Change your web.config to make sure /account/logoff accepts anonymous requests
7. Add this excerpt anywhere under <configuration>:
<location path="Account/LogOff">
<system.web>
<authorization>
<allow users="*" />
</authorization>
</system.web>
</location>
8. Build and publish your application
9. After logging in, click LogOff on the top side and you should see:
10. If you are using Kerberos/NTLM to authenticate with adfs, you have to close windows to make
sure the windows token is not reused automatically to connect to ADFS2
2
When ADFS is configured to use Forms Authentication you DO NOT NEED to close the browser
to completely log off
Changing ADFS to accept Forms Authentication
1.
2.
3.
4.
5.
Navigate to the folder where ADFS web application is located (normally C:\inetpub\adfs\ls)
Make a copy of the current web.config for safety
Open web.config in notepad
Locate <microsoft.identityServer.web>
In <localAuthenticationTypes>, change the order of authentication to assure that it lists
Forms Authentication first
6. The order must look like this:
<microsoft.identityServer.web>
<localAuthenticationTypes>
<add name="Forms" page="FormsSignIn.aspx" />
<add name="Integrated" page="auth/integrated/" />
<add name="TlsClient" page="auth/sslclient/" />
<add name="Basic" page="auth/basic/" />
</localAuthenticationTypes>
7. Save the changes (you do not need to restart ADFS)
8. Navigate to your application and instead of popping up a logon dialog, you will see:
Enter user name and password and you will login and be redirected to the Home page
9. Now if you log off and log in navigate to the home page (Click Home), you will be requested
to login again

