Comparison of Bond Properties and Intermolecular Bonding
advertisement
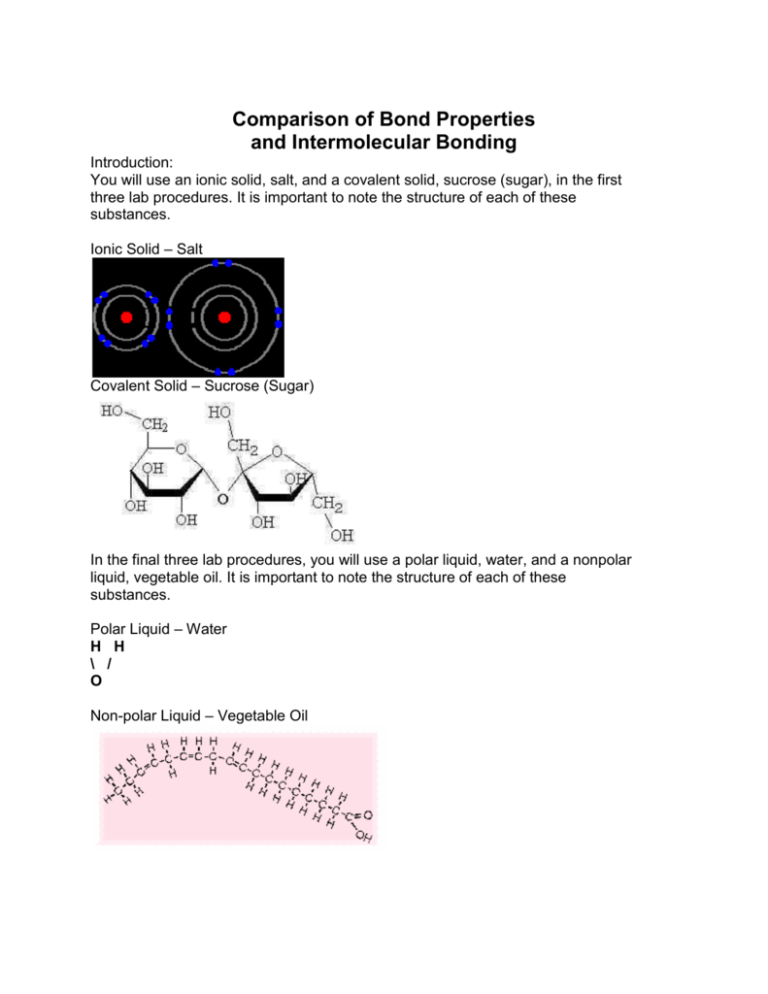
Comparison of Bond Properties and Intermolecular Bonding Introduction: You will use an ionic solid, salt, and a covalent solid, sucrose (sugar), in the first three lab procedures. It is important to note the structure of each of these substances. Ionic Solid – Salt Covalent Solid – Sucrose (Sugar) In the final three lab procedures, you will use a polar liquid, water, and a nonpolar liquid, vegetable oil. It is important to note the structure of each of these substances. Polar Liquid – Water H H \ / O Non-polar Liquid – Vegetable Oil Experiment A: Geometric Crystal Structure Purpose: To observe the shape of an ionic solid and a covalent solid. Hypothesis: I think the ionic solid will / will not display a regular and orderly crystal shape. The reason I think this is… I think the covalent solid will / will not display a regular and orderly crystal shape. The reason I think this is… Procedure: 1. Using a dissection microscope on high power and top lighting, observe the crystal shape of an ionic solid (salt) and a covalent solid (sucrose/sugar). 2. Draw each substance accurately in the space designated at the top of the page titled “Comparison of Physical Properties Data Chart”. Take the time to draw one or two typical crystals in great detail rather than trying to draw everything in your visual field. Experiment B: Hardness of Ionic and Covalent Solids Purpose: To test which substance is harder, the ionic solid or the covalent solid. Hypothesis: I think the ionic / covalent solid will be harder. The reason I think this is… Procedure: 1. Using a dissection microscope on high power with top lighting, observe the shape of the covalent solid in a Petri dish. Use your fingernail to crush the crystals until they break, then observe them under the microscope again to note their cleavage patterns. 2. Repeat the first step, this time using the ionic solid. 3. Make note of the hardness of each type of crystal in the Comparison of Physical Properties Data Chart. Which solid was more difficult to crush? Repeat the procedure if you have any uncertainty. Experiment C: Conductivity of Ionic and Covalent Solids Purpose: To test whether or not an ionic or covalent solution will conduct electricity. Hypothesis: I think the solution with the ionic solid dissolved in it will / will not conduct electricity. The reason I think this is… I think the solution with the covalent solid dissolved in it will / will not conduct electricity. The reason I think this is… Procedure: 1. Fill two beakers, A and B, with 100ml of distilled water. Add 20g of the ionic solid to beaker A and add 20g of the covalent solid to beaker B. 2. Stir each with separate stirring rods until each solid is completely dissolved in the solvent. 3. Using a conductivity meter or a set of alligator clips, a battery, a light and conductivity wires, place both probes in beaker A to see if the solution in the beaker is able to conduct electricity. 4. Record your results in the Comparison of Physical Properties Data Chart. 5. Rinse the probes in distilled water and then repeat the conductivity test for beaker B. Experiment D: Melting Point of Ionic and Covalent Solids Purpose: To test which of the two solids has a higher melting point. Hypothesis: I think the ionic / covalent solid will have a higher melting point. The reason I think this is… Procedure: 1. Using a mass balance, place 1g of the ionic solid in one crucible and 1g of the covalent solid in the other. 2. Place one crucible in the crucible holder of a ring stand and cover the crucible with a watch glass. 3. Light a Bunsen burner and adjust the air vent until the flame is low and steady (a candle can be used in place of a Bunsen burner). 4. Ask the time-keeper to begin timing the reaction at the same moment the Bunsen burner is placed under the crucible in the ring stand platform. 5. Watch carefully as the sample heats. When the ionic solid begins to brown or pop and sputter, stop the reaction and record the melting time. When the covalent solid melts on the edges and turns brown, stop the reaction and record the melting time. 6. Record both results in the Comparison of Physical Properties Data Chart. Experiment E: Demonstration of Capillary Action Purpose: To test the capillary action of polar and nonpolar liquids. Hypothesis: I think the polar / nonpolar liquid will have greater capillary action. The reason I think this is… Procedure: 1. Using a separate dropper for each, place three drops of a polar liquid on one end of a glass slide and three drops of a nonpolar liquid on the other end of the slide. 2. Using a capillary tube, gently touch the end of the tube to the drop of the polar liquid and watch the results. Repeat the procedure with the same tube several times until the results do not change. 3. Repeat step 2 using a new capillary tube and the nonpolar liquid. 4. Describe the results in the Comparison of Physical Properties Data Section. Experiment F: Demonstration of Surface Tension Purpose: To test the surface tension of polar and non-polar liquids. Hypothesis: I think the polar / nonpolar liquid will have greater surface tension. The reason I think this is… Procedure: 1. Add half a centimeter of the polar liquid to one petri dish and half a centimeter of the nonpolar liquid to the other petri dish. 2. Using a clean and dry paper clip, try to gently lay the paper clip on the surface of each liquid using the surface tension for support. Retrieve the paper clip, dry it and try again if you don’t do it on the first try. You should be able to have the paper clip float on at least one of the liquids. 3. Record your results in the Comparison of Physical Properties Data Chart. Experiment G: Demonstration of Solvent Ability Purpose: To test the ability of polar and non-polar liquids to dissolve an ionic and a covalent solid. Hypothesis: I think… The reason I think this is… Procedure: 1. Using a sectioned reaction dish, place 2ml of the polar liquid into two sections and 2ml of the nonpolar liquid into two sections. 2. Using a mass balance, measure two 0.5g portions of the ionic solid and two 0.5g portions of the covalent solid. Add 0.5g of the ionic solid to the first polar section and the first nonpolar section. Add 0.5g of the covalent solid to the second section of the polar liquid and the second section of the nonpolar liquid. 3. Record the start time. 4. Gently swirl the reaction dish so that the liquid in each of the sections can dissolve the solids. 5. Record the time it takes for each of the solids to dissolve in each of the solvents. 6. Record your results in the Comparison of Physical Properties Data Chart. **Note: The solids in some sections may never dissolve entirely.
