Training
advertisement
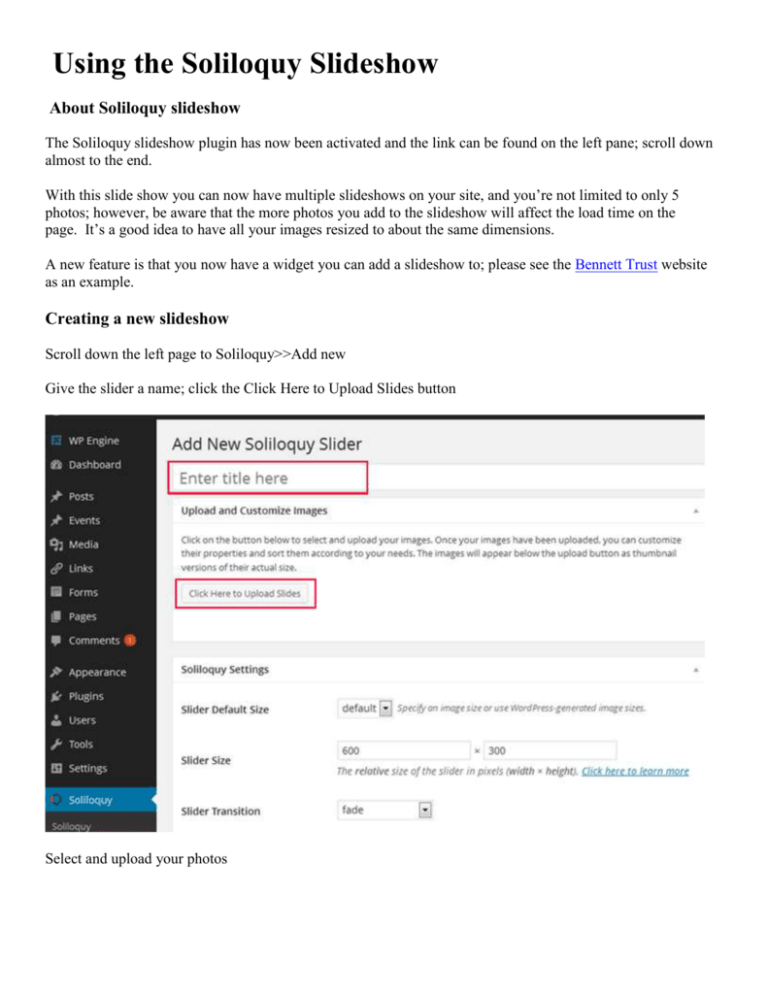
Using the Soliloquy Slideshow About Soliloquy slideshow The Soliloquy slideshow plugin has now been activated and the link can be found on the left pane; scroll down almost to the end. With this slide show you can now have multiple slideshows on your site, and you’re not limited to only 5 photos; however, be aware that the more photos you add to the slideshow will affect the load time on the page. It’s a good idea to have all your images resized to about the same dimensions. A new feature is that you now have a widget you can add a slideshow to; please see the Bennett Trust website as an example. Creating a new slideshow Scroll down the left page to Soliloquy>>Add new Give the slider a name; click the Click Here to Upload Slides button Select and upload your photos Once the photos have been uploaded, click the pencil icon on the top left corner of the thumbnail to add alt text, Captions, and the destination URL of the page you want to be sent to when you click the photo. Once the slideshow has been created, open the page you want to add the slideshow to – e.g., the home page (pages>>all pages). You’ll now see a button above the rows of icons that says Add Slider. Select the slider and click the Add Slider button on the bottom right corner (see next image). Update your page. Add a New Page Under Pages Choose Add New Add New Pages window opens (editor box ) (Toggle Full Screen Icon -to enlarge working space) The Top Box is for the Page HEADER -large fonts; NOTE: text in this box will so show up in the RIGHT menu Add , copy/past content into the Editor box Note: when copy/pasting use Past Plain Text or Paste from Word icon In Discussion box below NOTE: if you do not see this option click on Screen Options tab (top right) and check the Discussion box Make sure the Allow Comments is NOT checked Publish Edit a Page or Post Click on Pages (list of pages shows) Place cursor under page name Choose Edit Click on Toggle Full Screen Mode (enlarge work area) Make all changes in edit box Choose Update Preview Creating a Hyperlink 1. 2. 3. 4. highlighting the word or phrase you’d like to link from in the Visual Editor pressing the Insert/edit link icon either entering the URL you’d like to link to directly, or searching through existing content to link to internally pressing the Add Link button Adding PDF’s Open page Place cursor in content edit box, where you want PDF file to be on page. Choose the Add Media Icon Choose Select Browse your computer to find the PDF file Note: Maximum upload file size: 48MB Click on file name Choose Open ( files uploads to the Media Library) Edit the Title Name (what is in this box will appear on page) Choose Insert - Page Status To work on a page that the world can’t see until your ready to go live Under Publish (right menu bar) Status: Draft (down arrow) Choose Draft mode or View Pending mode Draft is NOT live, must login to see Draft files Pending is NOT live, it’s waiting to be reviewed before going public OK Publish Visibility: Public (down arrow) Public – is a published page the world can see Password protected – uses password only Private -uses user name and password and must choose Private Template (must be logged in) Under Page Attributes Under Template Click down arrow Choose Template Private Template OK Publish Add an image from your Computer Adding image to a post or page from your computer is as simple as: 1. Place your cursor where you would like the image to be inserted. 2. Click on the Add Media icon (located to the right of Upload/Insert). 3. Click the Select Files button 4. Locate the image(s) on your computer to upload and click open. 5. Once uploaded: type a title for the image add alternate text choose how you want to align the image (None, Left, Center or Right) select the image size to insert (Thumbnail, Medium, Large or Full Size) click Insert into Post Adding Image From Media Library Adding image to a post or page from your media library is as simple as: 1. Place your cursor where you would like the image to be inserted. 2. Click on the Add Media icon (located to the right of Upload/Insert). 3. Click on the Media Library tab and then on Images. 4. Locate the image you wish to insert and click the Show located on the right. 5. Now you just need to: type a title for the image add alternate text choose how you want to align the image (None, Left, Center or Right) select size of image you want to insert (Thumbnail, Medium, Large or Full Size) and then click Insert into Post Password Protected Open page Under Publish (right menu bar) Choose Edit Visibility Check Password Protected Enter a Password in box Choose OK Update Links Add New Under Links Choose Add New Name: Add name of website in box Web Address: Add address in box Description: Type in key words that describe what’s on web site Choose the Category you want it to be in – (default is Links) Choose Add Link (right side Save Box) Link Category Under Links Choose Link Categories Add Link Category name in box (county 4H sites) Choose Add Category After you hit Add you will see it show up in the (All Categories box with a check box) Each time you create another 4H county web site link by choosing Add New Add Name Web Adderss Description This time, in the All Categories box, check County 4H sites Add Link Add Links into Widgets (shows up on main menu bar under menu box) Under Appearance Choose Widgets Click on down arrow in Below Right Sidebar box With box open – Left Click on Links (middle of page) and drag it into Below Right Sidebar box Choose Link Name or Type in the Name (sample, if you had a category it will show up in the box to choose from) Check Show Link Name Save For Frequently Asked Questions go to: http://agrilife.org/learnwordpress/faqs/


