SolidWorksFlowSimula..
advertisement

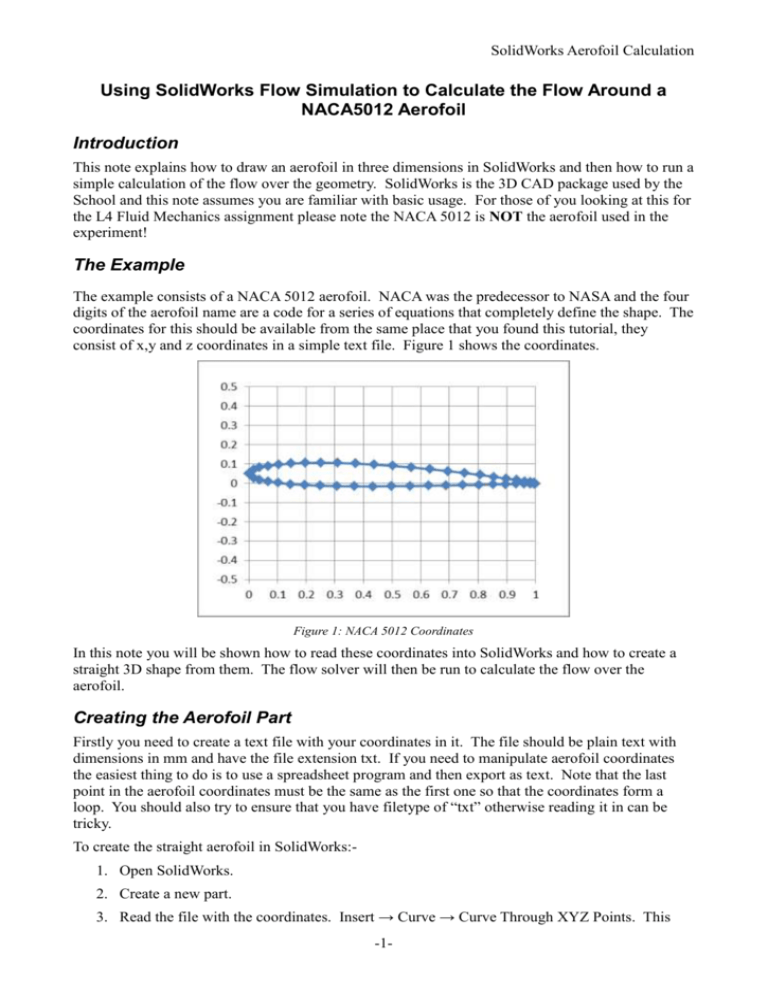
SolidWorks Aerofoil Calculation Using SolidWorks Flow Simulation to Calculate the Flow Around a NACA5012 Aerofoil Introduction This note explains how to draw an aerofoil in three dimensions in SolidWorks and then how to run a simple calculation of the flow over the geometry. SolidWorks is the 3D CAD package used by the School and this note assumes you are familiar with basic usage. For those of you looking at this for the L4 Fluid Mechanics assignment please note the NACA 5012 is NOT the aerofoil used in the experiment! The Example The example consists of a NACA 5012 aerofoil. NACA was the predecessor to NASA and the four digits of the aerofoil name are a code for a series of equations that completely define the shape. The coordinates for this should be available from the same place that you found this tutorial, they consist of x,y and z coordinates in a simple text file. Figure 1 shows the coordinates. Figure 1: NACA 5012 Coordinates In this note you will be shown how to read these coordinates into SolidWorks and how to create a straight 3D shape from them. The flow solver will then be run to calculate the flow over the aerofoil. Creating the Aerofoil Part Firstly you need to create a text file with your coordinates in it. The file should be plain text with dimensions in mm and have the file extension txt. If you need to manipulate aerofoil coordinates the easiest thing to do is to use a spreadsheet program and then export as text. Note that the last point in the aerofoil coordinates must be the same as the first one so that the coordinates form a loop. You should also try to ensure that you have filetype of “txt” otherwise reading it in can be tricky. To create the straight aerofoil in SolidWorks:1. Open SolidWorks. 2. Create a new part. 3. Read the file with the coordinates. Insert → Curve → Curve Through XYZ Points. This -1- SolidWorks Aerofoil Calculation should look something like Figure 2 . Figure 2: Curve File Dialogue 4. Select the curve, usually it is called Curve 1. You will usually need to “Zoom to Fit” to see it. 5. Now create a sketch and click on the plane that the aerofoil coordinates are in to select its orientation. (Insert -> Sketch and select the front plane – see ) Figure 3: Selecting the Front Plane 6. Select Curve 1. 7. Tools → Sketch Tools → Convert Entities. This will convert the Curve to a Sketch which you can then manipulate in SolidWorks 8. Exit the sketch. 9. You can now extrude the sketch as normal. You should end up with something like Figure 4 10. You may wish to rename “Curve1” to “aerofoil” and “Boss-Extrude1” to “extruded aerofoil” as this may make setting up the boundary conditions somewhat easier. -2- SolidWorks Aerofoil Calculation Figure 4: The Extruded Aerofoil Setting up the Flow Calculation There are a number of ways of simulating fluid flow in Solidworks. If you don’t have a “Flow Simulation Menu” you need to go through the menus: Tools -> Add Ins and select “SolidWorks Flow Simulation” Figure 5: Enable the Add-In -3- SolidWorks Aerofoil Calculation This should then give you a menu called “Flow Simulation”. 1. Select Flow Simulation -> Project – Wizard Should give you this: Figure 6: Setup Wizard 2. Follow the wizard through, by filling out the boxes and hitting next. Use the following settings: a. SI Units (though I shouldn’t have to tell you this!) b. Analysis Type: Set to External c. Select Air as the fluid. Find it under Gases and then you need to add it to the simulation. d. Leave the Wall Conditions as default e. Set the x-velocity to be 10 m/s. (Obviously for a real simulation you will want to match the Reynolds and Mach numbers but this tutorial is about pushing buttons!) f. Leave the Results and Geometry Resolution at default values. 3. Flow Simulation -> Computational Domain 4. Select 2D simulation and make sure the XY plane is selected. This should look like this: -4- SolidWorks Aerofoil Calculation Figure 7: Setting Up the Domain 5. You can alter the domain size here but for the moment we can just go with the default. 6. Flow Simulation -> Calculation Control Options has a number of controls you can use later but for now we can leave them as default values. The Help system has more information on what each option does. 7. Flow Simulation -> Project -> Show Basic Mesh allows the mesh to be visualised. As you can see it is pretty simple at this stage. Figure 8: Building the Mesh -5- SolidWorks Aerofoil Calculation Solving the Flow Equations 1. Flow Simulation -> Solve -> Run will run the calculation. A window such as this will pop up (you might have to hunt to find it): Figure 9: Running the Calculation 2. At some time afterwards the program will tell you the “Solver is Finished” and we can look at the results. To do this we need to find the “Flow Simulation Analysis Tree” which is usually found on the left hand side of Solidworks. 3. Turn off the basic mesh display by Flow Simulation -> Project -> Display Basic Mesh 4. To view results click on the + next to Results. Put the mouse over “Cut Plots” and right click to insert. This should give you something like: -6- SolidWorks Aerofoil Calculation Figure 10: Setting up the Contours 5. Change the contour levels to 35 (say) and admire the pretty picture! Figure 11: Colours for Directors 6. Clearly for engineering analysis you will want to explore the Help and the various options to refine a large number of these parameters but this note at least will get you started. -7- SolidWorks Aerofoil Calculation This tutorial shows you the mechanism of running the calculations, it is not an illustration of best practise. In particular if you are doing one of my courses you will need to think carefully about what it is you are calculating and do a lot more work than just follow this guide through! Grant Ingram 2012-11-12 -8-


