The redox reaction in a galvanic cell is a spontaneous reaction. For
advertisement
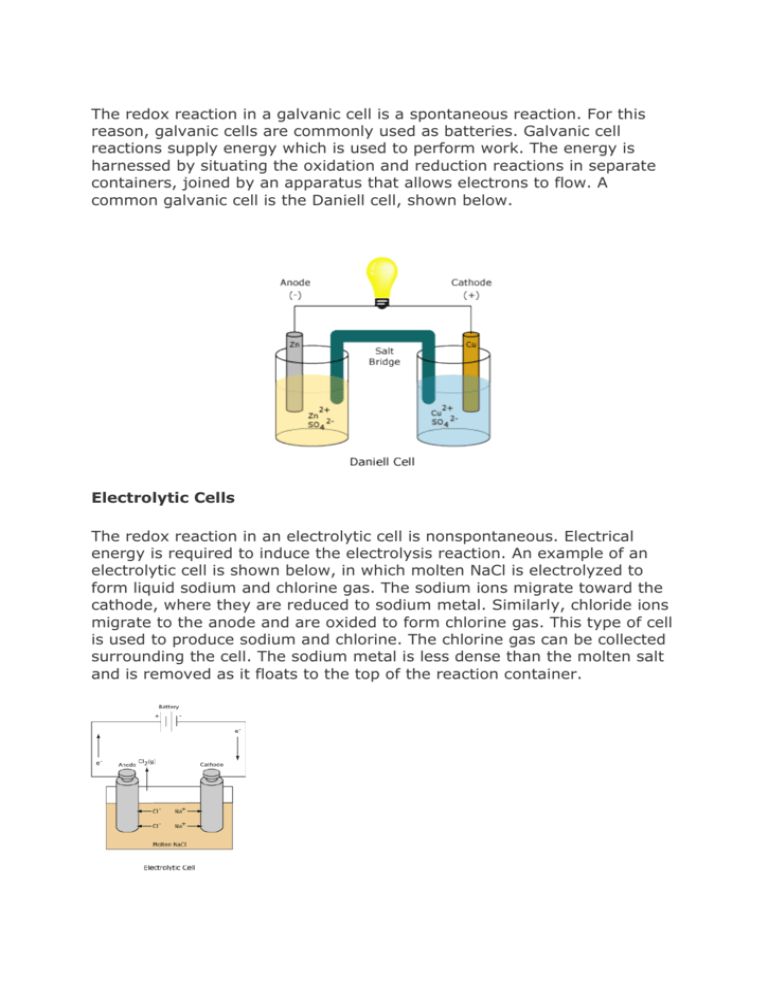
The redox reaction in a galvanic cell is a spontaneous reaction. For this reason, galvanic cells are commonly used as batteries. Galvanic cell reactions supply energy which is used to perform work. The energy is harnessed by situating the oxidation and reduction reactions in separate containers, joined by an apparatus that allows electrons to flow. A common galvanic cell is the Daniell cell, shown below. Electrolytic Cells The redox reaction in an electrolytic cell is nonspontaneous. Electrical energy is required to induce the electrolysis reaction. An example of an electrolytic cell is shown below, in which molten NaCl is electrolyzed to form liquid sodium and chlorine gas. The sodium ions migrate toward the cathode, where they are reduced to sodium metal. Similarly, chloride ions migrate to the anode and are oxided to form chlorine gas. This type of cell is used to produce sodium and chlorine. The chlorine gas can be collected surrounding the cell. The sodium metal is less dense than the molten salt and is removed as it floats to the top of the reaction container. How To Make a Rainbow in a Glass Density Demonstration By Anne Marie Helmenstine, Ph.D. You don't have to use lots of different chemicals to make a colorfuldensity column. This project uses colored sugar solutions made at different concentrations. The solutions will form layers, from least dense, on top, to most dense (concentrated) at the bottom of the glass. Difficulty: Easy Time Required: minutes Here's How: 1. Line up five glasses. Add 1 tablespoon (15 g) of sugar to the first glass, 2 tablespoons (30 g) of sugar to the second glass, 3 tablespoons of sugar (45 g) to the third glass, and 4 tablespoons of sugar (60 g) to the fourth glass. The fifth glass remains empty. 2. Add 3 tablespoons (45 ml) of water to each of the first 4 glasses. Stir each solution. If the sugar does not dissolve in any of the four glasses, then add one more tablespoon (15 ml) of water to each of the four glasses. 3. Add 2-3 drops of red food coloring to the first glass, yellow food coloring to the second glass, green food coloring to the third glass, and blue food coloring to the fourth glass. Stir each solution. 4. Now let's make a rainbow using the different density solutions. Fill the last glass about one-fourth full of the blue sugar solution. 5. Carefully layer some green sugar solution above the blue liquid. Do this by putting a spoon in the glass, just above the blue layer, and pouring the green solution slowly over the back of the spoon. If you do this right, you won't disturb the 6. blue solution much at all. Add green solution until the glass is about half full. Now layer the yellow solution above the green liquid, using the back of the spoon. Fill the glass to three-quarters full. 7. Finally, layer the red solution above the yellow liquid. Fill the glass the rest of the way. Tips: 1. The sugar solutions are miscible, or mixable, so the colors will bleed into each other and eventually mix. 2. If you stir the rainbow, what will happen? Because this density column is made with different concentrations of the same chemical (sugar or sucrose), stirring would mix the solution. It would not un-mix, like you would see with oil and water. 3. Try to avoid using gel food colorings. As you can see in my photo, it is difficult for young children to mix them into the solution. 4. If your sugar won't dissolve, an alternative to adding more water is to nuke the solutions for about 30 seconds in the microwave or to use warm water in the first place. If you heat the water, use care to avoid burns. 5. If you want to make layers you can drink, try substituting unsweetened soft drink mix for the food coloring, or four flavors of sweetened mix for the sugar plus coloring. Hot Ice or Sodium Acetate Make Hot Ice or Sodium Acetate from Vinegar and Baking Soda By Anne Marie Helmenstine, Ph.D. Ads: Sodium Acetate Dissolve It Solution Baking Soda Vinegar Water You can supercool hot ice or sodium acetate so that it will remain a liquid below its melting point. You can trigger crystallization on command, forming sculptures as the liquid solidifies. The reaction is exothermic so heat is generated by the hot ice. Anne Helmenstine Ads Claritywww.dataapex.comChromatography Data Stations for any laboratory See More About sodium acetate hot ice exothermic reactions home experiments make chemicals This is a crystal of sodium acetate trihydrate, sometimes known as hot ice because it somewhat resembles water ice and because it generates heat when it crystallizes. This is a photograph of sodium acetate crystallization. Anne Helmenstine Sodium acetate or hot ice is an amazing chemical you can prepare yourself from baking soda and vinegar. You can cool a solution of sodium acetate below its melting point and then cause the liquid to crystallize. The crystallization is an exothermic process, so the resulting ice is hot. Solidification occurs so quickly you can form sculptures as you pour the hot ice. Sodium Acetate or Hot Ice Materials 1 liter clear vinegar (weakacetic acid) 4 tablespoons baking soda (sodium bicarbonate) Prepare the Sodium Acetate or Hot Ice 1. In a saucepan or large beaker, add baking soda to the vinegar, a little at a time and stirring between additions. The baking soda and vinegar react to form sodium acetate and carbon dioxide gas. If you don't add the baking soda slowly, you'll essentially get a baking soda and vinegar volcano, which would overflow your container. You've made the sodium acetate, but it is too dilute to be very useful, so you need to remove most of the water. Here is the reaction between the baking soda and vinegar to produce the sodium acetate: Na+[HCO3]– + CH3–COOH → CH3–COO– Na+ + H2O + CO2 2. Boil the solution to concentrate the sodium acetate. You could just remove the solution from heat once you have 100150 ml of solution remaining, but the easiest way to get good results is to simply boil the solution until a crystal skin or film starts to form on the surface. This took me about an hour on the stove over medium heat. If you use lower heat you 3. are less likely to get yellow or brown liguid, but it will take longer. If discoloration occurs, it's okay. Once you remove the sodium acetate solution from heat, immediately cover it to prevent any further evaporation. I poured my solution into a separate container and covered it with plastic wrap. You should not have any crystals in your solution. If you do have crystals, stir a very small amount of water or vinegar into the solution, just sufficient to 4. dissolve the crystals. Place the covered container of sodium acetate solution in the refrigerator to chill. Activities Involving Hot Ice The sodium acetate in the solution in the refrigerator is an example of a supercooled liquid. That is, the sodium acetate exists in liquid form below its usual melting point. You can initiate crystallization by adding a small crystal of sodium acetate or possibly even by touching the surface of the sodium acetate solution with a spoon or finger. The crystallization is an example of an exothermic process. Heat is released as the 'ice' forms. To demonstrate supercooling, crystallization, and heat release you could: Drop a crystal into the container of cooled sodium acetate solution. The sodium acetate will crystallize within seconds, working outward from where you added the crystal. The crystal acts as a nucleation site or seed for rapid crystal growth. Although the solution just came out of the refrigerator, if you touch the container you will find it is now warm or hot. Pour the solution onto a shallow dish. If the hot ice does not spontaneously begin crystallization, you can touch it with a crystal of sodium acetate (you can usually scrape a small amount of sodium acetate from the side of the container you used earlier). The crystallization will progress from the dish up toward where you are pouring the liquid. You can construct towers of hot ice. The towers will be warm to the touch. You can re-melt sodium acetate and re-use it for demonstrations. Make Your Own Magic Rocks Grow a Chemical Garden Magic Rocks are a classic chemistry project that doesn't take a lot of time to complete. The sodium silicate in the growing solution reacts with the metal salts in the 'rocks' of Magic Rocks to produce an underwater chemical garden. Anne Helmenstine What Are Magic Rocks? Magic Rocks, sometimes called Chemical Garden or Crystal Garden, are a product that includes a small packet of multicolored 'rocks' and some 'magic solution'. You scatter the rocks at the bottom of a glass container, add the magic solution, and the rocks grow into magical-looking chemical towers within a day. It's crystal-growing at its finest for people who prefer not to wait days/weeks for results. After the chemical garden has grown, the magic solution is (carefully) poured off and replaced with water. At this point, the garden can be maintained as a decoration almost indefinitely. Magic rocks tend to be recommended for ages 10+ because the rocks and solution are not edible! However, younger children will also enjoy growing magic rocks, providing they have close adult supervision. How Magic Rocks Work The Magic Rocks are chunks of metal salts that have been stabilized by being dispersed in aluminum hydroxide or alum. The magic solution is a solution of sodium silicate (Na2SiO3) in water. The metal salts react with the sodium silicate to form the characteristic colored precipitant (chemical towers about 4" high). Grow Your Own Chemical Garden Magic rocks are available on the Internet and are quite inexpensive, but you can make them yourself. These are the salts used to make magic rocks. Some of the colorants are readily available; most require access to a general chemistry lab. White - calcium chloride (found on the laundry aisle of some stores) White - lead (II) nitrate Purple - manganese (II) chloride Blue - copper (II) sulfate (common chemistry lab chemical, also used for aquaria and as an algicide for pools) Red - cobalt (II) chloride Pink - manganese (II) chloride Orange - iron (III) chloride Yellow - iron (III) chloride Green - nickel (II) nitrate Make the garden by placing a thin layer of sand on the bottom of a 600-ml beaker (or equivalent glass container). Add a mixture consisting of 100-ml sodium silicate solution with 400 ml distilled water. (You can make sodium silicate yourself.) Add crystals or chunks of the metal salts. If you add too many 'rocks' the solution will turn cloudy and immediate precipitation will occur. A slower precipitation rate will give you a nice chemical garden. Once the garden has grown, you can replace the sodium silicate solution with pure water. Watch Magic Rocks Grow
