Deep and Irregular Crease Theory
advertisement
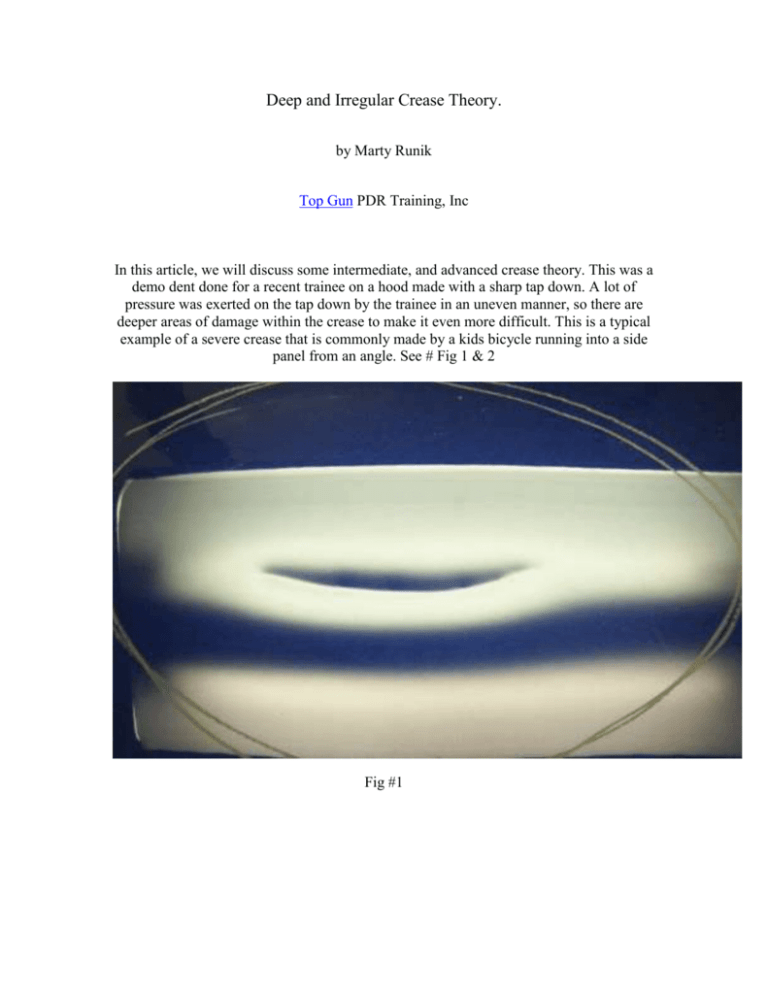
Deep and Irregular Crease Theory. by Marty Runik Top Gun PDR Training, Inc In this article, we will discuss some intermediate, and advanced crease theory. This was a demo dent done for a recent trainee on a hood made with a sharp tap down. A lot of pressure was exerted on the tap down by the trainee in an uneven manner, so there are deeper areas of damage within the crease to make it even more difficult. This is a typical example of a severe crease that is commonly made by a kids bicycle running into a side panel from an angle. See # Fig 1 & 2 Fig #1 Fig #2 Here is a view with overhead lighting to give an idea of the relative size and depth of this crease. See # 2 Fig #3 Pic #3 is a view of the crease with the mini light right over the crease to show the deeper areas within the dent. In many cases this would be close to the proper board position to start working this crease if the bottom were more uniform. This crease was locked up almost entirely at the bottom, with very little shoulder work needed. The deeper areas in this crease are a bit extreme, but they illustrate a common problem area for many techs when it comes to creases. Many real world creases don't have perfectly smooth bottoms, but have two or more deeper area within the crease. When you work these creases from one side to the other, you probably notice there are some areas within your repair that give you trouble, and just don't want to come out right. One reason for this is that when you work side to side, you actually trap metal at the rim of these deeper areas, and stretch out or warp these areas making a quality repair difficult. The correct procedure for repairing creases with these deep areas is to go right for the centers of these deep areas, and bring them up ONLY far enough to bring them ALMOST even with the bottom of the rest of the crease. It is very important NOT to over do this. If you over push these areas, you will make pressure traps that will haunt you for the rest of your repair. The next pic is with the mini light set perpendicular to the crease. # 4 As can be seen, these deeper areas are stretched and will be hard to find your tool tip in. The first problem is how do we see where to push with our tool in these deep areas within an already deep crease? Notice when the board is parallel to the crease you can see the deeper areas, but not as well as when the board is perpendicular to the crease. Working these deep areas with the light perpendicular will be hard however because we sometimes loose the look at the bottom of the crease. Fig # 4 Fig # 5 One technique that works well is to tilt the board about 45 -50 degrees to the crease as seen in pic # 5. This board position will eliminate most of the distracting visual information from the crease, and allow us to focus only on these deep areas within the crease. The sweet spot for this board placement as far as position and tilt goes is narrow, so you may need to play with it a little to get the right look at the bottom of the crease. The right look should be free from any visual distractions and give you a very accurate view of those sharp points at the bottom of the crease. Starting from the right side, we bring up each of these low areas until they are almost level with the bottom of the crease. With the board in this position, it will also make it easier to see when to stop each push so we do not over push, and further stress the bottom of the crease. Working a crease first in this 45 degree board position should generally be used on creases with irregular or sharp bottoms, to see the pressure release from the bottom as you push. Many times it is easier to keep the board in this position throughout the entire repair, as it gives you a two dimensional view of the crease, and can prevent you from making the zippered look when you cross check. If you want though, you can move the board to the parallel position as soon as the bottom of the crease is even. Heat is used here because a pencil tip will be needed to shrink or gather up the metal in these deep areas. Remember we are NOT trying to bring the crease up! We are ONLY relieving as much stress off these deep areas as it takes to make them about the same level as the rest of the bottom of the crease. Figure 6 shows the crease with the mini light returned to the perpendicular position, after the deep areas within the crease were brought up only to the bottom of the crease. Notice how the bottom is much more even? The crease will now release properly with no bad areas caused by these former pressure traps within the crease. Fig # 6 Starting from the right side we continue with heat and our pencil tip and make connected, and accurate pushes over the whole length of the crease. We push ONLY hard enough to gather up the stretched metal at the bottom. Raising the crease is the LAST thing we are concerned about at this point. Bringing up the crease by overly aggressive pushes will turn this difficult crease into an oil canned mess. Pic # 7 is a look at the crease after the first row of pushes were made with the pencil tip to gather up the stretched metal at the bottom of the crease. Fig # 7 Notice that there are no bad push marks. This means no stress was introduced inside the crease by aggressive, or inaccurate pushes, ONLY pressure release. No tap down was used inside the crease because all pushes were accurate and stopped at the right time. The extra time spent with this step will save us a HUGE amount of time on the finish side of this crease. We cross check the crease and see no bad spots worth fixing, so we are ready for the next pass. Now looking at the bottom of the crease in the fog, we see only a medium grey fog at the bottom with no dark areas. Since the fog shows that there is no more stretched metal at the bottom, we will do the rest of this dent without heat. We will also switch now to a tripick or similar tool for the next pass. Using a pencil tip for another pass would result in gathering up too much metal. A pencil tip is used ONLY to gather stretched metal. This pass was also done with very connected pushes also, and was done in about one-third the time as the pencil tip pass. Many techs when working extreme creases like these find it is necessary to make multiple passes or zippered pushes to bring the crease up. When you relieve the stress off the bottom of the crease in this way, it usually makes multiple passes unnecessary...but not always. See fig #8 Fig # 8 The middle of the crease was pushed just a bit past level to save another pass. Because the pushes were connected this was OK to do and made another complete pass unnecessary. The high area was tapped down and the dent was cross checked again see fig # 9 Fig # 9 Some minor tap down work and a few minor pushes with a pencil tip were needed to finish the crease in this board position. The fog board was returned to parallel with the crease, and a couple minor pushes were made with a pencil tip and a few tap downs were made with a sharp tip tap. It was necessary to manufacture some orange peel at the center of this crease because the pencil tip erased the factory peel at the bottom of the crease. See Fig # 10 for finish picture. The finished crease was tight with no oil canning whatsoever. Fig # 10 A side panel irregular crease is worked basically the same way. Keep in mind on a horizontal crease, correct board placement is much more limited because of the curvature of the panel. On horizontal creases you must take the time to find the correct board position to get the right look at the bottom of the crease, or you will be guessing where your tip is throughout the repair. I hope this will help some that have difficulty with these types of creases. Doing them in this way will result in a much faster, and cleaner repair. Please ask any questions in the forum area.
