Standing Wave: Resonance in a Tube
advertisement
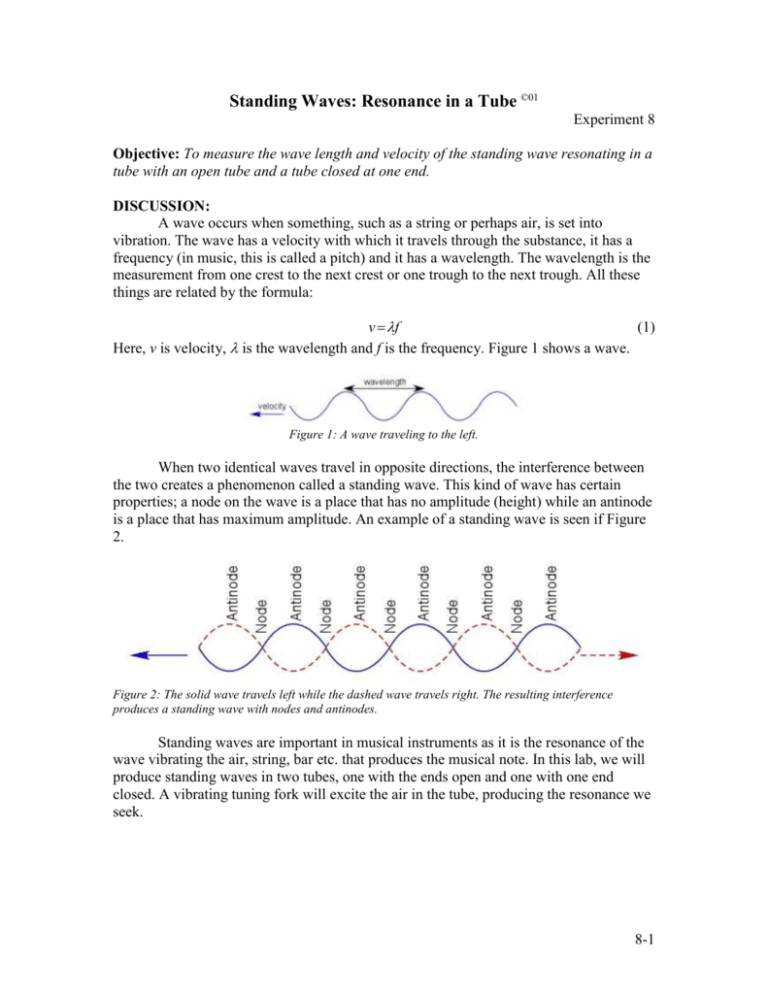
Standing Waves: Resonance in a Tube ©01 Experiment 8 Objective: To measure the wave length and velocity of the standing wave resonating in a tube with an open tube and a tube closed at one end. DISCUSSION: A wave occurs when something, such as a string or perhaps air, is set into vibration. The wave has a velocity with which it travels through the substance, it has a frequency (in music, this is called a pitch) and it has a wavelength. The wavelength is the measurement from one crest to the next crest or one trough to the next trough. All these things are related by the formula: v f (1) Here, v is velocity, is the wavelength and f is the frequency. Figure 1 shows a wave. Figure 1: A wave traveling to the left. When two identical waves travel in opposite directions, the interference between the two creates a phenomenon called a standing wave. This kind of wave has certain properties; a node on the wave is a place that has no amplitude (height) while an antinode is a place that has maximum amplitude. An example of a standing wave is seen if Figure 2. Figure 2: The solid wave travels left while the dashed wave travels right. The resulting interference produces a standing wave with nodes and antinodes. Standing waves are important in musical instruments as it is the resonance of the wave vibrating the air, string, bar etc. that produces the musical note. In this lab, we will produce standing waves in two tubes, one with the ends open and one with one end closed. A vibrating tuning fork will excite the air in the tube, producing the resonance we seek. 8-1 In a tube with both ends open, such as in Figure 3, there must be an antinode at each end for resonance to be maintained. The lowest number of antinodes possible is two. This creates one node in the middle and represents ½ of a wavelength. The next lowest number of antinodes is three, giving and antinode at each end and one in the middle. Two nodes exist in this wave. This pattern continues, adding an antinode and a node each time. Figure 3: Standing waves in a tube open at both ends. In a tube with one end closed, such as in Figure 4, there must be a node at the closed end, but an antinode at the open end. Thus, the lowest resonant configuration is ¼ of a wavelength. There is one node and one antinode in this configuration. The next possible one adds half a wavelength making two nodes and two antinodes. Again, the pattern continues adding an antinode and a node each time. Figure 4: Standing waves in a tube closed at one end. EXERCISES: You are given two sections of pipe, each approximately 30 cm long. You are also given an end cap for the larger of the two pipes. The smaller diameter pipe will fit inside the larger pipe and you can change the length of the overall system by sliding the inner pipe in and out of the outer pipe. 1. Open End Pipe (no cap on the end): a. Place the inner pipe just inside the outer pipe. Be sure not to cover the end of the pipe! b. Tap the tuning fork against the rubber actuator. Do not tap the fork against the table; this will weaken them and eventually they will crack! c. While moving the tuning fork so that it is always near one end of the pipe, slowly slide the inner pipe into the outer pipe and LISTEN CAREFULLY. d. Find the length that produces loudest tone. e. Measure and record this length. f. Switch partners and repeat the exercise again. g. Take and average of the two (or three, depending on how many are in the group) lengths. h. For the open ended pipe, this length is ½ a wavelength. Calculate and record the wavelength. i. Check on the tuning fork for the frequency (such as 256 Hz). Record this number. j. Using Equation 1, calculate the speed of sound in air. k. Choose a different tuning fork and repeat the process until you have done 3 forks. 8-2 2. Closed End Pipe (cap on the end): a. Place the cap firmly on the end of the outer pipe. b. Place the inner pipe just inside the outer pipe at the other end. c. Tap the tuning fork against the rubber actuator. Do not tap the fork against the table; this will weaken them and eventually they will crack! d. While moving the tuning fork so that it is always near one end of the pipe, slowly slide the inner pipe into the outer pipe and LISTEN CAREFULLY. e. Find the length that produces loudest tone. f. Measure and record this length. g. Switch partners and repeat the exercise again. h. Take and average of the two (or three, depending on how many are in the group) lengths. i. For the one closed ended pipe, this length is ¾ a wavelength. Calculate and record the wavelength. j. Check on the tuning fork for the frequency (such as 256 Hz). Record this number. k. Using Equation 1, calculate the speed of sound in air. l. Choose a different tuning fork and repeat the process until you have done 2 forks. 3. Questions: a. What did you notice about the velocity of sound in air? b. If the frequency goes up, what happens to the wavelength? c. If the wavelength doubles, what happens to the frequency? d. Using the concepts learned in this lab, explain why a Tuba is lower in tone than a Piccolo. 8-3 Data Sheet – Experiment X Open End Pipe: Tuning Fork Length (m) Ave. Length (m) Wavelength (m) Frequency (Hz) Velocity (m/s) Length (m) Ave. Length (m) Wavelength (m) Frequency (Hz) Velocity (m/s) v f 1: trial a 1: trial b 1: trial c 2: trial a 2: trial b 2: trial c 3: trial a 3: trial b 3: trial c Closed End Pipe: Tuning Fork v f 1: trial a 1: trial b 1: trial c 2: trial a 2: trial b 2: trial c 8-4
