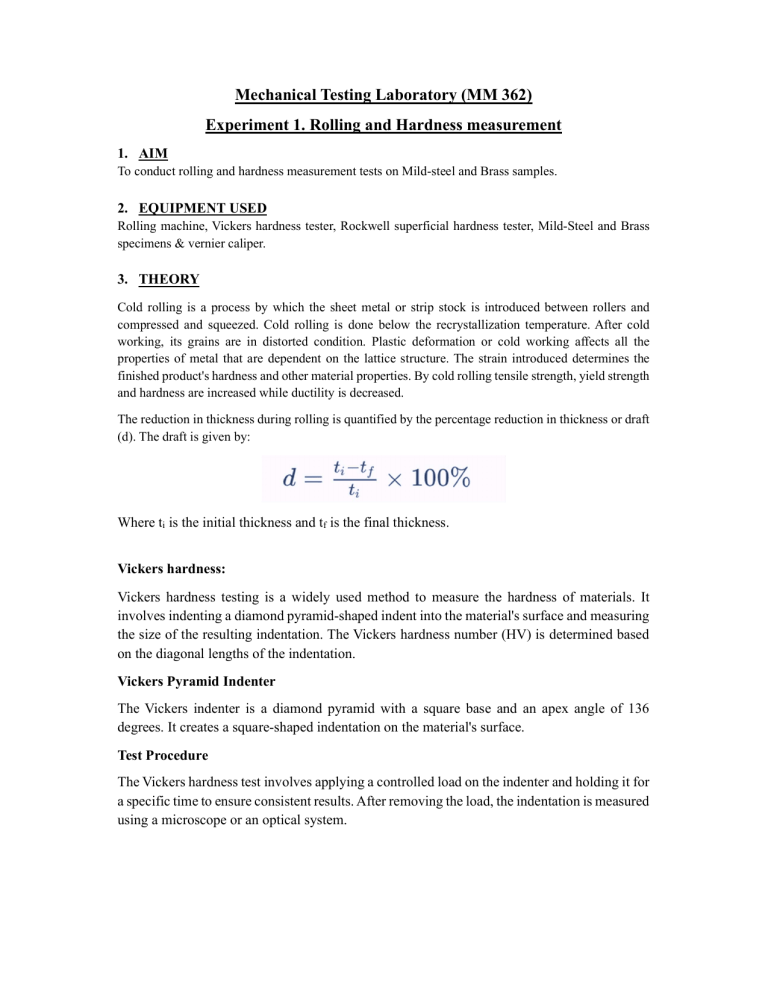
Mechanical Testing Laboratory (MM 362) Experiment 1. Rolling and Hardness measurement 1. AIM To conduct rolling and hardness measurement tests on Mild-steel and Brass samples. 2. EQUIPMENT USED Rolling machine, Vickers hardness tester, Rockwell superficial hardness tester, Mild-Steel and Brass specimens & vernier caliper. 3. THEORY Cold rolling is a process by which the sheet metal or strip stock is introduced between rollers and compressed and squeezed. Cold rolling is done below the recrystallization temperature. After cold working, its grains are in distorted condition. Plastic deformation or cold working affects all the properties of metal that are dependent on the lattice structure. The strain introduced determines the finished product's hardness and other material properties. By cold rolling tensile strength, yield strength and hardness are increased while ductility is decreased. The reduction in thickness during rolling is quantified by the percentage reduction in thickness or draft (d). The draft is given by: Where ti is the initial thickness and tf is the final thickness. Vickers hardness: Vickers hardness testing is a widely used method to measure the hardness of materials. It involves indenting a diamond pyramid-shaped indent into the material's surface and measuring the size of the resulting indentation. The Vickers hardness number (HV) is determined based on the diagonal lengths of the indentation. Vickers Pyramid Indenter The Vickers indenter is a diamond pyramid with a square base and an apex angle of 136 degrees. It creates a square-shaped indentation on the material's surface. Test Procedure The Vickers hardness test involves applying a controlled load on the indenter and holding it for a specific time to ensure consistent results. After removing the load, the indentation is measured using a microscope or an optical system. Calculation of Vickers Hardness Number (HV) where F is the applied force (in Newtons), and d is the average of the two diagonals of the indentation (in millimetres). Superficial Rockwell: A more surface-sensitive hardness measurement scale. This technique is useful for samples with hardness gradients at the surface, to test small areas, and for thin samples. Superficial Rockwell hardness scales are N and T for metals and W, X, and Y for nonmetallic materials and coatings. 4. EXPERIMENTAL PROCEDURE 1. Bring the distance between the rollers in the rolling machine to zero by rotating the top wheel. 2. Set the distance between the rollers equal to the current thickness of the sample. Place the sample in the specimen passage and push it toward the rollers using a rod. Retrieve the rolled sample from the other end using tongs. 3. Perform rolling by reducing the distance between the rollers to 0.5mm in 2 passes in one set (0.25mm in each pass) and measure the thickness of the sample using vernier after each set of rolling. Observe the sample after rolling. 4. Similarly, perform three more sets (a total of eight passes). 5. Measure hardness after each set of rolling, for Mild-Steel measure using Vickers hardness tester, and for Brass sample measure using Rockwell Superficial hardness tester. OBSERVATIONS Sample name:__________ No. of passes 2 4 6 8 Initial thickness Initial hardness value=___________ Final thickness True strain Hardness EXERCISE SHEET 1. Calculate the true strain for all sets of passes and PLOT Hardness vs True strain. Fit the curve using suitable fitting parameters and comment on the trend. 2. Describe the differences between hot rolling and cold rolling. Provide examples of products produced using each method. 3. Calculate the draft percentage for a material that undergoes a reduction in thickness from 6.4 mm to 1.2 mm during rolling. 4. Were there any defects seen in the sample after rolling? If yes, name the rolling defect and list out the possible reasons. 5. What did you observe when the Brass sample was rolled by 0.25mm reduction in one pass and 0.1mm reduction in one pass? 6. Why is surface preparation required for the Mild-steel sample and not for the Brass sample? 7. In Vickers hardness testing, the length of diagonals measured were 67.81µm and 66.83µm. and the load applied was 500gf. Calculate the Vickers hardness value.


