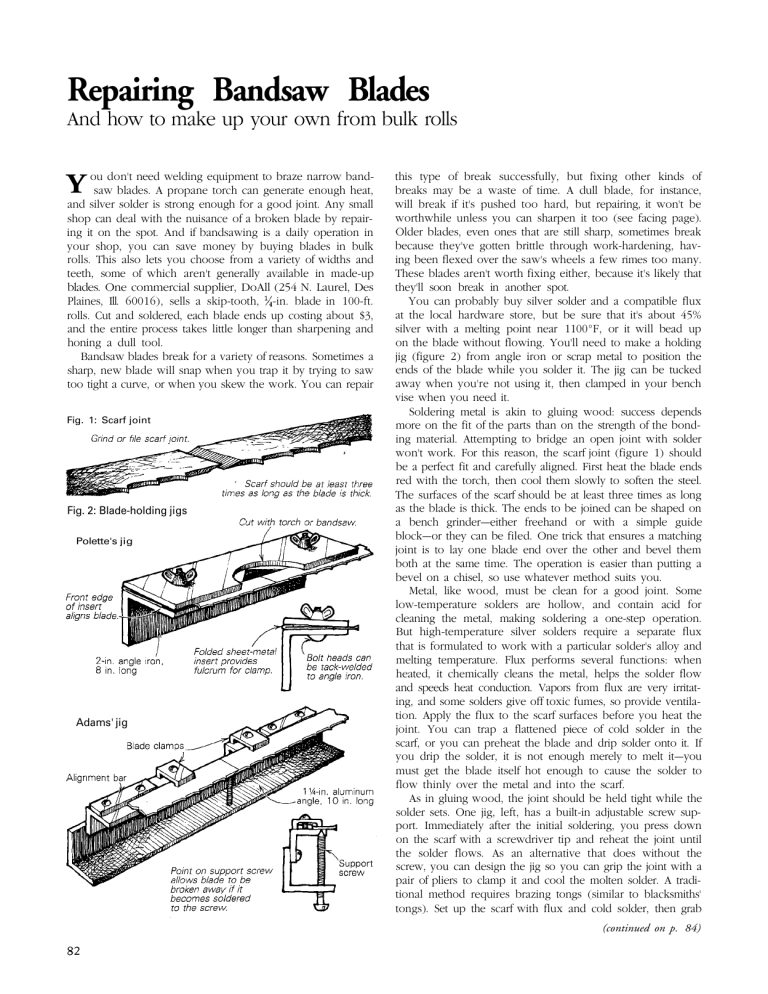
Repairing Bandsaw Blades And how to make up your own from bulk rolls need welding equipment to braze narrow bandY ousawdon't blades. A propane torch can generate enough heat, and silver solder is strong enough for a good joint. Any small shop can deal with the nuisance of a broken blade by repairing it on the spot. And if bandsawing is a daily operation in your shop, you can save money by buying blades in bulk rolls. This also lets you choose from a variety of widths and teeth, some of which aren't generally available in made-up blades. One commercial supplier, DoAll (254 N. Laurel, Des Plaines, Ill. 60016), sells a skip-tooth, -in. blade in 100-ft. rolls. Cut and soldered, each blade ends up costing about $3, and the entire process takes little longer than sharpening and honing a dull tool. Bandsaw blades break for a variety of reasons. Sometimes a sharp, new blade will snap when you trap it by trying to saw too tight a curve, or when you skew the work. You can repair Fig. 1: Scarf joint Fig. 2: Blade-holding jigs Polette's jig Adams' jig this type of break successfully, but fixing other kinds of breaks may be a waste of time. A dull blade, for instance, will break if it's pushed too hard, but repairing, it won't be worthwhile unless you can sharpen it too (see facing page). Older blades, even ones that are still sharp, sometimes break because they've gotten brittle through work-hardening, having been flexed over the saw's wheels a few rimes too many. These blades aren't worth fixing either, because it's likely that they'll soon break in another spot. You can probably buy silver solder and a compatible flux at the local hardware store, but be sure that it's about 45% silver with a melting point near 1100°F, or it will bead up on the blade without flowing. You'll need to make a holding jig (figure 2) from angle iron or scrap metal to position the ends of the blade while you solder it. The jig can be tucked away when you're not using it, then clamped in your bench vise when you need it. Soldering metal is akin to gluing wood: success depends more on the fit of the parts than on the strength of the bonding material. Attempting to bridge an open joint with solder won't work. For this reason, the scarf joint (figure 1) should be a perfect fit and carefully aligned. First heat the blade ends red with the torch, then cool them slowly to soften the steel. The surfaces of the scarf should be at least three times as long as the blade is thick. The ends to be joined can be shaped on a bench grinder—either freehand or with a simple guide block—or they can be filed. One trick that ensures a matching joint is to lay one blade end over the other and bevel them both at the same time. The operation is easier than putting a bevel on a chisel, so use whatever method suits you. Metal, like wood, must be clean for a good joint. Some low-temperature solders are hollow, and contain acid for cleaning the metal, making soldering a one-step operation. But high-temperature silver solders require a separate flux that is formulated to work with a particular solder's alloy and melting temperature. Flux performs several functions: when heated, it chemically cleans the metal, helps the solder flow and speeds heat conduction. Vapors from flux are very irritating, and some solders give off toxic fumes, so provide ventilation. Apply the flux to the scarf surfaces before you heat the joint. You can trap a flattened piece of cold solder in the scarf, or you can preheat the blade and drip solder onto it. If you drip the solder, it is not enough merely to melt it—you must get the blade itself hot enough to cause the solder to flow thinly over the metal and into the scarf. As in gluing wood, the joint should be held tight while the solder sets. One jig, left, has a built-in adjustable screw support. Immediately after the initial soldering, you press down on the scarf with a screwdriver tip and reheat the joint until the solder flows. As an alternative that does without the screw, you can design the jig so you can grip the joint with a pair of pliers to clamp it and cool the molten solder. A traditional method requires brazing tongs (similar to blacksmiths' tongs). Set up the scarf with flux and cold solder, then grab (continued on p. 84) Bandsaw-blade sharpening jig by Robert Meadow Detail A: Ripping blade Detail B: Base and sliding tables actory-fresh bandsaw blades leave a lot to be desired if you want to resaw slices thin enough for veneer or for instruments such as the lutes I build. The teeth are usually uneven, and they are sharpened to points like a crosscut or a combination blade, not square across like a ripping blade, which is the best shape for resawing. I built a sharpening rig that attaches to a standard bench grinder, adjusts to blades of various widths, and sharpens blades for ripping, with a slight negative rake and squarefaced teeth. This not only improves a new blade, it greatly prolongs its life— the blade can be resharpened many times. I can adjust the mechanism and sharpen a 6-ft. blade in about 10 minutes. It will then cut slices that come off the flitch looking like they've already been sanded with 40-grit paper. The setup is made from scrap and a few pieces of hardware. No doubt you can adapt a similar design for a dollar or two. The only real expense is the Nor- bide dressing stick used to shape the stone to match the gullets of the blade. That cost me $27. The rig almost builds itself. First, attach the flat plywood base to your grinder. Next, choose your favorite blade, turn it inside out, and use the Norbide stick to true the grindstone to the shape of one of its gullets, or use the gullet shape shown in the drawing. Then, with the grinder turned off, line up the blade so that the stone fits the gullet—this will show you the height of the post, the angle at which the blade should be clamped and the angle at which the sliding table will have to move. The outside washers on the sliding table act as cams. They can be adjusted to different-width blades, and can also be used to change the sharpening angle slightly. Fine adjustments can be made by loosening the central bolt and shifting the upper layer of the sliding table. At the back of the sliding table, a thumbscrew controls the depth of cut. The steel pawl, tensioned by a rubber band, indexes the blade. It pivots and clicks into each successive gullet as you slide the blade into position to sharpen the next tooth. When you reach the weld in the blade, you can just grind that tooth shorter freehand if the spacing is uneven. If you have a variety of blades with different-size teeth, you'll find it best to have interchangeable grindstones and pawls to fit. I'm delighted with the results this gadget produces and I'm sorry I didn't make it years ago. It has had only one drawback so far: A friend of mine had been complaining that his 14-in. Rockwell bandsaw was too underpowered to resaw 12-in. stock. I made him an offer for the saw, then made the mistake of sharpening a blade for him. He promptly cancelled the sale. Robert Meadow runs The Luthierie, an instrument-making and woodworking school in Saugerties, N.Y. the joint with the red-hot tongs. This activates the flux, melts the solder and clamps the joint all in one step. You can even get away with not clamping by taking advantage of the springiness of the blade. Align the scarf joint in the holder, then bend the ends of the blade until the joint is tight. If you heat and cool the metal too quickly, it will be brit- tle. Manufacturers—who weld blades with an intense shot of electricity—reheat the joint at a lower voltage so it will cool slowly. But if the joint cools too slowly, the metal around the joint will be too soft. Conditions will vary depending on your torch, your solder, how you clamp and the speed at which you work. It's best to make a few practice repairs. Try to bend each joint. If the metal is too hard, it will snap. The remedy is to cool the joint more slowly. The blacksmiths' tongs do this automatically, but cold pliers will probably leave the blade brittle. In this case, heating the joint with the torch until it turns the same blue color as the rest of the blade will temper it to the correct degree of spring. If the metal is too soft, it won't have any spring, and will bend easily. In this case, cool the joint more quickly. After the solder has set, file away any excess from the sides and back of the blade—only the solder in the joint itself contributes to the strength of the bond. This article was compiled from information contributed by three woodworkers: Wash Adams, from Richardson, Tex.; Doug Polette, a professor at Montana State University in Bozeman; and John Leeke, of Sanford, Maine.


