installation and tech. specs.
advertisement

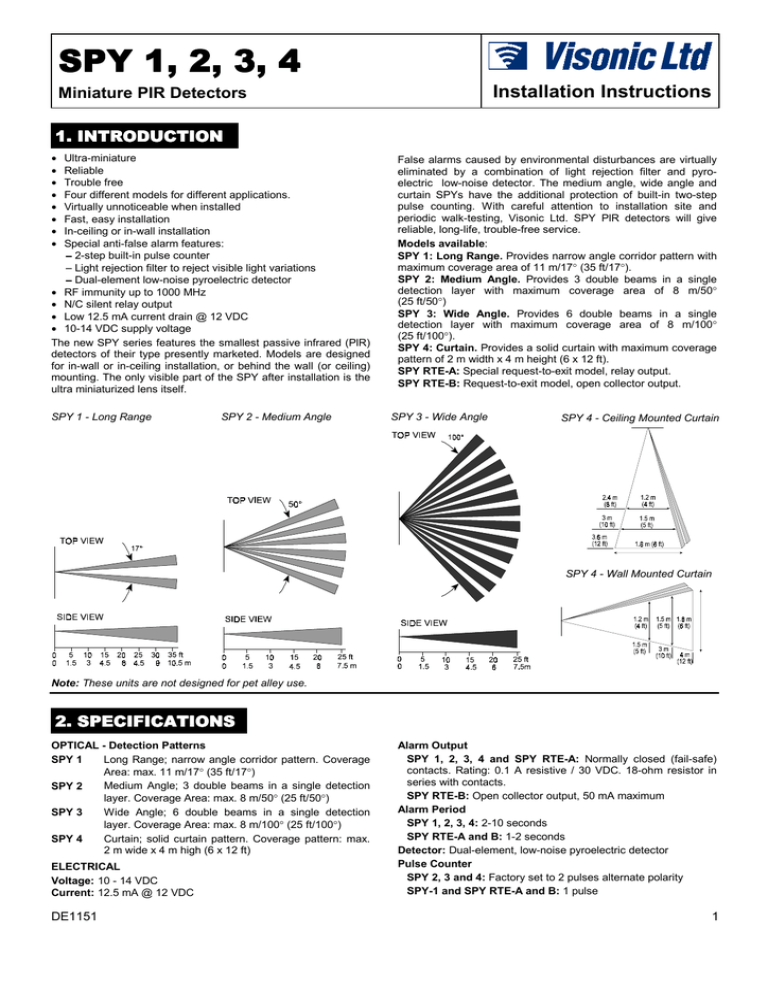
SPY 1, 2, 3, 4 Installation Instructions Miniature PIR Detectors 1. INTRODUCTION • • • • • • • • Ultra-miniature Reliable Trouble free Four different models for different applications. Virtually unnoticeable when installed Fast, easy installation In-ceiling or in-wall installation Special anti-false alarm features: − 2-step built-in pulse counter − Light rejection filter to reject visible light variations − Dual-element low-noise pyroelectric detector • RF immunity up to 1000 MHz • N/C silent relay output • Low 12.5 mA current drain @ 12 VDC • 10-14 VDC supply voltage The new SPY series features the smallest passive infrared (PlR) detectors of their type presently marketed. Models are designed for in-wall or in-ceiling installation, or behind the wall (or ceiling) mounting. The only visible part of the SPY after installation is the ultra miniaturized lens itself. SPY 1 - Long Range SPY 2 - Medium Angle False alarms caused by environmental disturbances are virtually eliminated by a combination of light rejection filter and pyroelectric low-noise detector. The medium angle, wide angle and curtain SPYs have the additional protection of built-in two-step pulse counting. With careful attention to installation site and periodic walk-testing, Visonic Ltd. SPY PlR detectors will give reliable, long-life, trouble-free service. Models available: SPY 1: Long Range. Provides narrow angle corridor pattern with maximum coverage area of 11 m/17° (35 ft/17°). SPY 2: Medium Angle. Provides 3 double beams in a single detection layer with maximum coverage area of 8 m/50° (25 ft/50°) SPY 3: Wide Angle. Provides 6 double beams in a single detection layer with maximum coverage area of 8 m/100° (25 ft/100°). SPY 4: Curtain. Provides a solid curtain with maximum coverage pattern of 2 m width x 4 m height (6 x 12 ft). SPY RTE-A: Special request-to-exit model, relay output. SPY RTE-B: Request-to-exit model, open collector output. SPY 3 - Wide Angle SPY 4 - Ceiling Mounted Curtain SPY 4 - Wall Mounted Curtain Note: These units are not designed for pet alley use. 2. SPECIFICATIONS OPTICAL - Detection Patterns Long Range; narrow angle corridor pattern. Coverage SPY 1 Area: max. 11 m/17° (35 ft/17°) Medium Angle; 3 double beams in a single detection SPY 2 layer. Coverage Area: max. 8 m/50° (25 ft/50°) Wide Angle; 6 double beams in a single detection SPY 3 layer. Coverage Area: max. 8 m/100° (25 ft/100°) Curtain; solid curtain pattern. Coverage pattern: max. SPY 4 2 m wide x 4 m high (6 x 12 ft) ELECTRICAL Voltage: 10 - 14 VDC Current: 12.5 mA @ 12 VDC DE1151 Alarm Output SPY 1, 2, 3, 4 and SPY RTE-A: Normally closed (fail-safe) contacts. Rating: 0.1 A resistive / 30 VDC. 18-ohm resistor in series with contacts. SPY RTE-B: Open collector output, 50 mA maximum Alarm Period SPY 1, 2, 3, 4: 2-10 seconds SPY RTE-A and B: 1-2 seconds Detector: Dual-element, low-noise pyroelectric detector Pulse Counter SPY 2, 3 and 4: Factory set to 2 pulses alternate polarity SPY-1 and SPY RTE-A and B: 1 pulse 1 INSTALLATION Suitable for wall or ceiling installation, and available with both a collar and a front or rear mounting plate, depending on the model. ENVIRONMENTAL Operating Temperature: 0°C to 50°C (32°F to 122°F) Storage Temperature: -20°C to 60°C (-4°F to 140°F) RFl Protection: Greater than 10 V/m to 1000MHz PHYSICAL Dimensions: Diameter: 19 mm (0.75 in) Length: 70 mm (2.75 in) Weight: 30 g (1.1 oz) Color: White 3. INSTALLATION ATTENTION: Whichever model of SPY PIR detector you are installing, please observe the following: 1. Never touch the lens. Whenever you are handling the detector, hold it firmly by the collar, mounting plate, or sides. 2. Splice or solder the wires from the control panel to the SPY detector. Do not attach by only twisting wires together. 3. Insulate each wire individually. Do not permit uninsulated wires to touch each other. 4. During the wiring operation, be careful to place the detector so that the lens is protected. 5. Do not open the detector from either the front (lens end) or the back (wire end). FAILURE TO OBSERVE THESE PROCEDURES MAY INVALIDATE YOUR WARRANTY. 3.1 Choosing the Right Location SPY PIRs can be installed in a wall or ceiling and are available with both a collar and a front/rear mounting plate. Three of the models (SPY 1, 2 and 4) can be installed with the mounting plate in the front or rear of the detector unit, as required. The choice of method depends upon the type of wall or ceiling and the degree to which the detector should be unnoticed. • SPY Models SPY 1, SPY 2 and SPY 4 are provided with both a collar and a front/rear mounting plate. • SPY 3 is provided with a fixed mounting plate for frontof-the-wall installation. 1. Select the mounting location so that the expected motion of an intruder will cross the coverage pattern. 2. When wall mounted, the SPY should be installed parallel to the floor for maximum coverage. Recommended mounting height: between 80 cm and 1.35 m (2.5 and 4.5 ft). 3. The curtain detector SPY 4 can be mounted in the ceiling or in the wall. When mounting in the wall it should be installed parallel to the floor. Maximum ceiling height: 4 m (12 ft). 4. Always install the unit into a firm and stable surface, and assure that there are no moving objects within its field of view. 3. 4. 5. 6. the detector and adjust its position so that the front of the detector and the collar are aligned (Fig. 1). Fish the wiring from the control panel through the hole and connect to the detector unit as described under WIRING. Feed the wiring into the Figure 1 - Installation with prepared hole. Collar, Models SPY 1, SPY 2 Orient the detector unit so that the mark on the front faces up (Fig. 1). With your fingers on the outer edge of the collar, push the detector unit, rear end first, into the hole until the retaining collar is seated securely. 3.3 Front-of-Wall Installation (MODELS SPY 1 and 2) 1. Drill a 24 mm (15/16 in) hole in the wall. 2. Hold the detector unit by the sides and put it, lens end first, into the mounting plate (Fig. 2A). 3. Adjust the detector unit in the mounting plate so that the front of the detector extends a minimum distance from the wall. 4. Place the locking ring over the rear end of the detector unit and move it over the tabs of the locking plate until the detector unit is absolutely stable in the mounting plate (Fig. 2A). 5. Fish the wiring from the control panel through the hole and connect to the detector unit as described in WIRING. 6. Feed the wiring into the prepared hole. 7. Prepare the mounting plate screw holes on a horizontal line, making sure that the mark on the front of the detector unit is facing up (Fig. 2B). 8. Insert the detector unit, rear end first, into the hole with the mark on the front facing up (Fig. 2B) and secure the mounting plate to the wall with the screws provided. Remember: Passive infrared detectors are sensitive to changes in infrared energy caused by an object moving across the unit's field of view. Detection depends on the difference between the amount of infrared energy transmitted by the moving object and the temperature of the background. It is therefore recommended that the detector be aimed toward the coolest place in the area to be protected, in order to obtain maximum sensitivity in installations where high ambient temperatures are expected. Do not aim the detector toward areas containing hot water pipes or windows, which might cause problems in the operational efficiency of PIR detectors. BEFORE YOU START: Do not touch the lens. Solder or splice wire connections. Insulate wires individually so that they cannot touch. 3.2 Installation with Collar (MODELS SPY 1 and 2) 1. Drill a 22 mm (7/8 in.) hole in the wall. 2. Hold the detector unit by the sides. Carefully put the collar on 2 Figure 2 (A & B) - Front of Wall Installation, Models SPY 1 and 2 3.4 Back-of-Wall Installation (Models SPY 007.1, 007.2) 1. Drill a 19 mm (3/4 in.) hole in the wall. 2. Hold the detector unit by the sides and put it, lens end first, into the mounting plate (Fig. 3A). 3. Adjust the detector unit in the mounting plate according to the thickness of the wall. When installed, the lens end of the detector should extend about 1 mm (0.05 in.) from the wall. 4. Place the locking ring over the rear end of the detector unit and move it over the tabs of the locking plate until the detector unit is absolutely stable in the mounting plate (Fig. 3A). DE1151 5. Connect the detector unit and control panel wires as described in WIRING. 6. Prepare the mounting plate screw holes on a horizontal line, making sure that the mark on the front of the detector unit faces up (Fig. 3B). 7. Insert the detector unit, front end first, into the hole with the mark on the front facing up (Fig. 3B) and secure the mounting plate to the back of the wall with the screws provided. Figure 3 (A & B) - Back of Wall Installation, Models SPY 1 and 2 3.5 Installation of Model SPY 3 1. Drill a 3/4 in. (19 mm) hole in the wall. 2. Fish the wiring from the control panel through the hole and connect them to the detector unit as described in WIRING. 3. Feed the wiring into the prepared hole. 4. Prepare the mounting plate screw holes on a horizontal line, making sure that the mark on the front of the detector unit faces up (Fig. 4). Figure 5A - Model SPY 4 Installation with Collar Figure 5B - Model SPY 4 Installation with Mounting Plate 3.7 In-Wall Installation of Curtain Model SPY 4 Refer to curtain wall mounted coverage pattern of Model SPY 4. 1. Follow the appropriate instructions above for installation with collar or mounting plate. 2. Install the detector unit perpendicular to the floor. Recommended mounting height: between 80 cm and 1.35 m (2.5 and 4.5 ft). 3. Position the detector unit with the mark on the front facing up. 3.8 Wiring Caution: Do not apply power until all connections are made. A. SPY 1 through 4 Figure 4. Model SPY 3 Installation 5. Holding the detector unit by the mounting plate, insert it, rear end first, into the hole, with the mark on the front facing up (Fig. 4). 6. Secure the mounting plate to the wall with the screws provided. 3.6 Ceiling Installation of Curtain Model SPY 4 Refer to the ceiling-mounted coverage pattern of SPY 4. Installation with Collar: Select a location so the curtain pattern lies across the anticipated direction of motion (Fig. 5A). 1. Refer to Installation with Collar, Models SPY 1 and 2. 2. Replace Step 6 with the following: Step 5 - Orient the detector unit so that the mark on the unit is perpendicular to the direction of motion (Fig. 5A). Installation with Mounting Plate: Select a location that will place the curtain pattern in the direction of motion (Fig. 5B). 1. Refer to Back of Wall Installation, 2. Replace Step 6 with the following: Step 6 - Prepare the mounting plate screw holes so they are in line with the anticipated direction of motion (Fig. 5B). Step 7 - Install the detector unit, front end first, into the hole with the mark on the front perpendicular to the path of travel (Fig. 5B) and secure the mounting plate to the back of the ceiling with the screws provided. DE1151 Red to +12 VDC White Common (dry contact) Black to −12 VDC Green Normally Closed (dry contact) 1. Connect wires by splicing or soldering. Avoid any possible contact between the connected wires by insulating them separately. 2. Use #22 AWG wire or larger. 3. Connect the 12 VDC (+) and (−) wires to a 10 to 14 Volt DC power source and check for correct polarity. The power source should have a back-up battery capable of supplying power for at least four hours of operation during power failure. Current drain of each sensor is approximately 12.5 mA @ 12 Volts DC. 4. Connection of relay to control panel: Connect the White and Green wires to a normally closed burglary protection zone of the control panel. Relay contacts will open when motion is detected or during power loss. The relay contacts are rated at 100 mA, 30 VDC maximum (resistive load only). An 18 ohm resistor is internally connected in series with the relay contacts. B. SPY RTE-A and B Wire the SPY RTE models as shown in Figure 6. Figure 6. SPY RTE Wiring 3.9 Walk Testing Apply 12 VDC power and allow 5 minutes for the unit to warm up and stabilize before testing. 3 Walk-Test the coverage area by walking slowly across the field of view, first one way and then the other, while monitoring the N/C relay contacts with an ohmmeter. Alternatively, place the control panel in the test mode (if possible). The relay contacts will open whenever you walk across the PIR detection pattern. This will be indicated either on the ohmmeter or by whatever signal is designated through the control panel. Allow 10 seconds between each test for the unit to stabilize. NOTE: The range and coverage area should be checked at least once a year. To assure proper continuous functioning, the user should be instructed to perform a walk test at the far end of the coverage pattern to assure an alarm signal prior to each time the alarm system is armed. WARRANTY Visonic Ltd. and/or its subsidiaries and its affiliates ("the Manufacturer") warrants its products hereinafter referred to as "the Product" or "Products" to be in conformance with its own plans and specifications and to be free of defects in materials and workmanship under normal use and service for a period of twelve months from the date of shipment by the Manufacturer. The Manufacturer's obligations shall be limited within the warranty period, at its option, to repair or replace the product or any part thereof. The Manufacturer shall not be responsible for dismantling and/or reinstallation charges. To exercise the warranty the product must be returned to the Manufacturer freight prepaid and insured. This warranty does not apply in the following cases: improper installation, misuse, failure to follow installation and operating instructions, alteration, abuse, accident or tampering, and repair by anyone other than the Manufacturer. This warranty is exclusive and expressly in lieu of all other warranties, obligations or liabilities, whether written, oral, express or implied, including any warranty of merchantability or fitness for a particular purpose, or otherwise. In no case shall the Manufacturer be liable to anyone for any consequential or incidental damages for breach of this warranty or any other warranties whatsoever, as aforesaid. This warranty shall not be modified, varied or extended, and the Manufacturer does not authorize any person to act on its behalf in the modification, variation or extension of this warranty. This warranty shall apply to the Product only. All products, accessories or attachments of others used in conjunction with the Product, including batteries, shall be covered solely by their own warranty, if any. The Manufacturer shall not be liable for any damage or loss whatsoever, whether directly, indirectly, incidentally, consequentially or otherwise, caused by the malfunction of the Product due to products, accessories, or attachments of others, including batteries, used in conjunction with the Products. The Manufacturer does not represent that its Product may not be compromised and/or circumvented, or that the Product will prevent any death, personal and/or bodily injury and/or damage to property resulting from burglary, robbery, fire or otherwise, or that the Product will in all cases provide adequate warning or protection. User understands that a properly installed and maintained alarm may only reduce the risk of events such as burglary, robbery, and fire without warning, but it is not insurance or a guarantee that such will not occur or that there will be no death, personal damage and/or damage to property as a result. The Manufacturer shall have no liability for any death, personal and/or bodily injury and/or damage to property or other loss whether direct, indirect, incidental, consequential or otherwise, based on a claim that the Product failed to function. However, if the Manufacturer is held liable, whether directly or indirectly, for any loss or damage arising under this limited warranty or otherwise, regardless of cause or origin, the Manufacturer's maximum liability shall not in any case exceed the purchase price of the Product, which shall be fixed as liquidated damages and not as a penalty, and shall be the complete and exclusive remedy against the Manufacturer. Warning: The user should follow the installation and operation instructions and among other things test the Product and the whole system at least once a week. For various reasons, including, but not limited to, changes in environmental conditions, electric or electronic disruptions and tampering, the Product may not perform as expected. The user is advised to take all necessary precautions for his/her safety and the protection of his/her property. 6/91 VISONIC LTD. (ISRAEL): P.O.B 22020 TEL-AVIV 61220 ISRAEL. PHONE: (972-3) 645-6789, FAX: (972-3) 645-6788 VISONIC INC. (U.S.A.): 10 NORTHWOOD DRIVE, BLOOMFIELD CT. 06002-1911. PHONE: (860) 243-0833, (800) 223-0020 FAX: (860) 242-8094 VISONIC LTD. (UK): UNIT 1, STRATTON PARK, DUNTON LANE, BIGGLESWADE, BEDS. SG18 8QS. PHONE: (01767) 600857 FAX: (01767) 601098 VISONIC LTD. 1998 SPY D-1151-0 NEW : DE1151- (REV. 3 , 4/98) 4 DE1151


