Lesson 1
advertisement
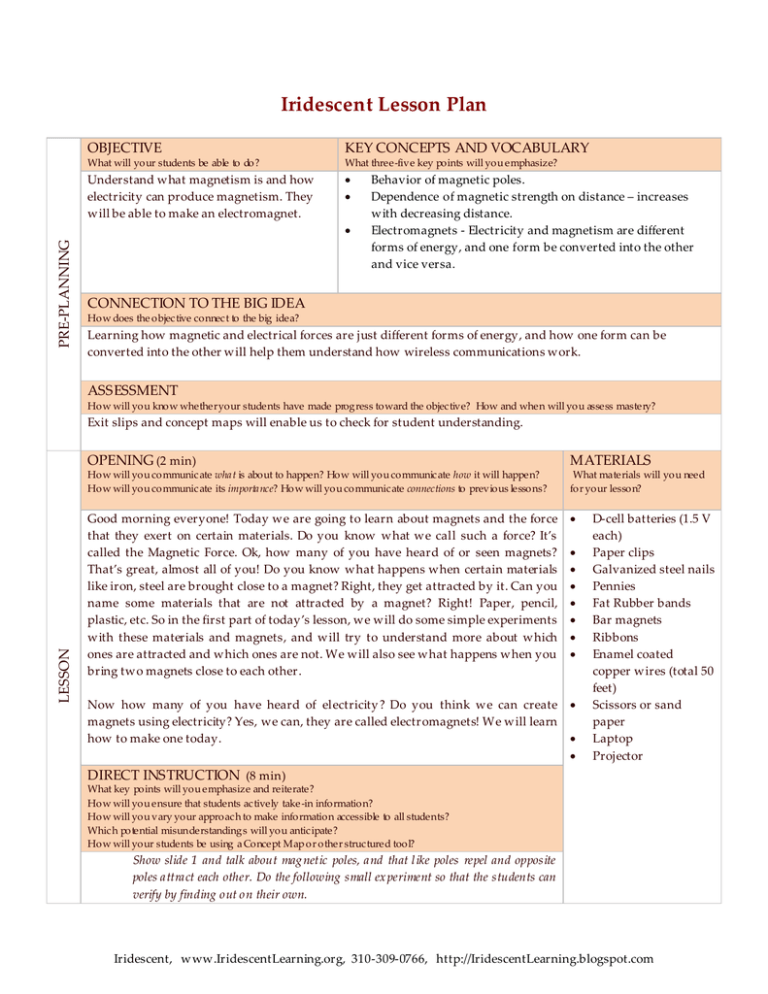
Iridescent Lesson Plan OBJECTIVE KEY CONCEPTS AND VOCABULARY What will your students be able to do? What three-five key points will you emphasize? Understand what magnetism is and how electricity can produce magnetism. They will be able to make an electromagnet. PRE-PLANNING Behavior of magnetic poles. Dependence of magnetic strength on distance – increases with decreasing distance. Electromagnets - Electricity and magnetism are different forms of energy, and one form be converted into the other and vice versa. CONNECTION TO THE BIG IDEA How does the objective connect to the big idea? Learning how magnetic and electrical forces are just different forms of energy, and how one form can be converted into the other will help them understand how wireless communications work. ASSESSMENT How will you know whether your students have made progress toward the objective? How and when will you assess mastery? LESSON Exit slips and concept maps will enable us to check for student understanding. OPENING (2 min) MATERIALS How will you communicate what is about to happen? How will you communicate how it will happen? How will you communicate its importance? How will you communicate connections to previous lessons? What materials will you need for your lesson? Good morning everyone! Today we are going to learn about magnets and the force that they exert on certain materials. Do you know what we call such a force? It’s called the Magnetic Force. Ok, how many of you have heard of or seen magnets? That’s great, almost all of you! Do you know what happens when certain materials like iron, steel are brought close to a magnet? Right, they get attracted by it. Can you name some materials that are not attracted by a magnet? Right! Paper, pencil, plastic, etc. So in the first part of today’s lesson, we will do some simple experiments with these materials and magnets, and will try to understand more about which ones are attracted and which ones are not. We will also see what happens when you bring two magnets close to each other . Now how many of you have heard of electricity ? Do you think we can create magnets using electricity? Yes, we can, they are called electromagnets! We will learn how to make one today. D-cell batteries (1.5 V each) Paper clips Galvanized steel nails Pennies Fat Rubber bands Bar magnets Ribbons Enamel coated copper wires (total 50 feet) Scissors or sand paper Laptop Projector DIRECT INSTRUCTION (8 min) What key points will you emphasize and reiterate? How will you ensure that students actively take -in information? How will you vary your approach to make information accessible to all students? Whic h potential misunderstandings will you anticipate? How will your students be using a Concept Map or other structured tool? Show slide 1 and talk about mag netic poles, and that l ike poles repel and opposite poles attract each other. Do the following small ex periment so that the students can verify by finding out on their own. Iridescent, www.IridescentLearning.org, 310-309-0766, http://IridescentLearning.blogspot.com 1. Small experiment 1: (Distribute two bar magnets to everyone). The two ends of a magnet are called magnetic poles. Now bring the magnets close to each other? Do you feel a force? It the force pushing the magnets away from each other or pulling them together? Does the force become stronger when the magnets are closer? Write down what you observed in the Observation Box of your concept map. Show slide 2 and 3, and talk about the magnetic f ield that exists around a magnet. Also talk about what happens when you cut a bar mag net into two pieces. Give the example of an earthworm. Do the following small experiment so that the students can f ind out which materials are attracted by magnets and which are not. 2. Small experiment 2: (Distribute a penny, a paper clip, a piece of paper, a plastic bottle cap, and a galvanized steel nail to everyone.) Bring each one of these materials close to the magnet and see if they are attracted by it. Write down in the Observation Box which ones are attracted by the magnet and which ones are not. Do you know what these materials are made of? The penny has Copper, the paper clip has Iron, and the galvanized steel nail has Zinc. Show slide 4 and ask them to place the bar magnet on the table and bring the nail very slowly close to the magnet. Ask them to w rite their observation as to when the force is the strongest. Show slide 5 and talk about the Earth being a huge mag net by itself. Briefly ex plain the pictures showing the polar l ights and how they are formed Do the following simple ex periment so that the students can verify that the Earth is a magnet. 3. Small experiment 2: (Distribute a ribbon to everyone.) Tie one end of the ribbon to the middle of on e of the bar magnets and hang it by holding the other end. Let the magnet stabilize. Does it point at a particular direction? What happens when you move your hand around, does the magnet come back and keep pointing to the same direction as before? Write down what you observed in the Observation Box. Do you know why that happens? It’s because Earth is a HUGE magnet too, and it is attracting our small bar magnet. Can you name another device that has a similar behavior? That’s right, it’s the compass! Show slide 6 and g ive them the idea that other planets and stars also have mag netic properties just like the Earth Now that we know a little bit more about magnetism, how many of you think that electricity can be used to produce magnetism? Show slide 7 and give them the idea that electricity and magnetism are different Iridescent, www.IridescentLearning.org, 310-309-0766, http://IridescentLearning.blogspot.com forms of energy and one form can be converted into another. Prepare for the experiment to make an electromagnet, which is the Beak man’s electric motor. Talk a little bit about electromagnets: An electromagnet is simply a coil of wire wound around an iron core or simply an air core. When connected to a DC voltage or current source, the electromagnet becomes energized, creating a magnetic field just like a permanent magnet. The magnetic field strength is proportional to the magnitude of the current flowing in the wire. The poles of the electromagnet are determined by the direction the current. The north pole of the electromagnet is determined by using your right hand. Wrap your fingers around the coil in the same direction as the current is flowing. The direction your thumb is pointing is the direction of the magnetic field, so north would come out of the electromagnet in the direction of your thumb. (http://www.coolmagnetman.com/magelect.htm) DIRECTIONS FOR EXPERIMENT(5 min) How will you c learly state and model behavioral expectations? How will you give 3-5 clear directions for the activity and model them? Now we are going to produce magnetism from electricity, and we are going to make an electric motor called the Beakman’s Motor. Show them the demo model and how the coil is rotating. (Distribute a rubber band to everyone. They al ready have all the other materials that are needed.) You can see this model that I have here and make according to it. Give further step by step instructions. EXPERIMENT (40-60 min) What kind of ac tivity can be performed by students that directly relates to your objective and the big idea? How will you engage students and capture their interest to explore the concept? What exac tly will your students be doing during the activity? What will you be doing? How will your students be using a Concept Map or other structured tool? Participants make Beakman’s electric motor that converts electricity into magnetism and produces an electromagnet. This will help them understand that electricity and magnetism are just different forms of energy and can be converted into one another. Ask them if they know of any instruments or machines that use this conversion and make use in daily life? Experiment steps: 1. Take the D-cell and wrap the copper wire around it about 7-10 times making a circular coil. Leave about 2-3 inches on both ends of the wire. 2. Take the two paper clips and build two frame (if needed show slide 10 for a picture) 3. Attach the two frames on the positive and negative sides of the D-cell and wrap a rubber band around it so that they are held in place. 4. Take the coil and scrape off the enamel coating on both ends about half the diameter. This is the most crucial step, show the diagram on slide 11 if needed. 5. Place the bar magnet on the battery. Ask them about the direction of the Iridescent, www.IridescentLearning.org, 310-309-0766, http://IridescentLearning.blogspot.com 6. 7. magnetic field that exists due to the bar magnet. The bar magnet should be placed such that the magnetic flux and the two frames made by the paper clips lie on approximately the same horizontal place. Place the coil on the frames. It starts rotating. Ask them the reason. Explain the working on the board. REFLECTION (5 min) How will students summarize what they learned? How will students be asked to state the significance of what they learned? How will students relate what they learned back to your objective and big idea using key vocabulary? Exit Slip questions: 1. What is the behavior of magnetic poles when two magnets are brought close to each other? 2. Why does the coil in the Beakman’s motor rotate? 3. Do you think if we use a m ore powerful battery the coil will rotate faster? 4. What concept are you proud of learning today? Iridescent, www.IridescentLearning.org, 310-309-0766, http://IridescentLearning.blogspot.com
