Jandy® Pro Series Stealth™ Pumps Lid Assembly Replacement Kit
advertisement

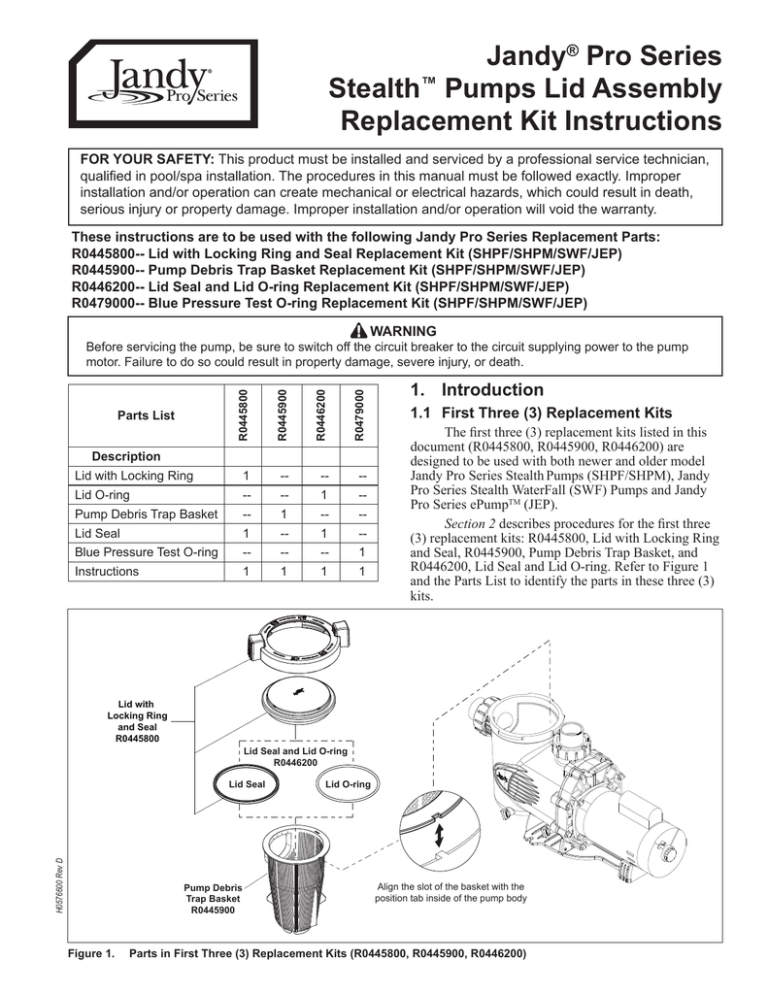
Jandy® Pro Series Stealth™ Pumps Lid Assembly Replacement Kit Instructions FOR YOUR SAFETY: This product must be installed and serviced by a professional service technician, qualified in pool/spa installation. The procedures in this manual must be followed exactly. Improper installation and/or operation can create mechanical or electrical hazards, which could result in death, serious injury or property damage. Improper installation and/or operation will void the warranty. These instructions are to be used with the following Jandy Pro Series Replacement Parts: R0445800-- Lid with Locking Ring and Seal Replacement Kit (SHPF/SHPM/SWF/JEP) R0445900-- Pump Debris Trap Basket Replacement Kit (SHPF/SHPM/SWF/JEP) R0446200-- Lid Seal and Lid O-ring Replacement Kit (SHPF/SHPM/SWF/JEP) R0479000-- Blue Pressure Test O-ring Replacement Kit (SHPF/SHPM/SWF/JEP) WARNING R0445800 R0445900 R0446200 R0479000 Before servicing the pump, be sure to switch off the circuit breaker to the circuit supplying power to the pump motor. Failure to do so could result in property damage, severe injury, or death. Lid with Locking Ring 1 -- -- -- Lid O-ring -- -- 1 -- Pump Debris Trap Basket -- 1 -- -- Parts List Description Lid Seal 1 -- 1 -- Blue Pressure Test O-ring -- -- -- 1 Instructions 1 1 1 1 Lid with Locking Ring and Seal R0445800 1.1 First Three (3) Replacement Kits The first three (3) replacement kits listed in this document (R0445800, R0445900, R0446200) are designed to be used with both newer and older model Jandy Pro Series Stealth Pumps (SHPF/SHPM), Jandy Pro Series Stealth WaterFall (SWF) Pumps and Jandy Pro Series ePumpTM (JEP). Section 2 describes procedures for the first three (3) replacement kits: R0445800, Lid with Locking Ring and Seal, R0445900, Pump Debris Trap Basket, and R0446200, Lid Seal and Lid O-ring. Refer to Figure 1 and the Parts List to identify the parts in these three (3) kits. Lid Seal and Lid O-ring R0446200 Lid Seal H0576600 Rev D 1.Introduction Pump Debris Trap Basket R0445900 Lid O-ring Align the slot of the basket with the position tab inside of the pump body Figure 1. Parts in First Three (3) Replacement Kits (R0445800, R0445900, R0446200) Page 2 Jandy® Pro Series Stealth™ Pumps Lid Assembly | Replacement Kit Instructions 1.2 Blue Pressure Test O-ring Replacement Kit Section 3, Blue Pressure Test O-Ring Replacement Procedures, describes the procedures for replacing a blue pressure test o-ring (R0479000). The blue pressure test o-ring is only used with newer model Jandy Pro Series ePumpTM (JEP), Jandy Pro Series Stealth™ Pumps (SHPF/SHPM) and Jandy Pro Series Stealth WaterFall (SWF) Pumps. These are pumps with serial number revisions “O” through current. The blue pressure test o-ring is used one time only, during pressure testing. If you are replacing a blue pressure test o-ring, skip Section 2, Procedures for First Three Replacement Kits, and go to Section 3, Blue Pressure Test O-ring Replacement Procedures. 3. Close all necessary isolation valves to prevent pool water from reaching the pump. 4. Following the markings on the lid’s locking ring, turn the ring counter-clockwise until the ‘START’ markings align with the ports. 5. Carefully remove the lid with the locking ring. 6. Depending on the model of the pump lid, remove either the lid o-ring or the lid seal. NOTE Section 2.2, Replacing Lid Seal or Lid O-Ring (Kit R0446200), explains how to determine whether your model uses a lid o-ring or a lid seal. 7. 2. Procedures for First Three (3) Replacement Kits WARNING Trapped air in the system can cause the filter lid to be blown off, which can result in death, serious personal injury, or property damage. Be sure all the air is removed from the filter before operating. Follow these instructions for using the first three (3) replacement kits listed in this document (R0445800, R0445900, and R0446200). These instructions must be followed exactly. Read through the instructions completely before starting the procedure. 2.1 Opening Pump 1. Turn off the pump. 2. Switch off the circuit breaker to the pump motor. WARNING Turn off the pump and the main breaker in the pump electrical circuit before starting the procedure. Failure to comply may cause a shock hazard, which could result in severe personal injury or death. WARNING Due to the potential risk of fire, electric shock, or injuries to persons, Jandy Pumps must be installed in accordance with the National Electrical Code® (NEC®), in the USA, or the Canadian Electrical Code (CEC) in Canada. All applicable local codes must also be followed. The NEC may be obtained by contacting the National Fire Protection Association (NFPA) at 1-800-344-3555 or 1-617-770-3000. Check for any debris in the lid o-ring or lid seal groove and on the sealing surface on the pump housing. Debris left on lid sealing surfaces may cause air leaks into the system. 8. Go to the appropriate section: 2.2 Replacing Lid Seal or Lid O-ring (Kit R0446200) 2.3 Replacing Pump Debris Trap Basket (Kit R0445900) 2.4 Replacing Lid with Locking Ring and Seal (Kit R0445800) Page 3 Jandy® Pro Series Stealth™ Pumps Lid Assembly | Replacement Kit Instructions 2.2 Replacing Lid Seal or Lid O-ring (Kit R0446200) 2. a. Comply with the warnings and follow steps 1-7 in Section 2.1, Opening Pump. WARNING Trapped air in the system can cause the filter lid to be blown off, which can result in death, serious personal injury, or property damage. Be sure all the air is removed from the filter before operating. The lid seal is used with newer model pump lids, and the lid o-ring is used with older model pump lids. b. Clean the lid o-ring groove. c. Place the new o-ring into the lid o-ring groove. Skip step 3 and go to step 4. 3. Replace the lid seal. a. Comply with the warnings and follow steps 1-7 in Section 2.1, Opening Pump. NOTE The lid seal has a three-lobed cross section and the lid o-ring has a round cross section. 1. Replace the lid o-ring. b. Clean the lid groove. c. Note that one side of the seal has two (2) ribs and the other side has one (1) rib. Insert the new seal into the lid groove, placing the side with two (2) ribs into the groove. See Figure 4. Determine whether your pump lid is a newer or older model by locating the lid part number. a. If the lid part number is on the bottom of the lid (see Figure 2), your pump lid is an older model and uses a lid o-ring. Go to step 2. Cross Section of Lid Seal Bottom View of Lid (Older Models) Place side with two ribs into lid groove. Figure 4. Cross Section of Lid Seal If the lid part number is on a raised ridge on the bottom of the lid, use a lid o-ring. Figure 2. Older Model Uses Lid O-ring b. If the lid part number is on the top of the lid (see Figure 3), your pump lid is a newer model and uses a lid seal. Go to step 3. Top View of Lid (Newer Model) If the lid part number is on the top of the lid, use a lid seal. Figure 3. Newer Model Uses Lid Seal 4. Go to the appropriate section: 2.3 Replacing Pump Debris Trap Basket (Kit R0445900) 2.4 Replacing Lid with Locking Ring and Seal (Kit R0445800) 2.5 Completing Procedures for First Three (3) Replacement Kits Page 4 Jandy® Pro Series Stealth™ Pumps Lid Assembly | Replacement Kit Instructions 2.3 Replacing Pump Debris Trap Basket (Kit R0445900) WARNING 2.5 Completing Procedures for First Three Replacement Kits 1. If necessary, install any remaining parts. Follow the proper procedures, which are described in Section 2.2, step 2 (lid o-ring), Section 2.2, step 3, (lid seal), Section 2.3, (pump debris trap basket) and Section 2.4 (lid with locking ring). 2. Return the valves to the proper position for normal operation. 3. Open the filter pressure release valve in order to bleed air. Trapped air in the system can cause the filter lid to be blown off, which can result in death, serious personal injury, or property damage. Be sure all the air is removed from the filter before operating. 1. Comply with the warnings and follow steps 1-7 in Section 2.1, Opening Pump. 2. Lift the pump debris trap basket out of the pump. 3. Before installing the new debris trap basket, remove all debris from the pump. 4. Place the new pump debris trap basket into the pump. Make sure that the slot of the basket is aligned with the positioning tab inside the pump housing. (See Figure 1.) If aligned properly, the basket will drop easily into place. Do not force it into place. CAUTION A misaligned basket may cause the lid to be improperly seated, which could cause air leaks in the system. 5. Go to the appropriate section: 2.4 Replacing Lid with Locking Ring and Seal (Kit R0445800) 2.5 Completing Procedures for First Three (3) Replacement Kits 2.4 Replacing Lid with Locking Ring and Seal (Kit R0445800) WARNING Trapped air in the system can cause the filter lid to be blown off, which can result in death, serious personal injury, or property damage. Be sure all the air is removed from the filter before operating. 1. Comply with the warnings and follow steps 1-5 in Section 2.1, Opening Pump. 2. Place the lid with the locking ring onto the pump housing. 3. Following the markings on the locking ring, align the ‘START’ marking with the ports and turn the ring clockwise until the ‘LOCKED’ marking aligns with the ports. Do not tighten past the ‘LOCKED’ marking. WARNING Trapped air in the system can cause the filter lid to be blown off, which can result in death, serious personal injury, or property damage. Be sure all the air is removed from the filter when starting the system. 4. Once all the air has been bled from the filter, close the filter pressure release valve assembly. 5. Turn on the power to the pump at the circuit breaker. 6. Turn on the pump. 7. Check to see if the pump is operating properly, with no lid leaks. 8. If there are lid leaks, repeat the steps in Section 2, Parts Replacement Procedure. For technical support, call 1.800.822.7933. Jandy® Pro Series Stealth™ Pumps Lid Assembly | Replacement Kit Instructions 3. Blue Pressure Test O-ring Replacement Procedures The blue pressure test o-ring is only available in Jandy Pro Series ePumpTM (JEP), Jandy Pro Series Stealth™ Pumps (SHPF/SHPM) and Jandy Pro Series Stealth WaterFall Pumps (SWF) with serial number revisions “O” through current. Page 5 Lid with Locking Ring Refer to Figure 5 for an exploded view of this pump, showing the location of the blue pressure test o-ring. Refer to Figure 6 for a view of the blue pressure test o-ring in the lid assembly. Seal Blue Pressure Test O-ring Figure 6: Blue Pressure Test O-ring in Lid Assembly The blue pressure test o-ring is a temporary part, designed to be used only during pressure testing. When you open the pump lid after the pressure test, it will automatically fall out. Lid with Locking Ring and Seal R0445800 If you open the pump lid before conducting the pressure test, the blue pressure test o-ring will probably fall out. If this happens, you will need to install it on the lid again before conducting pressure testing. There is a risk of damage to the blue pressure test o-ring during re-installation. If it is damaged, you will need to order a new blue pressure test o-ring before you begin pressure testing. Blue Pressure Test O-ring R0479000 FMA58D Pump Debris Trap Basket (Inside Pump) R0445900 Figure 5. Exploded View of Pump with Blue Pressure Test O-ring These instructions describe the proper procedures for replacing, using, and disposing of the blue pressure test o-ring. These instructions must be followed exactly. Read through them completely before starting the procedure. Page 6 Jandy® Pro Series Stealth™ Pumps Lid Assembly | Replacement Kit Instructions 3.1 Opening Pump 1. Make sure the pump is turned off. 2. Make sure the switch to the circuit breaker that powers the pump motor is turned off. Upside Down View of Bottom of Lid WARNING Turn off the pump and the main breaker in the pump electrical circuit before starting the procedure. Failure to comply may cause a shock hazard, resulting in severe personal injury or death. WARNING Due to the potential risk of fire, electric shock, or injuries to persons, Jandy Pumps must be installed in accordance with the National Electrical Code® (NEC®), in the USA, or the Canadian Electrical Code (CEC) in Canada. All applicable local codes must also be followed. The NEC may be obtained by contacting the National Fire Protection Association (NFPA) at 1-800-344-3555 or 1-617-770-3000. 3. Make sure all necessary isolation valves are closed to prevent pool water from reaching the pump. 4. Following the markings on the locking ring, turn the ring counter-clockwise until the ‘START’ markings align with the ports. 5. Carefully remove the lid with locking ring. 3.2 Replacing Blue Pressure Test O-ring 1. Turn the lid with locking ring upside down and place it on a stable surface. 2. Place the blue pressure test o-ring on the step located ¼" from the bottom of the lid. See Figure 7. 3. Make sure that the o-ring is properly seated. It helps to “place” the o-ring on the step rather than to “roll” it on. If it is rolled on, it may roll off again. NOTE The blue pressure test o-ring sits approximately ¼" away from the seal. See Figure 7. Groove where Seal is Seated Step where O-ring is Seated Figure 7: Placement of Blue Pressure Test O-ring 4. Carefully install the lid, making sure that the blue pressure test o-ring sits in the housing without “binding” or “rolling” off. 5. Following the markings on the locking ring, align ‘START’ markings with the ports and turn clockwise until ‘LOCKED’ markings align with the ports. Do not tighten past the ‘LOCKED’ marking. 3.3 Conducting Pressure Test For instructions on conducting a pressure test, refer to Section 3.3, Pressure Testing, in the following Installation and Operation Manuals: - H0573800, for the Stealth™ Series - H0321400, for the WaterFall Series - H0311700, for the ePump™ Series After completing the pressure test, observe the system for leaks and/or pressure decay. If there are lid leaks, repeat the steps in Section 3.1, Opening Pump, and Section 3.2, Replacing Blue Pressure Test O-Ring. For technical support, call 1.800.822.7933. Jandy® Pro Series Stealth™ Pumps Lid Assembly | Replacement Kit Instructions 3.4 Discarding Blue Pressure Test O-ring 1. Turn off the pump. 2. Switch off the circuit breaker to the pump motor. WARNING Turn off the pump and the main breaker in the pump electrical circuit before starting the procedure. Failure to comply may cause a shock hazard, resulting in severe personal injury or death. WARNING Due to the potential risk of fire, electric shock, or injuries to persons, Jandy Pumps must be installed in accordance with the National Electrical Code® (NEC®), in the USA, or the Canadian Electrical Code (CEC) in Canada. All applicable local codes must also be followed. The NEC may be obtained by contacting the National Fire Protection Association (NFPA) at 1-800-344-3555 or 1-617-770-3000. 3. Close all necessary isolation valves to prevent pool water from reaching the pump. 4. Following the markings on the locking ring, turn the ring counter-clockwise until the ‘START’ markings align with the ports. 5. Carefully remove the lid with locking ring. As you open it, the blue pressure test o-ring will drop off. 6. Discard the blue pressure test o-ring. 7. Replace the lid and turn it clockwise until the ‘LOCKED’ markings align with the ports. Do not tighten past the ‘LOCKED’ marking. 3.5 Completing Procedures for Installing New Pump Complete installation of the new pump and test the operation. Refer to Section 4, Operation, in the following Installation and Operation Manuals: - H0573800, for the Stealth™ Series - H0321400, for the WaterFall Series - H0311700, for the ePump™ Series Page 7 Page 8 Jandy® Pro Series Stealth™ Pumps Lid Assembly | Replacement Kit Instructions Zodiac Pool Systems, Inc. 2620 Commerce Way, Vista, CA 92081 1.800.822.7933 | www.ZodiacPoolSystems.com ©2014 Zodiac Pool Systems, Inc. ZODIAC ® is a registered trademark of Zodiac International, S.A.S.U., used under license. All other trademarks referenced herein are the property of their respective owners. H0576600 Rev D


