A Hive Stand - Michigan Beekeepers Association
advertisement

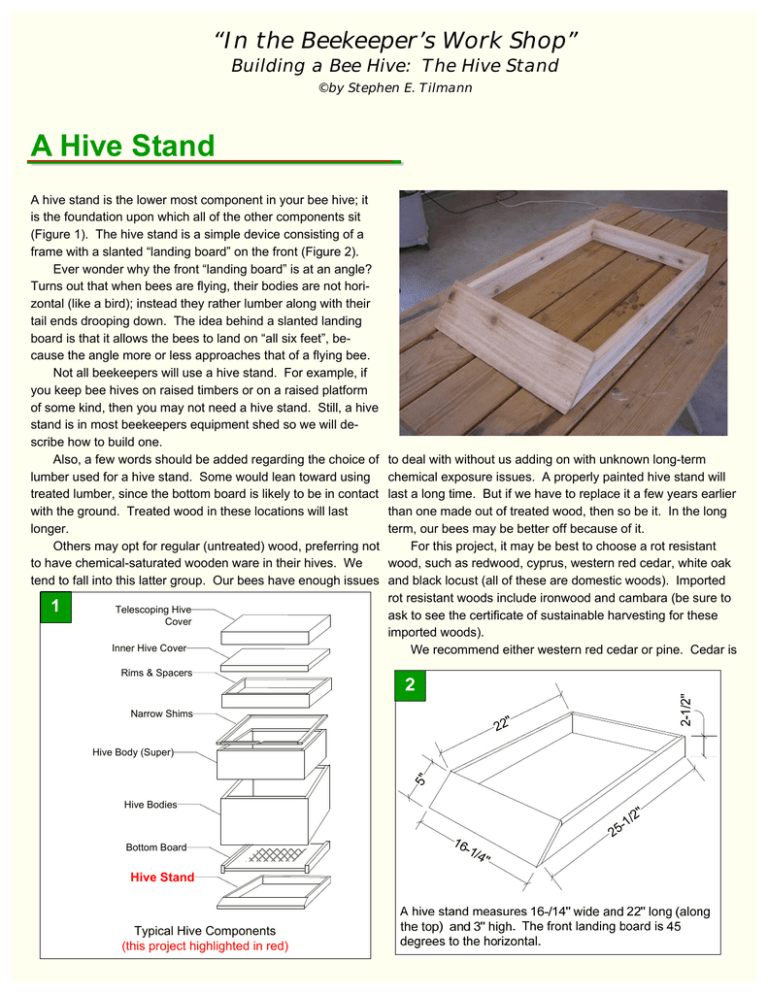
“In the Beekeeper’s Work Shop” Building a Bee Hive: The Hive Stand ©by Stephen E. Tilmann A Hive Stand A hive stand is the lower most component in your bee hive; it is the foundation upon which all of the other components sit (Figure 1). The hive stand is a simple device consisting of a frame with a slanted “landing board” on the front (Figure 2). Ever wonder why the front “landing board” is at an angle? Turns out that when bees are flying, their bodies are not horizontal (like a bird); instead they rather lumber along with their tail ends drooping down. The idea behind a slanted landing board is that it allows the bees to land on “all six feet”, because the angle more or less approaches that of a flying bee. Not all beekeepers will use a hive stand. For example, if you keep bee hives on raised timbers or on a raised platform of some kind, then you may not need a hive stand. Still, a hive stand is in most beekeepers equipment shed so we will describe how to build one. Also, a few words should be added regarding the choice of lumber used for a hive stand. Some would lean toward using treated lumber, since the bottom board is likely to be in contact with the ground. Treated wood in these locations will last longer. Others may opt for regular (untreated) wood, preferring not to have chemical-saturated wooden ware in their hives. We tend to fall into this latter group. Our bees have enough issues 1 Telescoping Hive Cover Inner Hive Cover Rims & Spacers Narrow Shims Hive Body (Super) Hive Bodies Bottom Board Hive Stand Typical Hive Components (this project highlighted in red) to deal with without us adding on with unknown long-term chemical exposure issues. A properly painted hive stand will last a long time. But if we have to replace it a few years earlier than one made out of treated wood, then so be it. In the long term, our bees may be better off because of it. For this project, it may be best to choose a rot resistant wood, such as redwood, cyprus, western red cedar, white oak and black locust (all of these are domestic woods). Imported rot resistant woods include ironwood and cambara (be sure to ask to see the certificate of sustainable harvesting for these imported woods). We recommend either western red cedar or pine. Cedar is “In the Beekeeper’s Work Shop” Building a Bee Hive: The Hive Stand ©by Stephen E. Tilmann commonly available at many lumber yards (it is used for sheds and trimming), though the grade may be #3 (rough cut on one side). Western red cedar will be about twice as expensive as pine, but will stand up quite well when in contact with the ground. The price difference between red cedar and pine should not be a major factor in your decision. For those truly adventurous souls, you may also want to consider manufactured “boards” (polypropylene) sold at lumber yards for outdoor decks. Although you can’t glue this material with regular carpenter’s glue, it will certainly last many years when in contact with the ground. An IPM Bottom Board Hive Stand The hive stand depicted in Figure2 would be suitable for a standard bottom board. If you are using an IPM bottom board (a screened bottom board with a sampling tray), then you may want to consider some slight modifications. A standard bottom board has about one inch from the bottom of the side rail to the top of the board; whereas a screened bottom board this distance is closer to 2-14” inches (see the plans for an IPM bottom board in this series). Therefore, if you use a screened bottom board on the hive stand depicted in Figure 2, there will about a one inch vertical face from the top of the landing board to the entrance. This may deter the bees using the landing board and somewhat defeats its purpose. To correct this situation, we also offer in these plans a more suitable hive stand when using IPM screened bottom boards (see Figure 3). In this modified version, the distance from the top of the side rails (where the bottom board sits) to the top of the landing board (the uppermost tip of the beveled edge) is about 2-1/4”. Where appropriate, we will point out these differences in the steps that follow. Before You Begin... All of the dimensions shown in the drawings and cut list are for a standard 10-frame hive. A table is provided at the back of this article with the sizes of the various components for an 8frame and 5-frame “nuc” hive. Basic Construction A hive stand is constructed from 1x4 cedar or pine for the side and back rails and 1x6 cedar or pine for the landing board (or a 1x8 if using the IPM version). If you decide to use 5/4 treated wood (which is a full 1-inch thick), then you will have to modify the length specified for the back rail and increase the width of the rabbet on the back of the landing board. The key is to keep the overall size of the hive stand the same with 5/4 lumber as when using 3/4-inch (1x4s and 1x6s) lumber as called for in these plans. Note: If you are using rough cut cedar, the thickness will probably be closer to 7/8” (not the standard 3/4”). You may have to adjust the width of the rabbets in the plans that follow to accommodate the material you are working with. Let your material be your guide. “In the Beekeeper’s Work Shop” Building a Bee Hive: The Hive Stand ©by Stephen E. Tilmann Construction Details (For a 10-Frame Hive Stand) Cut the Side Rails and End Pieces From 1x4 cedar or pine ripped to 2-1/2” in width, cut two sides 24-1/2” long, then make a 45-degree angled cut on the front. The back is 15-1/2” long (Figure 4). The front is cut from 1x6 cedar or pine. The top and bottom edges are beveled at 45 degrees. The back is the same length as the angled front of the side boards (about 3-3/8”) and the front face is about 5” wide. Make a beveled cut first and then measure against the sloped front of the side piece to get the other beveled cut location. The end profile of the landing board will be trapezoidal. For the IPM version, the side rails are 25-1/2” long from a 1x4 board (Figure 5). The front again has a 45-degree angled cut (see detail in Figure 6, next page). The front landing board is cut from 1x8 stock. 4 22" 15-1/2 " 2-1/2" Step 1. 45 /2 -1 24 " 16 -1/ 4" From 1x4 cedar or pine ripped to 2-1/2" wide, cut two sides 24-7/8" long and one back piece 15-1/2" long. Make a 45degree angled cut on the front of both side rails. From a 1x6, cut a 16-1/4" piece for the landing board. “In the Beekeeper’s Work Shop” Building a Bee Hive: The Hive Stand ©by Stephen E. Tilmann Step 2. Create a Rebate Joint on Back Corners We want to minimize exposed end grain, so we will use a rebate joint for the back piece (Figure 7). To do this, cut a 3/4” wide and 3/8” deep rabbet on the back edge of each side rail. The back piece will fit into these rabbets. Step 3. Assemble the Hive Stand We can now assemble the hive stand (refer to Figure 4 or 5). Clamp, glue and nail the back piece into the two rabbets on the back of the side rails, checking for square, Nail as shown (Figure 7). The landing board is glued and nailed to the front sloping front ends of the side rails. It may be difficult to use a clamp when attaching the landing board, so the nails will have to do. Test fit your landing board on the assembled hive stand. You may notice that the tip of the landing board extends above the top surface of the bottom board. If this is the case, simply trim a small slice off the top tip of the landing board using your saw or a hand plane. Step 4. Paint the Hive Stand We suggest that you paint the hive stand using a quality latex primer and two top coats. Don’t skimp on the paint job since it will probably be the last time you paint the cover. A good paint job will greatly prolong the life of your equipment. Resources Dadant & Sons (1997). The Hive and the Honey Bee. Chapter 12. “Building a Bee Hive” series. Published on-line at www.michiganbees.org/beekeeping/in-the-beekeeper’sworkshop. For other beekeeper’s workshop project plans, search for “workshop”. “In the Beekeeper’s Work Shop” Building a Bee Hive: The Hive Stand ©by Stephen E. Tilmann “In the Beekeeper’s Work Shop” Building a Bee Hive: The Hive Stand ©by Stephen E. Tilmann Photo Gallery (Standard Version)... 1 3 2 4 5 Photo Captions: 1. Preparing to make the first 45 degree beveled edge on the landing board. 2. Using the angled cut on the front of the side rail to mark the location of the second beveled cut. 3. Preparing to make the second beveled edge of the landing board. 4. The four pieces of the hive stand ready to assemble. 5. Glue and nail the landing board to the side rails. “In the Beekeeper’s Work Shop” Building a Bee Hive: The Hive Stand ©by Stephen E. Tilmann Photo Gallery (IPM Bottom Board Version)... 1 3 2 4 5 Photo Captions: 1. Assembled IPM bottom board version of the hive stand. Note wide landing board. 2. Profile of the side rail. The notch in the side rail is 11/8” and height of the beveled side of the landing board is about the same. Total is 2-1/4”. 3. First cut to make the notch. The depth of this cut is 1 -1/8 inches. 4. Cut out the majority of the notch using your table saw. Stop short of the first cut. 5. Complete the cutout using a jig saw or hand saw.


