Quick Reference Scanner Guide cPlease put this guide above your
advertisement
Quick Reference Scanner Guide
cPlease
put this guide above your machineg
How to save to the machine’s hard disk...
*The shape of the machine, screen displays,
procedures, and titles in references vary depending
on the machine you are using. Also, not all functions
are available on all machines.
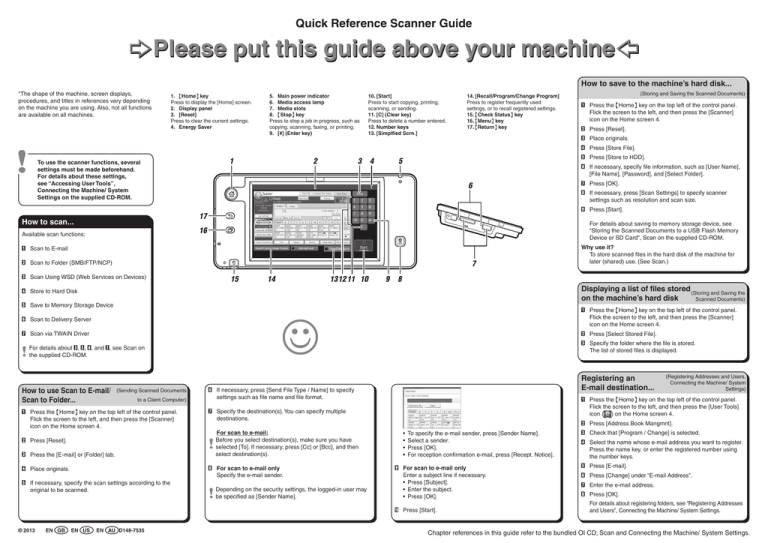
1. {Home} key
Press to display the [Home] screen.
2. Display panel
3. [Reset]
Press to clear the current settings.
4. Energy Saver
5. Main power indicator
6. Media access lamp
7. Media slots
8. {Stop} key
Press to stop a job in progress, such as
copying, scanning, faxing, or printing.
9. [#] (Enter key)
10.[Start]
Press to start copying, printing,
scanning, or sending.
11.[C] (Clear key)
Press to delete a number entered.
12.Number keys
13.[Simplfied Scrn.]
14.[Recall/Program/Change Program]
Press to register frequently used
settings, or to recall registered settings.
15.{Check Status} key
16.{Menu} key
17.{Return} key
(Storing and Saving the Scanned Documents)
A Press the {Home} key on the top left of the control panel.
Flick the screen to the left, and then press the [Scanner]
icon on the Home screen 4.
B Press [Reset].
C Place originals.
D Press [Store File].
1
To use the scanner functions, several
settings must be made beforehand.
For details about these settings,
see “Accessing User Tools”,
Connecting the Machine/ System
Settings on the supplied CD-ROM.
2
3
4
E Press [Store to HDD].
5
F If necessary, specify file information, such as [User Name],
[File Name], [Password], and [Select Folder].
6
For details about saving to memory storage device, see
“Storing the Scanned Documents to a USB Flash Memory
Device or SD Card”, Scan on the supplied CD-ROM.
16
Available scan functions:
A Scan to E-mail
7
B Scan to Folder (SMB/FTP/NCP)
C Scan Using WSD (Web Services on Devices)
15
13 12 11 10
14
9
8
3. (3. Storing Files Using the Scanner Function) (3. Storing Files
E Save to Memory Storage Device
F Scan to Delivery Server
G Scan via TWAIN Driver
For details about C, E, F, and G, see Scan on
the supplied CD-ROM.
(Sending Scanned Documents
to a Client Computer)
A Press the {Home} key on the top left of the control panel.
Flick the screen to the left, and then press the [Scanner]
icon on the Home screen 4.
B Press [Reset].
C Press the [E-mail] or [Folder] tab.
E If necessary, specify the scan settings according to the
original to be scanned.
A Press the {Home} key on the top left of the control panel.
Flick the screen to the left, and then press the [Scanner]
icon on the Home screen 4.
B Press [Select Stored File].
C Specify the folder where the file is stored.
The list of stored files is displayed.
Registering an
E-mail destination...
F If necessary, press [Send File Type / Name] to specify
settings such as file name and file format.
G Specify the destination(s). You can specify multiple
destinations.
�
For scan to e-mail:
Before you select destination(s), make sure you have
selected [To]. If necessary, press [Cc] or [Bcc], and then
select destination(s).
H For scan to e-mail only
Specify the e-mail sender.
D Place originals.
Depending on the security settings, the logged-in user may
be specified as [Sender Name].
EN GB
EN US
EN AU D148-7535
(Registering Addresses and Users,
Connecting the Machine/ System
Settings)
A Press the {Home} key on the top left of the control panel.
Flick the screen to the left, and then press the [User Tools]
icon ( ) on the Home screen 4.
B Press [Address Book Mangmnt].
• To specify the e-mail sender, press [Sender Name].
• Select a sender.
• Press [OK].
• For reception confirmation e-mail, press [Recept. Notice].
I For scan to e-mail only
Enter a subject line if necessary.
• Press [Subject].
• Enter the subject.
• Press [OK].
J Press [Start].
© 2013
Why use it?
To store scanned files in the hard disk of the machine for
later (shared) use. (See Scan.)
Displaying
list of
files (3.
stored
Using the a
Scanner
Function)
Storing (Storing
Files Using
Scanner
andthe
Saving
the
Function) (3.
Storing
Files Using the
Scanner
Function)
on the machine’s
hard
disk
Scanned
Documents)
D Store to Hard Disk
How to use Scan to E-mail/
Scan to Folder...
H If necessary, press [Scan Settings] to specify scanner
settings such as resolution and scan size.
I Press [Start].
17
How to scan...
G Press [OK].
C Check that [Program / Change] is selected.
D Select the name whose e-mail address you want to register.
Press the name key, or enter the registered number using
the number keys.
E Press [E-mail].
F Press [Change] under “E-mail Address”.
G Enter the e-mail address.
H Press [OK].
For details about registering folders, see “Registering Addresses
and Users”, Connecting the Machine/ System Settings.
Chapter references in this guide refer to the bundled OI CD; Scan and Connecting the Machine/ System Settings.
