INSTALLATION INSTRUCTIONS Wall Mount Box
advertisement
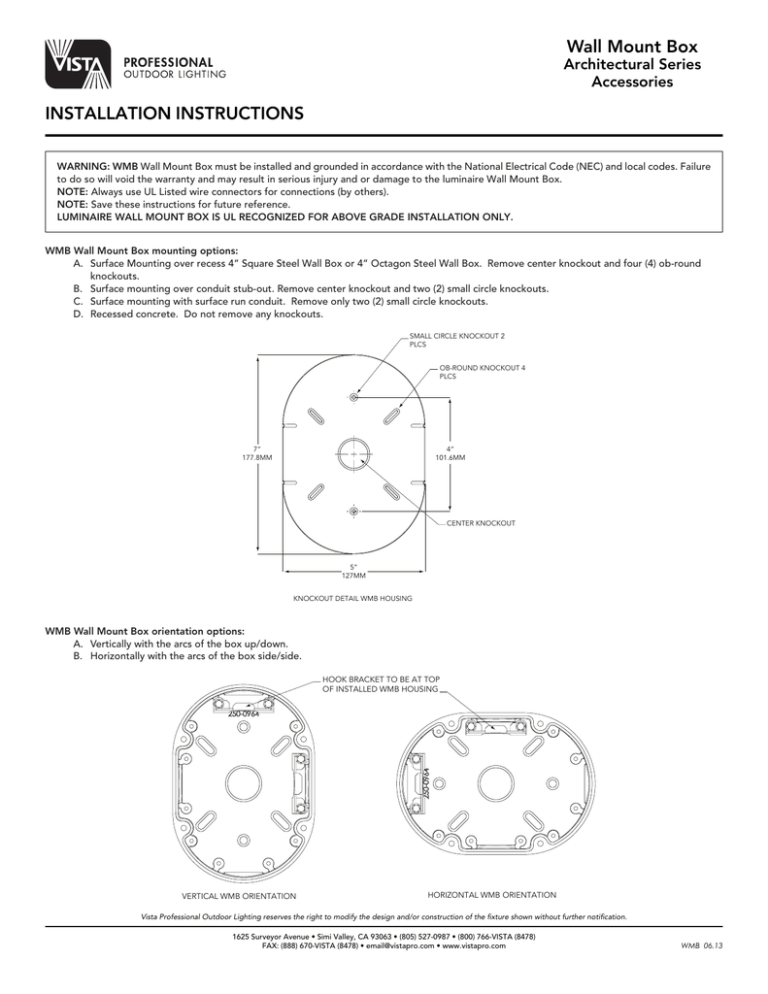
Wall Mount Box Architectural Series Accessories INSTALLATION INSTRUCTIONS WARNING: WMB Wall Mount Box must be installed and grounded in accordance with the National Electrical Code (NEC) and local codes. Failure to do so will void the warranty and may result in serious injury and or damage to the luminaire Wall Mount Box. NOTE: Always use UL Listed wire connectors for connections (by others). NOTE: Save these instructions for future reference. LUMINAIRE WALL MOUNT BOX IS UL RECOGNIZED FOR ABOVE GRADE INSTALLATION ONLY. WMB Wall Mount Box mounting options: A. Surface Mounting over recess 4” Square Steel Wall Box or 4” Octagon Steel Wall Box. Remove center knockout and four (4) ob-round knockouts. B. Surface mounting over conduit stub-out. Remove center knockout and two (2) small circle knockouts. C. Surface mounting with surface run conduit. Remove only two (2) small circle knockouts. D. Recessed concrete. Do not remove any knockouts. SMALL CIRCLE KNOCKOUT 2 PLCS OB-ROUND KNOCKOUT 4 PLCS 4” 101.6MM 7” 177.8MM CENTER KNOCKOUT 5” 127MM KNOCKOUT DETAIL WMB HOUSING WMB Wall Mount Box orientation options: A. Vertically with the arcs of the box up/down. B. Horizontally with the arcs of the box side/side. HOOK BRACKET TO BE AT TOP OF INSTALLED WMB HOUSING VERTICAL WMB ORIENTATION HORIZONTAL WMB ORIENTATION Vista Professional Outdoor Lighting reserves the right to modify the design and/or construction of the fixture shown without further notification. 1625 Surveyor Avenue • Simi Valley, CA 93063 • (805) 527-0987 • (800) 766-VISTA (8478) FAX: (888) 670-VISTA (8478) • email@vistapro.com • www.vistapro.com WMB 06.13 Wall Mount Box Architectural Series Accessories INSTALLATION INSTRUCTIONS Surface Mounting: 1. Remove lid of WMB by loosening four (4) lid screws. Do not remove screws completely; the lid gasket will retain the screws. The lid is retained to the housing with hook and catch brackets; after loosening the screws, lift the lid straight up and outwards. Set the WMB lid aside. 2. Remove only the knockouts as indicated above. 3. Secure surface mount gasket to back of housing (gasket not shown) by removing liner tape from adhesive backed side. Be sure to align the gasket holes to the housing holes. 4. Secure the WMB housing to the wall surface. Note: When mounting over a recessed 4” Square or 4” Octagon Steel Wall Box, the WMB housing may me attached directly to the recessed steel box (fasteners by others). When surface mounting over a conduit stub-out or when running surface conduit, the WMB must be affixed directly to the wall using appropriate wall anchors and fasteners (by others). 5. If running surface conduit, connect conduit to ½” NPT hubs on the WMB housing using appropriate thread sealing compound. Plug any unused ½” NPT openings with plugs and thread sealing compound. 6. Pull electrical supply wires (line in) through conduit and WMB housing. Pull wires and make a 4”- 6” loop, long enough for manual connections with the terminal block (4” to 6” beyond the front rim of WMB housing). 7. Stuff wire loop into the WMB housing and reinstall the WMB lid. 8. See supplemental instructions for LUMINAIRE MOUNTING TO WMB. HOOK BRACKET AT TOP OF WMB HOUSING WMB LID ASSEMBLY HOOK BRACKET AT TOP OF WMB HOUSING LID ASSEMBLY SCREW 4 PLCS WMB HOUSING HORIZONTAL ORIENTATION VERTICAL ORIENTATION Recessed in Concrete Important note: Concrete pour mask and temporary vinyl label must remain in place during pouring and curing of concrete (fig. 3) 1. Remove lid of WMB by loosening four (4) lid screws. Do not remove screws completely; the lid gasket will retain the screws. The lid is retained to the housing with hook and catch brackets; after loosening the screws, lift the lid straight up and outwards. Set the WMB lid aside. 2. Do not remove any of the WMB knockouts. 3. Using the four (4) ¼-20 flat head screws provided, install the concrete pour mask. 4. Install the temporary vinyl label. 5. Install (4) threaded 8-32 rods (supplied) into WMB housing by piercing through vinyl label in specified location. Hand tighten until secure. 6. Attach WMB housing to pour form using (4) wing nuts provided so the front face of the WMB housing will be flush with the finished surface (fig. 4) 7. Connect conduit to WMB housing using appropriate thread sealing compound. Plug any unused ½” NPT openings with plugs and thread sealing compound. 8. Pour concrete. NOTE: DO NOT PUMP OR DROP CONCRETE DIRECTLY ON TOP OF THE WMB HOUSING (fig. 4). 9. Remove the wing nuts from threaded rods before removing pour form. 10. Remove and discard temporary vinyl label. Remove and recycle concrete pour mask (HDPE polymer). 11. Pull electrical supply wires (line in) through conduit and WMB housing. Pull wires and make a 4”- 6” loop, long enough for manual connections with the terminal block (4” to 6” beyond the front rim of WMB housing). 12. Stuff wire loop into the WMB housing and reinstall the WMB lid. 13. See supplemental instructions for LUMINAIRE MOUNTING TO WMB. ¼-20 FLAT HEAD SCREW - 4PLCS CONCRETE POUR MASK CONCRETE HOOK BRACKET TEMPORARY VINYL LABEL WMB HOUSING CONDUIT POUR FORM WMB HOUSING POUR FORM 8-32 THREADED RODS USED FOR MOUNTING WMB HOUSING TO POUR FORM 8-32 WING NUT USED TO DRAW WMB HOUSING TIGHT TO POUR FORM 8-32 WING NUT - 4 PLCS 8-32 THREADED ROD - 4 PLCS FINISHED WALL SURFACE Vista Professional Outdoor Lighting reserves the right to modify the design and/or construction of the fixture shown without further notification. 1625 Surveyor Avenue • Simi Valley, CA 93063 • (805) 527-0987 • (800) 766-VISTA (8478) FAX: (888) 670-VISTA (8478) • email@vistapro.com • www.vistapro.com WMB 06.13 Wall Mount Box Architectural Series Accessories INSTALLATION INSTRUCTIONS LUMINAIRE MOUNTING TO WMB (Infinity Knuckle): 1. Make sure electrical supply is off at circuit breaker before starting luminaire installation or servicing luminaire. 2. Remove lid of WMB by loosening four (4) lid screws. Do not remove screws completely; the lid gasket will retain the screws. The lid is retained to the housing with hook and catch brackets; after loosening the screws, lift the lid straight up and outwards. 3. Using Thread sealant, thread stainless steel knuckle stem onto the WMB lid. 4. Using a 15/16” open end wrench or large crescent wrench, firmly tighten the stainless steel knuckle stem into the WMB lid. 5. Route luminaire supply conductors through stainless steel knuckle stem. Fish the wires in the space between the inside of the lid and the underside of the ballast towards the two terminal blocks located on the inside surface of the lid. 6. Seat luminaire onto stainless steel knuckle stem. Using the 1/8” allen wrench provided, lock the luminaire onto the stainless steel stem by firmly tightening the lower knuckle set screw. 7. Attach luminaire supply conductors black, white, & green (load) to the fixture terminal block observing polarity, black to red, white to blue and green to green. 8. Attach conduit supply conductors (by others) to the (line-in) terminal block observing polarity, line to black, neutral to white, and ground to green. 9. Affix the luminaire/WMB lid assembly to the WMB housing by dropping the assembly onto the hook and catch brackets. 10.Stuff any protruding wires into the box ensuring that the wires won’t get pinched by the WMB lid seal. 11.Using the 1/8” allen wrench provided, firmly tighten all four (4) lid screws. 12.Using thread sealant, plug any unused conduit entry holes. 13.To adjust luminaire aiming angle, loosen adjustable knuckle screw. Do not disengage completely. Hold luminaire at selected angle and tighten knuckle screw firmly until knuckle halves come completely together. 14.To adjust luminaire rotational direction, loosen the lower rotational adjustment set screw. Rotate fixture to desired position then firmly tighten rotational adjustment set screw. 15.Install lamp (see reverse). 16.Supply power to the luminaire and check for proper operation. ANGLE ADJUSTMENT SCREW ROTATIONAL ADJUSTMENT SCREW BLACK GREEN RED WHITE GREEN BLUE STAINLESS STEEL KNUCKLE STEM WMB LID ASSEMBLY BALLAST WMB HOUSING TERMINAL BLOCKS LUMINAIRE (FIXTURE HEAD) ATTACH CONDUIT SUPPLY CONDUCTORS (BY OTHERS) TO THIS TERMINAL BLOCK: LINE - BLACK NEUTRAL - WHITE GROUND - GREEN ATTACH LUMINAIRE (FIXTURE) SUPPLY CONDUCTOR WIRES TO THIS TERMINAL BLOCK: BLACK - RED WHITE - BLUE GREEN - GREEN Vista Professional Outdoor Lighting reserves the right to modify the design and/or construction of the fixture shown without further notification. 1625 Surveyor Avenue • Simi Valley, CA 93063 • (805) 527-0987 • (800) 766-VISTA (8478) FAX: (888) 670-VISTA (8478) • email@vistapro.com • www.vistapro.com WMB 06.13 Wall Mount Box Architectural Series Accessories INSTALLATION INSTRUCTIONS IMPORTANT SAFETY INSTRUCTIONS THE LIGHTED LAMP IS HOT!! WARNING: TO REDUCE THE RISK OF FIRE, OR INJURY TO PERSONS: 1. Turn off/unplug and allow to cool before replacing lamp. 2. Lamps get hot quickly! Contact only switch/plug when turning on. 3. Do not touch hot lens, guard or enclosure.4. Keep lamp away from material that may burn. 5. Do not touch the lamp at any time. Use a soft cloth. Oil from the skin may damage lamp. 6. Do not operate luminaire fitting with a missing or damaged cover SAVE THESE INSTRUCTIONS CAUTION: Do not exceed maximum wattage marked on luminaire label. 1.To prevent electrical shock, disconnect from electrical supply before service. 2.Loosen captive shroud screw. 3.Remove shroud and gasketed lens to expose lamp. 4.Replace lamp with correct wattage and type marked on fixture label. NOTE: DO NOT touch lamp with bare hands. Always use soft cloth or the plastic wrapping (if available) to handle the lamp. 5.Re-install shroud and gasketed lens and tighten captive shroud screws. LAMP INFORMATION MODEL # LAMP TYPE WATTAGE 1096 T6 - G12 Base T4 - G8.5 Base T4 - GU6.5 Base 70W, 39W 70W, 39W 20W SHROUD CAPTIVE SHROUD SCREW (LOOSEN-DO NOT REMOVE) LENS LENS GASKET LAMP HOUSING Vista Professional Outdoor Lighting reserves the right to modify the design and/or construction of the fixture shown without further notification. 1625 Surveyor Avenue • Simi Valley, CA 93063 • (805) 527-0987 • (800) 766-VISTA (8478) FAX: (888) 670-VISTA (8478) • email@vistapro.com • www.vistapro.com WMB 06.13
