Testing Gene Expression by Reverse Transcriptase PCR (rt
advertisement
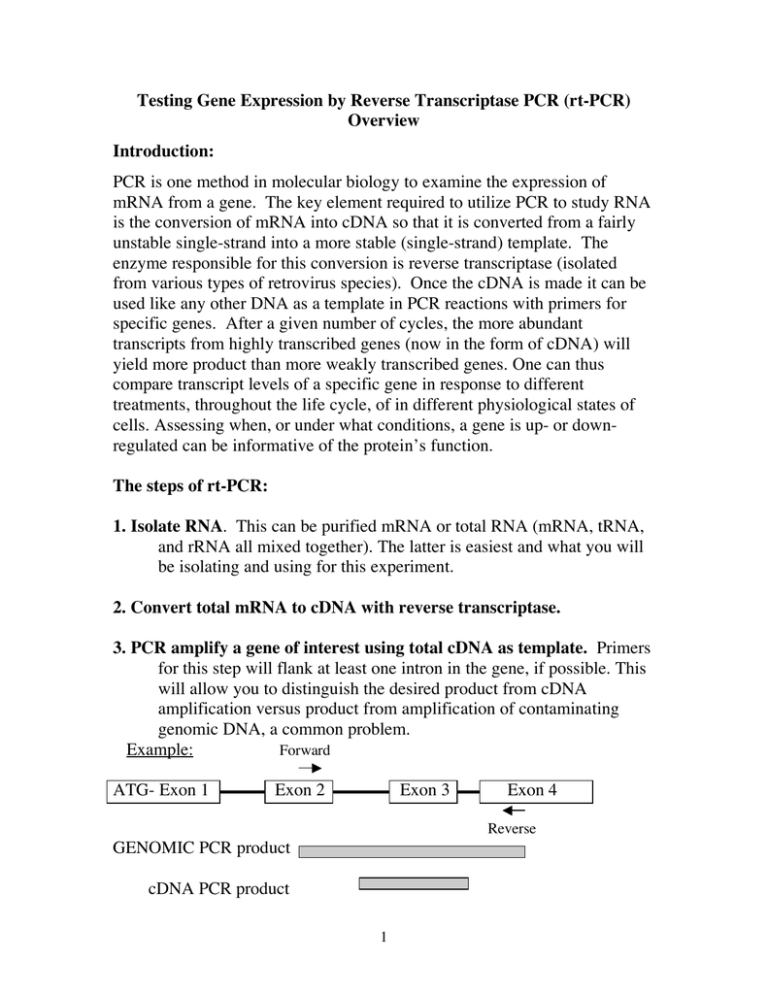
Testing Gene Expression by Reverse Transcriptase PCR (rt-PCR) Overview Introduction: PCR is one method in molecular biology to examine the expression of mRNA from a gene. The key element required to utilize PCR to study RNA is the conversion of mRNA into cDNA so that it is converted from a fairly unstable single-strand into a more stable (single-strand) template. The enzyme responsible for this conversion is reverse transcriptase (isolated from various types of retrovirus species). Once the cDNA is made it can be used like any other DNA as a template in PCR reactions with primers for specific genes. After a given number of cycles, the more abundant transcripts from highly transcribed genes (now in the form of cDNA) will yield more product than more weakly transcribed genes. One can thus compare transcript levels of a specific gene in response to different treatments, throughout the life cycle, of in different physiological states of cells. Assessing when, or under what conditions, a gene is up- or downregulated can be informative of the protein’s function. The steps of rt-PCR: 1. Isolate RNA. This can be purified mRNA or total RNA (mRNA, tRNA, and rRNA all mixed together). The latter is easiest and what you will be isolating and using for this experiment. 2. Convert total mRNA to cDNA with reverse transcriptase. 3. PCR amplify a gene of interest using total cDNA as template. Primers for this step will flank at least one intron in the gene, if possible. This will allow you to distinguish the desired product from cDNA amplification versus product from amplification of contaminating genomic DNA, a common problem. Example: Forward ATG- Exon 1 Exon 2 Exon 3 Exon 4 Reverse GENOMIC PCR product cDNA PCR product 1 GE LAB 1: RNA Isolation In this lab you will be isolating total RNA from Tetrahymena cells at different points in their life cycle. Later, you will be making cDNA from this RNA to be used in “reversetranscriptase PCR” to test for levels of expression of your gene at the different time points. *RNA will be rapidly degraded by RNases, which are EVERYWHERE, especially on your skin. To prevent RNase contamination, you must wear gloves and use only RNase-free tips and microcentrifuge tubes. All solutions have also been specially treated with agents that deactivate RNase, like diethylpyrocarbonate (DEPC). Be especially careful to keep the RNase-free tips covered when not in use. 1. Pipet 5 x 10⁶ cells into a 15 mL screw cap tube. The concentration of cells in the culture will be given to you day of lab. 2. Pellet cells by centrifuging at 4,000 rpm. Pour off supernatant (into sink is fine). 3. Add 1 mL of Trizol reagent (this is a solution with phenol, which will lyse the cells and inhibit RNase activity). Incubate on the bench for 5 minutes. 4. Add 0.2 mL chloroform in the hood. Shake vigorously by hand for 15 seconds, incubate on your bench for 3 minutes. 5. Centrifuge sample for 15 minutes at 3,000 rpm, at 4˚C. Following centrifugation, the mixture separates into a lower, red phenolchloroform phase, a whitish interphase, and a colorless upper aqueous phase. RNA remains exclusively in the aqueous phase. 6. Transfer the aqueous phase to a microcentrifuge tube. Precipitate RNA from the aqueous phase by addition of 0.5 mL isopropanol and incubating your sample on ice for 10 minutes. 7. Centrifuge sample for 10 minutes at 10,000 rpm in a microcentrifuge in the cold room (4˚C). The RNA precipitate will form a gel-like pellet on the side and bottom of the tube. Remove the supernatant. 8. Wash the pellet by adding 1 mL of 75% ethanol, mix by vortexing, and centrifuge for 5 minutes at 5,000 rpm in the cold room. 9. Resuspend the pellet in 50 µL RNase-free water available at front of each bench. 10. Determine the concentration of your RNA by spectrophotometry (A260). Make a 1:500 dilution of your RNA with sterile water. Total volume should be 500 !L. Blank the spectrophotometer with sterile water. All readings should be done in a quartz microcuvette, by loading 100 !L of each sample to measure. An absorbance reading of 1 = 40 !g/mL of total RNA 11. Store your RNA samples at -20˚C until you make cDNA. Gene Expression Analysis meiosis mitosis Mic Mac Mic Mac early Veg Starved Mic ~6 hrs 7-8 A n Conjugation hrs OM ~10 hrs Mic A n ~12 hrs Tetrahymena life cycle: Vegetatively growing cells, when starved, will undergo sexual conjugation, giving rise to new progeny. In this process, the micronuclei undergo meiosis and nuclear fusion at about 4-5 hours. This is followed by a round of mitosis. Two of the products from mitosis develop into new macronuclei (transcriptionally active), and two remain highly condensed and transcriptionally silent (micronuclei). The new macronuclei are called “anlagen”, or “An” in the diagram above. Here are some interesting nuclear events that your proteins may be involved in: Starvation: Condensation of macronuclear chromatin Early conjugation (2-4 hours): meiosis 5-6 hrs conjugation: mitosis 7-8 hours conjugation: beginning of macronuclear differentiation – start of transcriptional activity ~10 hours conjugation: Old macronucleus (“OM”) undergoes apoptosis 12 hours conjugation: Unnecessary DNA is eliminated from the developing macronucleus and packaged into heterochromatin. By assessing the transcription level of a gene at various timepoints, one can get an idea of whether the protein is important for processes occurring at those times. For example, a large increase in mRNA from gene X during the time when meiosis is occurring is evidence that the protein may be important for meiosis. This will then lead to further investigation of that hypothesis. Over the next few labs, you will determine the expression of your gene throughout conjugation by a technique called reverse-transcriptase PCR (rt-PCR). In this technique, you harvest total RNA from cells at different time points, then make cDNA from the mRNA using an oligo-dT primer and reverse transcriptase. You then treat the cDNA with RNase to get rid of the RNA strands, leaving you with single stranded cDNA. This is used as template in a PCR reaction with primers that anneal to the gene coding sequence. The amount of mRNA from your gene is proportional to the amount of PCR product you obtain and visualize by EtBr staining. GE LAB 2: cDNA Synthesis; Test cDNA and Primers In this lab you will synthesize cDNA using the total RNA you previously isolated as template. You will then test the yield of cDNA by PCR using a control set of primers to a gene called CYP1, which is transcribed to the same degree throughout conjugation. At the same time, you will be able to test your new primers on genomic DNA. Part I: Set up cDNA Synthesis. mRNA will be converted to cDNA using reverse transcriptase enzyme and random hexamers (6-nucleotide ‘primers’ of randomized nucleotides) that will hybridize to many places along the RNA to be extended by RT. A “no (-) RT” reaction will serve as a negative control critical for assessing the amount of contaminating genomic template in the cDNA samples. Per RNA sample: Set up two reactions in two separate PCR tubes on ice. Add in the following (20 ml total): 1.0 ml 10 mM dNTPs (500 uM final each) 4.0 ml 5 X 1st strand synthesis buffer (1X final) 2.0 ml 0.1 M DTT (10 mM final) 0.5 ml 3 mg/ml random hexamers 0.5 ml (40 U) RNase out ribonuclease inhibitor *If the above ingredients are provided as a mix, use a total of 8 µl per reaction. Add 2 µg of total RNA Add H2O to 19 µl To one reaction add 1 ml Superscript II reverse transcriptase. Label this tube “+RT” To the other reaction, add 1 ml of water. Label this tube “- RT” Incubate the reactions in a water bath at 42oC for 50 minutes, then in a heat block at 85oC for 5 minutes. Store the reactions temporarily on ice. 1 Part II: PCR analysis of cDNA yield Set up PCR reactions to test cDNA yield. The best way to test yield from cDNA synthesis is to amplify a known cDNA with known primers. You will be testing all of the cDNA samples that you ultimately want to use to examine expression of your gene. Some of these may have been made by other students in the class. By assessing cDNA yield first, you can then correct for differences and put the same amount of cDNA into each reaction for the ultimate test of your gene. 1. Make a “MASTER MIX” with enough ingredients for all reactions (one reaction per cDNA sample), plus one extra, each with 25 µL final volume. In a 1.5-mL tube make the “MASTER MIX” with the following final concentrations of each component: 1X GoTaq Green Master Mix 0.5 pmol/µL Forward (+) CYP1 primer 0.5 pmol/µL Reverse (-) CYP1 primer H20 to a final volume of 24 µl per reaction (you will add 1 µL cDNA separately to each reaction later) PCR of cDNA (cDNA): [STOCK] [FINAL] 1 Rxn. MASTER MIX (__Rxns) 2XGoTaq 25 pmol/µL (+) Primer 25 pmol/µL (-) Primer 1X GoTaq 0.5 pmol/µL (+) Primer 0.5 pmol/µL (-) Primer Tetrahymena cDNA 1 µL H2 0 _____________________________________________________________ Total 25 µL ___ µL 2. Transfer 24 µl of the Master Mix to each of three 0.2-mL PCR tubes and label them appropriately. 2 3. Add 1 µL of each cDNA to the respective tube. 4. Place your PCR tubes in the thermocycler. The optimal annealing temperature for these primers was previously determined to be 52ºC. The thermocycler will run the following program: Step 1: Step 2: Step 3: Step 4: Step 5: Step 6: Step 7: 95°C for 2 minutes 95°C denaturation for 30 seconds 52ºC annealing for 30 seconds 72°C extension for 1 minute Go To Step 2, repeat 30 times 72°C for 5 minutes 4°C forever 5. Your samples will be removed from the thermocycler when finished and stored at –20°C until next week. Part III: Test the new primers A. Rehydrate primers. If your primers are dried down, you must first resuspend them in sterile ddH2O to a final concentration of 25 µM 1. Calculate the amount of sterile ddH2O to add to each primer tube. The moles of lyophilized primer is provided on the tube label. Each tube has a different amount. Check your calculations with an instructor before proceeding. 2. Before adding the calculated amount of water to each tube, centrifuge the tubes briefly before opening the cap to collect any sample that was dislodged during shipping. 3. Add the appropriate amount of sterile water to the tubes and allow them to stand on ice until you are ready to add them to your reactions. 4. Vortex the primers for 30 seconds before adding them to your reaction mix. Forward primer calculations: Reverse primer calculations: 3 B. Set up PCR reactions to test your new primers. You will test the ability of your primers to amplify genomic DNA at three different temperatures. This will inform you of the best temperature to use for amplifying your cDNA. 1. Make a “MASTER MIX” with enough ingredients for 4 reactions, each with 25 µL total volume. In a 1.5-mL tube make the “MASTER MIX” for 4 x 25 µL reactions (1 extra to account for potential pipeting error) that will have the following FINAL concentrations of each component: 1X GoTaq Green Master Mix 0.5 pmol/µL Forward (+) primer 0.5 pmol/µL Reverse (-) primer 15 ng/µL Tetrahymena genomic DNA H20 to a final volume of 25 µl per reaction NOTE: Check your calculations with an instructor prior to setting up reactions. MASTER MIX [STOCK] [FINAL] 1 Rxn. (4 Rxn.) 2XGoTaq 25 pmol/µL (+) primer 25 pmol/µL (-) primer 0.64 µg/µL gDNA 1X GoTaq 0.5 pmol/µL (+) Primer 0.5 pmol/µL (-) Primer 15 ng/µL gDNA H2 0 _____________________________________________________________ Total 25 µL 100 µL 2. Transfer 25 µl of the Master Mix to each of three 0.2-mL PCR tubes and label them so that you know which tubes are yours. (You should have 25 µl extra. Check to see if your pipeting is accurate and note that in your notebook). 3. Calculate the annealing temperatures to test. a) Average of the two primer Tms calculated by the oligo company b) 3-5 degrees above average Tm c) 3-5 degrees below average Tm 4 4. Place your PCR tubes in the thermocycler at the three determined annealing temperatures (See Chart next to thermocycler for rows or columns corresponding to the different annealing temperatures). Record in your notebook the tube name and its corresponding annealing temperatures used for reference next week. 5. The thermocycler will carry out the following program: Step 1: Step 2: Step 3: Step 4: Step 5: Step 6: Step 7: 95°C for 2 minutes 95°C denaturation for 30 seconds annealing for 30 seconds (gradient from 50°C to 58°C) 72°C extension for 1 minute Go To Step 2, repeat 31 times 72°C for 5 minutes 4°C forever 6. Your samples will be removed from the thermocycler when finished and stored at –20°C until next week. Next week you will analyze the results by agarose gel electrophoresis. 5 GE PRELAB 3 1. Decide how many lanes you need on your gel. You may use 2 tenwell combs per gel if necessary. 2. Sketch a schematic of how you want to load your gel and what you think the gel of your PCR reactions should look like. Make sure to include the predicted size of the PCR product(s) you expect to see for Genomic DNA versus cDNA. 3. Determine the percentage of agarose gel that you will electrophorese your samples on. 1 GE LAB 3: Gene Expression Profile In this lab you will set up the experiment to test expression of your gene throughout the Tetrahymena life cycle. First, you will electrophorese the PCR reactions that you set up the previous lab period with the control CYP1 primers. Based on the intensities of the bands, you can adjust the input of template such that the same amount of cDNA is put into each reaction for your experiment. (-) RT samples should be included in separate reactions for all time points. Part I. Electrophorese the test cDNA PCR set up last lab 1. Pour an appropriate percentage agarose gel. See “Making an Agarose Gel” supplement if you need guidance. Be sure to make your gel with enough lanes to include the primer test PCR as well. 2. Load 20 !L of each PCR sample. The GoTaq mix has its own loading dye (green), thus it is not necessary to add loading buffer before loading your samples onto the gel. any 3. Electrophorese your samples for ~25 minutes at 100 V. 4. Visualize your gel on the UV light box and take a picture. Ask an instructor for help to get a useful exposure of your gel. Part II. Adjust the concentrations of cDNA 1. Assess the relative concentrations of cDNA in the timepoint samples by comparing the intensities of bands produced with the CYP1 primers. 2. Equalize the cDNA concentrations in all samples by adding the appropriate amount of sterile ddH2O. Equalize all to the sample with the lowest concentration. Part III. Set up PCR reactions 1. Make a MASTER MIX with enough ingredients for all reactions (one reaction per cDNA sample), plus one extra, each with 25 !L final volume. *You will use the primers for your gene In a 1.5-mL tube make the MASTER MIX with the following final concentrations of each component: 1X GoTaq Green Master Mix 0.5 pmol/!L Forward (+) primer 0.5 pmol/!L Reverse (-) primer H20 to a final volume of 24 !l per reaction (you will add 1 !L cDNA separately to each reaction later) PCR of cDNA (cDNA): [STOCK] [FINAL] 1 Rxn. MASTER MIX (__Rxns) 2XGoTaq 25 pmol/!L (+) Primer 25 pmol/!L (-) Primer 1X GoTaq 0.5 pmol/!L (+) Primer 0.5 pmol/!L (-) Primer Tetrahymena cDNA 1 !L H20 _____________________________________________________________________ Total 25 !L ___ !L 2. Transfer 24 !l of the Master Mix to each of three 0.2-mL PCR tubes and label them appropriately. 3. Add 1 !L of each cDNA to the respective tube. 4. Place your PCR tubes in the thermocycler. The optimal annealing temperature for these primers was previously determined to be 52ºC. The thermocycler will run the following program: Step 1: Step 2: Step 3: Step 4: Step 5: Step 6: Step 7: 95°C for 2 minutes 95°C denaturation for 30 seconds 52ºC annealing for 30 seconds 72°C extension for 1 minute Go To Step 2, repeat 30 times 72°C for 5 minutes 4°C forever 5. Your samples will be removed from the thermocycler when finished and stored at –20°C until next week. Next week you will analyze the results by agarose gel electrophoresis.
