ALT Turbine Setup
advertisement
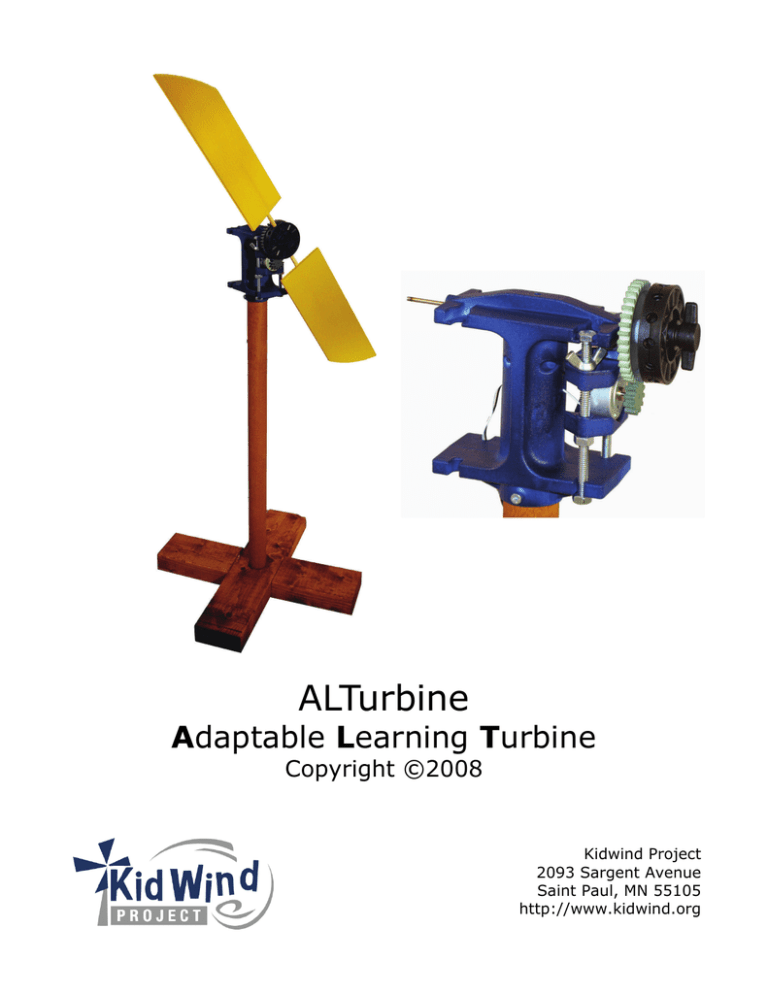
ALTurbine Adaptable Learning Turbine Copyright ©2008 Kidwind Project 2093 Sargent Avenue Saint Paul, MN 55105 http://www.kidwind.org This work may not be reproduced by mechanical or electronic means without written permission from KidWind, except for educational uses by teachers in a classroom situation or a teacher training workshop. For permission to copy portions or all of this material for other purposes, such as for inclusion in other documents please contact Michael Arquin at the KidWind Project at michael@kidwind.org. We would like to thank the Wright Center for Science Education at Tufts University for giving us the time and space to develop a nugget of an idea into a useful project for hundreds of teachers. We would also like to thank Trudy Forsyth at National Wind Technology Center and Richard Michaud at the Boston Office of the Department of Energy for having the vision and foresight to help establish the KidWind Project. Lastly we would like to thank all the teachers for their keen insights and feedback on making these wind turbine kits and materials first rate! 4/15/2009 — ALTurbine 2 Adaptable Learning Turbine Parts List (FULL KIT) Wood Tower ◊ ◊ (2) (1) 2 x 4 Interlocking wood boards with drilled hole 2’ Wooden Monopole Tower Nacelle Parts ◊ ◊ ◊ ◊ ◊ ◊ ◊ ◊ ◊ (1) (2) (4) (2) (4) (4) (8) (2) (2) 12-Hole Crimping Hub w/attached driveshaft Molded plastic nacelle sections Different sized gears + (1) gear key 4” Bolts Wing nuts Hex nuts Small screws Additional steel drive shafts DC Generators with wires attached Wires, Accessories, Output Devices & Blade Materials ◊ ◊ ◊ ◊ ◊ ◊ ◊ ◊ ◊ ◊ ◊ (2) (1) (2) (1) (1) (1) (25) (5) (5) (1) (1) Alligator Clip Wires Simple Multimeter LED Bulb and Incandescent Bulbs DC Motor w/ Yellow Mini Prop Mini-Pump and Cylinder System Ultra Capacitor 1/4” diameter poplar dowels 18” sheets of balsa wood 15” coroplast sheets Protractor Sheet Sandpaper Tools To build this turbine, you’ll need at minimum wire strippers a screwdriver, tape, and glue. 4/15/2009 — ALTurbine 3 Adaptable Learning Turbine These instructions will show you how to build the Adaptable Learning Turbine. While some parts come pre-assembled, you will have to put a few things together to finish the job. This turbine allows for maximum variability and experimentation while dramatically increasing power output through the use of gears. Cool Features of the ALTurbine: The ALTurbine is our most powerful, adaptable and experimental turbine. It is also our most eco-friendly design! Adaptable: ◊ Interchangeable gear ratios—up to 8:1 ◊ Ability to test BOTH electricity production and weighlifting ◊ Interchangeable generators—test different DC motors ◊ Can easily be converted to a yawing wind turbine ◊ Can fit two generators and/or rotors at the same time (MORE power!) Renewable: ◊ Forest Stewardship Council (FSC) Certified Renewable Wood Tower ◊ All plastic parts are made from 100% recycled plastic! Awesome! ◊ Can produce upwards of 12+ Volts! You can use your ALTurbine to power a variety of accessories, such as: • • • • Fuel Cells LEDs Incandescent Bulbs Mini Water Pumps 4/15/2009 — ALTurbine • • • Small Motors Ultra Capacitors Any other small applications that you can think of 4 Building a Tower for the ALTurbine Wood Tower 1. Connect the two 2 x 4 base boards to make an “X” 2. Slide in the 2 foot wood pole. If the pole is too tight, you can sand it a little bit, but it should be a snug fit. *NOTE* In humid weather, the wood may expand. It will still fit, but will require a bit more sanding. 3. The pole will only fit if the 2x4 base boards are put together a certain way. If it is not fitting, try reversing one of the 2x4 boards. 4. Now simply attach the nacelle (head) to the top of the tower. The ALTurbine can also be mounted on a PVC tower. Here is how to build it: Parts Needed: (All 1” diameter) ♦ (4) 90° PVC fittings ♦ (6) 6” PVC pipe sections ♦ (3) PVC T fittings Drill a small hole in one “T” ♦ (1) 24” PVC pipe section 1. Using (4) 90° PVC fittings, (2) PVC Ts and (4) 6” PVC pipe sections, construct the two sides of the PVC turbine base. Make sure in this step to use the PVC (2) Identical Base Sides Ts that DO NOT have a hole drilled in them. 2. Fit the parts together without using glue (PVC glue is really nasty stuff). To make them fit snuggly tap them together with a hammer or bang them on the floor once assembled. 3. Next, connect the two sides of the base using the PVC T with the hole. The hole will allow you to snake out the wires from the DC motor. Sides joined together. Make sure to use a PVC T with a hole drilled so you can get the wires out! 4. Slide the generator head (nacelle) onto the tower. Run the wires down through the post and through the hole in the PVC T at the center of the base. Attach the tower to the base. 5. Attach alligator clips to the wires. Then straighten all parts and make sure joints are secure. 4/15/2009 — ALTurbine 5 Building the Nacelle 1) Take the 2 identical molded nacelle parts and fit them together. Each side has 3 small holes. Secure the two sides together by screwing 6 small screws into these holes. 2) Take a wing-nut* and screw it about 2/3 of the way up the 4” bolt. Next, slide the 2 motor mount sections up the bolt such that the two concave sections are facing each other (see picture). Then screw a hex-nut onto the bolt under the mounts. 3) Notice that the top of the nacelle has cutouts shaped for the top of the bolts. Slide the bolt (with nuts & mount) into the cutouts. Then attach a wing-nut onto the bottom of the bolt so that it is secured to the molded nacelle. 4) Now take the second 4” bolt and screw a wing-nut about 1/3 of the way up. Slide that bolt into the top cutout and through the motor mounts. Take a hex-nut and screw it onto the bolt under the mounts. Move the wing-nut up the bolt so that you can slide the bolt all the way down to the bottom cutout. Now secure the second bolt with another wing-nut as you did with the first bolt. 5) Secure all the nuts and bolts so that the nacelle is tight and secure. Be careful not to over-tighten the wing-nuts on the bottom of the nacelle, or you will bend the nacelle. Over -tightening will probably not break anything, but it can make your turbine less efficient. Too tight! Done! *Note* When constructing the nacelle, the wing-nuts and hex-nuts may be used interchangeably. While wingnuts are easier to adjust, the smaller size of the hex-nuts allows for more variable configurations. 4/15/2009 — ALTurbine 6 ALTurbine Gears and Motors 6) Now you are ready to attach a generator to the nacelle. Choose a DC motor to use as your generator and loosen the motor mounts until you can fit the motor between them. Then tighten the nuts down onto the motor mount to hold the motor securely in place. Optional: If you are using a PVC tower, you can snake the wires from the motor through the slot in the nacelle behind the motor mount. Then the wires can go down through the PVC pipe. On a wood tower, the wires can go out the side of the nacelle. You can attach the wires to the wood tower with zip-ties or tape. 7) Attach the smallest gear (pinion) to the driveshaft of the DC motor. The small hole in this gear should friction fit onto most small DC motor driveshafts. 8) Choose a gear to use and push it onto the long driveshaft that is connected to your 12-hole crimping hub. Notice that the hub and the gears both have small notches that key into each other. Line up the notches so that the hub and gear can rotate together. NOTE: The ends of the driveshaft may be sharp. Use sandpaper to sand off edges. 9) Slide the driveshaft with attached hub into the hole at the top of the nacelle. You will now need to move your DC motor up or down so that the pinion gear meshes with the gear on the hub. Note: If you are using the largest gear size, you will notice that it will only fit with regular nuts under the motor mounts, as wing-nuts are too tall. If you are using the smallest gear size, you will have to use regular nuts above the motor mounts. Give the hub a spin to make sure that the gear turns and rotates the small pinion gear on the motor. 4/15/2009 — ALTurbine 7 10) Now slide the small gear key onto the back of the driveshaft where it sticks out the back of the molded nacelle. Slide it up pretty close to the nacelle, but if it is too close it will add friction as the turbine spins. This will keep the driveshaft from sliding forward as you are moving it around. Remember to be careful since the end of the driveshaft may be a bit sharp! Sanding the end is a good idea. Gearbox and generator in rear The gear key allows you to move the whole gearbox and generator to the back of the turbine, leaving the hub and rotor in front. Simply slide the main driveshaft out and slide it in the opposite side. Next slide a gear onto the back of the driveshaft, followed by the gear key to hold the gear in place. Again, be sure to line up the main drive gear with the pinion attached to your DC motor. Gearbox and generator in front 11) The completed nacelle will slide right onto your tower! You can secure the nacelle in place by screwing in one or two more small screws in the holes at the bottom of the nacelle. Now it’s time to build yourself some blades and start exploring the wonders of wind energy! 4/ More Important Notes on the ALTurbine How to Make the ALTurbine a Weightlifter: Lifting weights with your wind turbine is another great way to explore wind energy. Before wind turbines were used to generate electricity, windmills were used to grind grain and pump water. These windmills had very different characteristics from the modern electricity producing wind turbines. The ALTurbine can easily be converted to a weightlifting turbine. Remove the DC motor and String (tie its mount. Leave the hub and driveshaft and tape on) attached to the nacelle, and push the gear key to the back of the driveshaft. Now tie a string onto the driveshaft. It is a good idea to tape the string down on the driveshaft so that it does not slip on the shaft. Attach the other end of the string securely to a cup. This cup will hold your weights— nuts, bolts, anything you have laying around. With blades on the hub, the rotation of the driveshaft should draw up the cup. See how much weight you can lift with wind power! It is also a cool experiment to compare blades for electricity and weightlifting. Do blades that work well for making a lot of voltage also work well for lifting a lot of weight? What is different about your blades, and why does that make them better for different applications? Blade Strike: If your blades have a lot of pitch (high angle), it is possible that the blades will hit the nacelle or pinion gear and get stuck. If this happens, try a shallower pitch (angle) or move the blade further down the dowel so that the blades can freely rotate. Blade Strike 4/ Add a spacer to the ALTurbine for more pitch variability If you want to experiment with higher blade pitches, it is a good idea to insert this plastic spacer behind the hub of the ALTurbine. Without the spacer, the blades will strike the nacelle or pinion gear if their pitch is too steep. The addition of this spacer moves the blades further from the nacelle so that they can be pitched all the way to a flat 90 degrees without striking any part of the turbine. Remove the hub and driveshaft from the nacelle. If you have a gear attached to the hub, you will have to remove this as well. Slide the spacer down the driveshaft behind the hub. You can choose where to locate the gears and generator—on the front side or back side of the nacelle. In either location, you will need to use the small gear key to secure the larger gear in place since the gear can no longer be attached to the hub. As you push the larger gear in place, be careful to make sure that it lines up and meshes with the small pinion gear. Once you have it set in place, the gear key should hold it securely as the turbine rotates. If the gear key is slipping when the turbine rotates and your gears are not spinning, make sure there is not too much friction between the gears. You can also add a little bit of glue or tape on the gear key to hold it in place. 4/15/2009 — ALTurbine 10 The ALTurbine Dual-Generator System Dual generators The ALTurbine can be set up with a dualgenerator system. If you buy another set of motor mounts and nuts and bolts, you can attach a DC motor to the front and back of the nacelle. On the setup pictured, the front motor was producing 12 volts and the rear motor was producing 5 volts. You can wire the two generators together in series or in parallel. If you connect them in series your voltage will increase. If you connect them in parallel, your amperage will increase. Before you connect the generators, you need to determine their polarity. Finding Polarity: To correctly connect two or more generators in a circuit, you will need to find the polarity of the wires coming from each generator. Finding the polarity means figuring out which wire is positive (+) and which is negative (-). Connect your wind turbine to a multimeter. Make sure that the multimeter leads are in the correct ports, as shown in the picture (black to the left, red in the middle). Place the turbine in front of a fan, and get a voltage reading. If your voltage is a positive number, the wind turbine wire connected to the RED multimeter lead is positive (+). If your voltage reading is negative, the wind turbine wire connected to the RED multimeter lead is negative (-). Once you have established which wire is positive and which is negative, it is a good idea to mark them with some tape so you remember. The polarity of the wires is determined by the direction your blades are spinning. By changing the direction of spin you will change the polarity of your wires. If you are connecting the generators in series, connect the wires from positive to negative, making one continuous loop through the circuit. If you are connecting the generators in parallel, connect each positive and negative wire separately to the leads of the load or meter. If you have another hub, you can even try a Dual-Rotor setup on your ALTurbine! Slide the other hub onto the back of the driveshaft and attach another set of blades to it. Make sure your blades are pitched correctly! 4/15/2009 — ALTurbine 11 Using Mini-Supercapacitors to Store Energy A capacitor is similar to a battery because it can store and release electrical energy. But the way that capacitors work is very different from the way batteries work. Small supercapacitors Batteries are charged by chemical reactions. Every battery has two terminals. The chemical reactions inside the battery produce electrons on one terminal and absorb electrons on the other terminal. The chemical reaction is reversed to deliver the energy of a battery. A capacitor does not use chemical reactions at all. Instead, two metal plates separate negative charges from positive charges, creating voltage. Supercapacitors (also called “ultracapacitors”) are different from normal capacitors because they are able to hold a much greater charge. Therefore, the potential is greater, and the total energy stored can be much higher. Chemical reactions can take some time, but releasing the energy stored in capacitors can be done very fast. For this reason, capacitors are able to release an enormous amount of power in a very short time. However, batteries can release steady voltage for a longer period of time, while most small supercapacitors only store enough energy for a few minutes of voltage. Charging Supercapacitors: Charging a supercapacitor with renewable energy is very easy, but there are some important steps to follow. Supercapacitors are polarized, which means that they have positive and negative terminals. Because of this, you have to properly connect your electricity source (wind turbine, solar cell, etc.) to the supercapacitor. Sometimes the terminals are marked with (+) and (-) signs, but you can always be sure that the longer lead from the supercapacitor is the positive terminal. See the next page for instructions on determining polarity. Larger supercapacitors are used in hybrid-electric vehicles. They are charged when the vehicles brake, and discharged to enhance acceleration. 4/15/2009 — ALTurbine 12 Charging a Supercapacitor You can use a renewable energy! To determine the proper polarity of your turbine or solar cell, you will need to connect it to a multimeter. Make sure the wires from the multimeter are correctly installed as shown in the picture (black wire goes in COM port). If your voltage reading is positive, the lead connected to the red multimeter wire comes from the positive terminal. If the voltage reading is negative, the lead connected to the red multimeter wire comes from the negative terminal. It is a good idea to mark your wires with tape so you know which is positive and which is negative. The positive lead from your wind turbine, solar cell, or battery should attach to the long (+) lead on the supercapacitor. The negative lead goes to the short (-) lead on the supercapacitor. If you are sure you have the correct polarity, you can start to pump some energy into the supercapacitor! Turn the fan on to start your turbine or shine some light on your solar panel. Then wait about 1 1/2—2 minutes. After this time the supercapacitor should be charged up pretty well. Now you can use this stored energy to power small electrical gadgets! Experiments and Activities with Supercapacitors Although these are relatively small supercapacitors with low overall power, they can still do a good amount of work after you charge them up! With the supercapacitor charged up, it will start powering devices as soon as you complete a circuit. Remember that LED and incandescent bulbs are also polarized, so you might have to switch the leads before you can get them to light up. 4/15/2009 — ALTurbine What Can Kidwind SuperCapacitors Power??? • Light LED bulbs • Light incandescent bulbs • Pump water (with KidWind low-voltage water pump) • Drive motors • Cars • Boats • Planes/props • Other? 13 Gear Ratios You may have learned about the way an electric generator works: A coil of wire is rotated in a magnetic field to create a flow of electrons. This is the basis of how a wind turbine makes electricity. The blades spin, causing a driveshaft to spin, which in turn rotates the coils in the generator. The problem is that to make the type of electricity we use every day, the generator has to spin VERY fast. To simplify, the faster the coils rotate near the magnet, the more electrons will be pushed along. If you’ve seen a real utility-scale wind turbine, you probably noticed that the blades spin pretty slowly. So how do they get the generators to spin fast enough? They do this by using gears. You have probably used gears on a bicycle before, so you know how they work. Gears give a wind turbine a mechanical advantage. This means that they multiply the mechanical force of the turning blades. This is done by using gears with different numbers of teeth. When the larger gear makes one full revolution, the smaller gear has to spin faster to keep up. Routine maintenance on gears A “Gear ratio” is the relationship between the number of teeth on two or more gears that are meshed. So when you ride your bicycle, the gear in front might have 48 teeth, while the gear in back has 16 teeth. That would mean every time your pedals spin around once, the back wheel spins three revolutions (48/16 = 3). This is called a 3 to 1 (3:1) gear ratio. Wind turbines work the same way except that they have much larger gear ratios. A modern wind turbine may have a gear ratio of 100:1 or more. So every time the blades make one revolution, the generator shaft spins 100 times! The Kidwind ALTurbine offers 3 different gear ratios. The smallest gear attaches to the generator driveshaft and is called the spindle. This gear has 8 teeth. The other 3 gears attach to the rotor. One has 16 teeth, one has 32, and the largest has 64 teeth. What are the possible gear ratios of the ALTurbine? Do some experiments to find out how different gear ratios change the torque and power dynamics of your Kidwind ALTurbine! 4/15/2009 — ALTurbine ALTurbine Gearbox (8:1 ratio) 14 Building & Attaching Blades Caution!! Never make blades out of metal or any sharp edged material because they could cause injury during testing. Blades tend to spin very fast (300-600 RPM) and can easily cut people if they have sharp edges. 1. To make blades, carve or cut different shapes and sizes out of a variety of materials (wood, cardboard, felt, fabric). Tape or hot glue them to the dowels. Students have made blades out of styrofoam bowls, pie pans, and paper and plastic cups. Anything you find around the house or classroom can be made into blades! 2. Before testing check that the blades are securely attached to the dowel. If not secured properly, they may detach or deform as you test your turbine in high winds. We recommend using a combination of tape and hot or regular glue. 3. Insert the dowels into holes on the crimping hub. It is important to tighten the hub when inserting the blades so that they do not come out at high speed. 4. When attaching the blades to the hub consider a few important questions: • How close is the root of your blade to the hub? What do you think is optimal? • Are your blades about the same size and weight? Blades that are not balanced will cause vibrations that can reduce the efficiency of your turbine.. • Are the blades equally distributed around the hub? If not you can also have a set up that is out of balance. • Have you secured the hub after you inserted the blades? If not they can fly out at high speed! • Want to know how fast your blades are spinning? Get a Hangar 9 Micro Tachometer. Pie plate used to catch the wind. As the crimping hub can be separated into two parts you can try different creative ways to attach “blades” to the hub. One of the best blades we ever saw was made from a pizza pie box! Again, DO NOT USE sharp metal or very hard plastic to make blades, because blades can spin at very high speeds (500RPM) and could cause injury. 4/15/2009 — ALTurbine SAFETY & BLADE TESTING AREA • It is important to wear safety goggles testing blades. • NEVER make blades out of metal or any sharp edged material as these could cause injury while spinning fast during testing. SETUP FOR TESTING Safely set up your testing area like the picture below. It is important to clear this area of debris and materials. Make sure the center of the fan matches up with the center of the wind turbine. You may need to raise your fan with some books or a container. Stand In Front or Behind Turbine Some things to note about fan wind that reduces the efficiency. Fans create; • • • Highly Turbulent & Rotational Wind— Blades may spin better one direction than another Highly Variable Wind Speed— Wind speed is about 10-13 MPH on high for a $20 circular fan. Wind speeds near the middle will be much different than the edges. Limited Diameter— Blades bigger than the fan will not “catch” more wind—they will just add drag and slow down your blades. How to Clean Up Wind? Want some more “professional wind”? You can try to build a simple wind tunnel. Lots of plans can be found online (search term:classroom wind tunnel or go to www.kidwind.org). One simple way to make more laminar—smooth, straightened—flow is to build a honeycomb in front of your fan using milk cartons, 2” PVC pipe or some other material. Going Outside? If you want to use your wind turbine outside, you must make sure that it faces into the wind. Wind turbines are designed to YAW (or rotate) to face the wind. If the wind shifts, and the turbine cannot rotate, wind will hit the blades from the sides causing stress and inefficiency. If you want to experiment outside with a yawing wind turbine, check out the KidWind Yawing Add-On Tower. This yawing tower works great with the ALTurbine. 4/15/2009 — ALTurbine 16 Some Blade Building Tips KidWind model wind turbines are designed for use in science classes, or as a hobby or science fair project. Their purpose is to give students an affordable way to perform various blade design experiments quickly. Efficient blades are a key part of generating power from a wind turbine. Sloppy or poorly-made blades will never make enough energy to power anything. It takes time and thought to make good blades! An important concept to keep in mind when making turbine blades is drag. Ask yourself, “Are my blades creating too much DRAG?”. Your blades are probably catching the wind and helping to spin the hub and motor driveshaft, but consider the ways that their shape or design might be slowing the blades down as well. If they are adding DRAG to your system it will slow down and in most cases low RPM means less power output. Some tips on improving blades: • SHORTEN THE BLADES - Wind turbines with longer blades tend to generate more power. While this is also true on our small turbines, it is often difficult for students (and teachers) to make large, long blades that don’t add lots of drag and inefficiency. See what happens when you shorten them a few centimeters. • CHANGE THE PITCH - Students commonly set the angle of the blades to around 45° the first time they try to use the turbine. Try making the blades flatter toward the fan (0° - 5°) . Pitch dramatically affects power output, so play with it a bit and see what happens. You can use a protractor to measure the pitch. Finding a way to TWIST the blades (0° near the tips and around 10° - 20° near the root) can really improve performance. 0° 45° 90° Wind Source • USE FEWER BLADES - To reduce drag try using 2, 3 or 4 blades. • USE LIGHTER MATERIAL - To reduce the weight of the blades use less material or lighter material. • SMOOTH SURFACES - Smooth blade surfaces create less drag. Try removing excess tape or smoothing rough edges to reduce drag. • FIND MORE WIND - Make sure you are using a decently sized box or room fan with a diameter of at least 14”-18”. • BLADES VS. FAN - Are your blades bigger than your fan? If the tips of your blades are wider than the fan you’re using, then they’re not catching any wind– they are just adding drag! • BLADE SHAPE - Are the tips of your blade thin and narrow or wide and heavy? The tips travel much faster than the root and can travel faster if they are light and small, which means that if you have wide or heavy tips you may be adding lots of drag. 4/15/2009 — ALTurbine 17 How to use the Multimeter To accurately measure power production you should use a multimeter. Small DC motors like the one you’re using do not produce much power when spun slowly. On the Geared PVC Wind Turbine, gears cause the shaft of the generator to spin faster, increasing power output. Well designed blades can produce around 3 volts at 1/2 amp. With this level of power output you can light small bulbs, LEDs, small DC motors, fuel cells, and water pumps. Power (Watts) = Voltage (V) x Current (A) <—- Watch Your Units Make sure you are recording volts and amps (not milli or microvolts unless you want to!) If your readings are higher than 1— 2 watts you have done something wrong! Voltage 1. Attach the wires from the generator to the multimeter. Color does not matter! 2. To check the voltage select DC Volt (V) and set the whole number to 20 volts. Set to 20 DC Volts 3. Place your turbine out in the wind or in front of a fan and let it run. It is normal for the readings to fluctuate. Power output is often unsteady because the wind is inconstant or your blades are not balanced. 4. A set of very well designed blades may make around 2 — 4 volts. Typical blades will be in the 1—2volt range. 5. When measuring voltage you are calculating how fast the DC generator is spinning. The faster it spins the higher the voltage. Since there is no load on the generator it has very little resistance and can spin very fast. If you look closely when you attach a load (bulb, pump) the RPM will drop as will your voltage. Amperage 1. To get a more accurate picture of the power output of your turbine measure amperage as well. To accurately measure the amperage you must hook up your multimeter differently. 2. Place a load (a resistive object - small LED bulb, resistor, pump etc.) in series with the meter so that the generator is “loaded” and has to do work. 3. A set of very well designed blades will produce around 0.4 amps (400 milliamps) with this motor. Typical blades will make .1-.3 amps (100 – 300 milliamps). This will vary based on your resistive load (bulb, pump). 4. When measuring amperage you are gauging how many electrons are being pushed through the wire by the turbine. This relates to the torque your blades are generating. Wind Turbine wires meter Probes from the multimeter load in series To accurately record current you need to put a load in series. In this picture you can see the load (bulb) between the connection with the meter and the turbine. DON’T FORGET TO TURN OFF THE METER WHEN YOU ARE DONE OR THE BATTERY WILL DIE!! 4/ 15 Factors that Affect Power Output Now that you have a wind turbine, lets start exploring what factors affect the amount of power your turbine produces. Here are a few places to start; • • • • Wind Speed Generator Type Blades Gear Ratio Wind speed is an easy variable to change. Take your turbine and place it in front of a fan at three different distances. How does the power output change. Think about this in relation to the Power in the Wind equation on page 12. To more accurately measure the wind speed of your fan get a wind meter from Kidwind (www.kidwind.org) or search some ideas on the web to build your own. Generators The DC generator in your wind turbine is actually a DC motor that spins using the energy in the wind. The magnets and wires in the generator transform the energy in the wind into electricity. By manipulating the strength of the magnets used and coils of wire inside the generator we can affect the power output. In this kit we provide you with a DC generator preinstalled in the gearbox. If you wanted you could compare this to a different DC generator that you harvest from some old electronics in your house, but you would have to build another gearbox. Old VCRs, electrical toys and CD players are good places to start finding DC motors and gearboxes Do some research on how generators work or electromagnetism to learn more! Blade Design Blade design experiments are an entertaining place to explore how design affects power production. The blades on modern turbines "capture" the wind and use it to rotate the drive shaft of a generator. As we mentioned above the spinning shaft of the generator spins wires near magnets to generate electricity. How well you design and orient your blades can greatly impact how fast these blades spin and how much power your turbine produces. Experiments with blades can be simple or very complicated, depending on how deeply you want to explore. Some blade variables you can test include: • • • Length Number Pitch • • • Shape Materials Weight If you are doing this for a science fair or project you should focus on just one of these. variables at a time as your results can get confusing quite quickly. 4/15/2009 — ALTurbine 19 Powering items with your ALTurbine This geared turbine puts out some serious power, so you can put it to use! Try hooking it up to some different loads like the Kidwind Water Pump, a Fuel Cell, a buzzer or noisemaker or a short string of Christmas lights. Light Bulbs & LEDs You can use the ALTurbine to light small incandescent bulbs or LEDs. LEDs require much less current then incandescent so they are easier for the turbine to light. You can also use other bulbs from flashlights just make sure they are designed for low voltage and low current. LED lights need at least 1.75 volts to light, but very little amperage. LEDs also require that the electricity runs in the “right” direction. If your turbine is making more than 2 volts, but the LED is not lighting try reversing the turbine output wires that are connected to the LED bulb and try again. Small Motors The power needs of most small DC motors are pretty minimal, especially if they happen to have a low voltage rating. The Geared PVC Wind Turbine can easily power a variety of small DC motors. Look for small DC motors in broken electrical toys. You can also find a wide variety of at Kelvin.com, Pitsco or All Electronics online electronics store. You need around .6 - .8 volts to power a small motor with propeller. Low Voltage Water Pumps. KidWind uses a low voltage water pump that works well with our wind turbines. You need to produce around 2.0 volts for this pump to run well and a good deal of torque as pumping water requires a great deal of energy. This is one of our favorite demonstrations using wind energy. We typically hook it up to some type of graduated cylinder to see whose turbine blades can pump the most amount of water in 1 -2 minutes! Do not try to run 6V or 12V aquarium pumps using our wind turbines it will not work! Fuel Cells Using this wind turbine you can generate enough electricity to run a simple fuel cell. When you run electricity through the fuel cell it will create hydrogen and oxygen in a storage chamber which can be recombined to generate electricity. You could use this stored electricity to run the mini-water pump, a small DC motor or you can attach it to a fuel cell car and see how far it travels on two minutes of wind produced electricity-the ultimate in closed loop travel! To run this device your turbine needs to produce at least 1.75 volts. More than 2.0 volts for sustained periods can also damage your fuel cell so be careful. 4/15/2009 — ALTurbine 20 Power in the Wind — A Simple Look If a large truck or a 250lb linebacker was moving toward you at a high rate of speed, you would move out of the way, right? Why do you move? You move because in your mind you know that this moving object has a great deal of ENERGY as a result of its mass and its motion. And you do not want to be on the receiving end of that energy. Just as those large moving objects have energy, so does the wind. air from one place on earth to another. That’s the motion part. Wind is the movement of What is air though? Air is a mixture of gas molecules. It turns out that if you get lots of them (and I mean lots of them) together in a gang and they start moving pretty fast, they can definitely give you — a sailboat or a windmill — a serious push. Just think about hurricanes, tornadoes, or a very windy day! Why aren't we scared of light winds while we stay inside during a hurricane or wind storm? The velocity of those gangs of gas molecules have a dramatic impact on whether or not we will be able to stay standing on our feet. In fact, in just a 20 mph gust you can feel those gas molecules pushing you around. Humans have been taking advantage of the energy in the wind for ages. Sailboats, ancient windmills and their newer cousins the electrical wind turbines, have all captured the energy in the wind with varying degrees of effectiveness. They all use a device such as a sail, blade or fabric to "catch" the wind. Sailboats use wind energy to propel them through the water. Windmills use this energy to turn a rod or shaft. A simple equation for the Power in the Wind is described below. This equation describes a the power found in a column of wind of a specific size moving at a particular velocity. P = Power in the Wind (watts) ρ = Density of the Air (kg/m3) r = Radius of your swept area (m2) V = Wind Velocity (m/s) ∏ = 3.14 r From this formula you can see that the size of your turbine and the velocity of the wind are very strong drivers when it comes to power production. If we increase the velocity of the wind or the area of our blades we increase power output. P = 1/2 ρ (∏ r2)V3 How much wind power is coming from a regular house fan? V = 5 m/s (meters/sec) ρ = 1.0 kg/m3 (kilograms/cubic meter) r = .2 meters A = .125 m2 (Area of Circle = ∏r2) Power in the Wind = ½ρAV3 = (.5)(1.0)(.125)(5)3 The density of the air has some impact Power = 7.85 Watts as well. Cold air is more dense than warm air so you can produce more There are 7.85 watts of wind power coming energy in colder climates (as long as out typical house fan on high. Can our little the air is not too thin!). turbines capture all of this power? Do some research on the BETZ LIMIT to find out. 4/15/2009 — ALTurbine 21 ALTurbine FAQ Why won’t the rotor spin when I put my turbine in front of the fan? Check the orientation of the blades. Are your blades oriented in the same direction? Are they flat? Are they hitting the tower? Look at some pictures of old and new windmills to get some ideas about how to orient your blades. Why does the gearbox seem to turn slowly or feel stiff? The addition of the gearbox adds some friction to the system. Because of this you will need to make sure that your blades generate enough TORQUE (turning force) to overcome this friction. Why does the turbine slow down when I attach it to a load (pump, bulb, motor)? Loading the generator forces it to do work. This makes it harder to push electrons through the circuit. The more load you add the harder it is for the generator to turn and the more torque you must generate from the blades. The only way to do this is to make bigger blades or relocate your wind turbine to a place with higher wind speeds. Why are the readings on my multimeter all over the place? Your readings may be fluctuating because the wind coming out of your fan is fluctuating. This can also be caused by blades that don’t spin smoothly or change shape as they spin. Additionally, if your blades are not balanced, evenly distributed, or are producing unequal amounts of drag your readings will be irregular. I bent a driveshaft! How do I fix it? If you (or your student) bent a driveshaft, don’t worry! Hold the driveshaft tightly with a pair of pliers as you pull on the hub. The hub will pop off when you give it a good tug. Now take one of the extra driveshafts included in your kit and push it into the hub. A little spot of glue will secure it. Remember to sand any sharp ends of the driveshaft. Is a fan a good wind source to test with? Well, it is the best we’ve got, unless you have a wind tunnel handy! The wind that comes out of a fan has a great deal of rotation and turbulence. It isn’t very smooth. While it will still makes your turbine spin it is not exactly like the wind outside. To see this turbulence, hold a short piece of thread in front of a fan and move it from the center out. It should head out straight all the time...does it? Can I take my turbine outside? Can I leave it there? You can certainly take, use and test your wind turbine outside. But unless you have a yawing tower (available from KidWind) it will not track the wind and may not perform optimally. To make it work well you will have to continually face it into the wind. It is not a good idea to leave your turbine outside for too long. It is designed for basic lab tests and not to endure the rigors of the outdoor environment! Based on the power in the wind equation it seems that longer blades should make more power. On my turbine this is not true!! WHY?? The blades on your turbine may be bigger than the diameter of the fan. If that is the case, the extra part is only adding drag so your blades will slow down. Additionally, if you design large blades poorly they will have lots of drag near the tips and slow down. This will negate any positive effect of the added length. Also, short blades spin faster than 4/15/2009 — ALTurbine 22
