dimmer also possible
advertisement
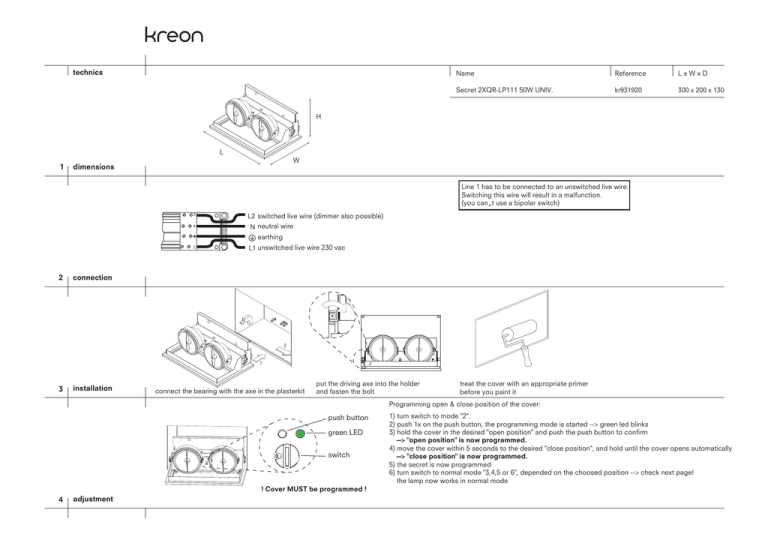
technics Name Reference LxWxD Secret 2XQR-LP111 50W UNIV. kr931920 300 x 200 x 130 H L 1 W dimensions N L2 Line 1 has to be connected to an unswitched live wire. Switching this wire will result in a malfunction. (you can’t use a bipolar switch) L2 switched live wire (dimmer also possible) N neutral wire L1 earthing 2 L1 unswitched live wire 230 vac connection 2 1 3 installation connect the bearing with the axe in the plasterkit put the driving axe into the holder and fasten the bolt treat the cover with an appropriate primer before you paint it Programming open & close position of the cover: push button green LED switch ! Cover MUST be programmed ! 4 adjustment 1) turn switch to mode "2". 2) push 1x on the push button, the programming mode is started --> green led blinks 3) hold the cover in the desired "open position" and push the push button to confirm --> "open position" is now programmed. 4) move the cover within 5 seconds to the desired "close position", and hold until the cover opens automatically --> "close position" is now programmed. 5) the secret is now programmed 6) turn switch to normal mode "3,4,5 or 6", depended on the choosed position --> check next page! the lamp now works in normal mode Important: turn switch to the correct mode in function of the position of the device and gravity. ? 5 define position switch to mode 3 the lamp now works in normal mode switch to mode 4 switch to mode 5 switch to mode 6 Remarks: - These actions have to be repeated on every secret installed. - For easy replacement of cover: turn switch to mode "1". - Cover must be reprogrammed after every replacement in box. - If you switch the light fast on/off (more then 4 times in 1 second), the device will shut down to prevent an overload of the engine, in this case you have to wait 1 minute before you can turn the light back on - The opened / closed position and gravity position are stored in the permanent memory. The adjustments remain stored, even during a long current dart. 6 remarks Problem: what to do: the secret doesn't close (entirely)?Check if there is a permanent (unswitched) live wire on L1 If a dimmer is used, check if there are working lamps placed in the device. (A lamp is needed to get rid of "leakage current" possibly caused by a dimmer) Is the secret programmed? Repeat the above described steps Switch mode in function of position/gravity? other problems 7 problems? 8 picture kreon nv Industrieweg Noord 1152 B 3660 Opglabbeek Belgium check current, reprogram as described before in this manual Tel +32 89 81 97 80 Fax + 32 89 81 97 90 www.kreon.com mailbox@kreon.be Rev. date :13/08/2009 KR8310001690 technics Plasterkit secret QT-DE12 Plasterkit secret QR-LP111 W dimensions Reference LxWxD PLASTERKIT-HOUSING SECRET QT-DE12 kr731574 382x302x100 PLASTERKIT-HOUSING SECRET QR-LP111 kr731524 382x265x165 Name Reference LxWxD PLASTERKIT-HOUSING SECRET QT-DE12 kr731574 315x250x125 PLASTERKIT-HOUSING SECRET QR-LP111 kr731524 315x250x200 W L 1 Name L D D Y W X d D X Y L 2 no obstructions in this zone X=100mm, Y= 150mm cut-out Wall thickness d: min 2mm, max 24mm 90° 3 installation rotate the plasterkit 90° place the plasterkit into the cut-out ° 90 3 installation rotate the plasterkit 90° to the original position insert the electrical wiring position plasterkit in the cut-out technics installation position the plaster kit in the hole fix the plasterkit with screws trough the wooden shelfs N L2 3 Loosen the 4 bolts, level the plasterkit to the wall fixate the 4 screws again fill with polyesterplaster L2 switched live wire (dimmer also possible) N neutral wire (unswitched) L1 earthing 4 L1 unswitched live wire 230 vac connection kreon nv Industrieweg Noord 1152 B 3660 Opglabbeek Belgium Tel +32 89 81 97 80 Fax + 32 89 81 97 90 www.kreon.com mailbox@kreon.be Rev. date: 29/10/2009 KR8315741664

