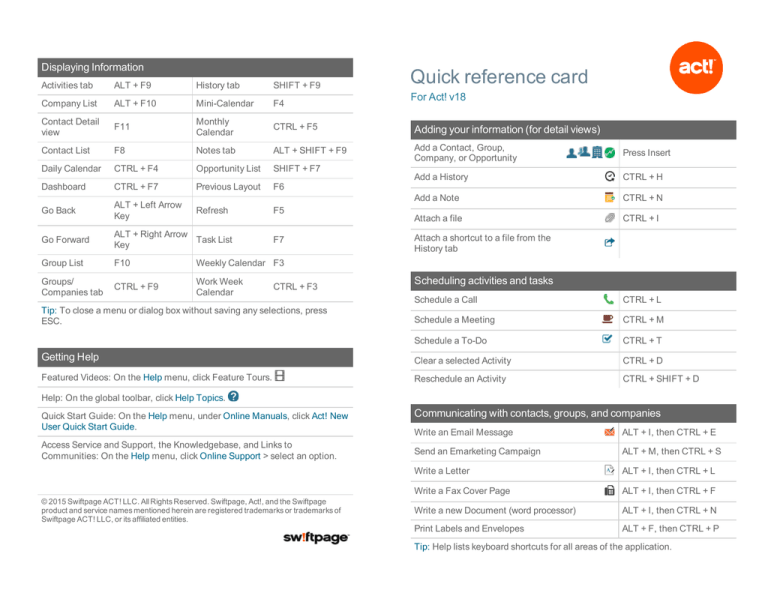
Displaying Information
Quick reference card
Activities tab
ALT + F9
History tab
SHIFT + F9
Company List
ALT + F10
Mini-Calendar
F4
Contact Detail
view
F11
Monthly
Calendar
CTRL + F5
Adding your information (for detail views)
Contact List
F8
Notes tab
ALT + SHIFT + F9
Add a Contact, Group,
Company, or Opportunity
Press Insert
Daily Calendar
CTRL + F4
Opportunity List
SHIFT + F7
Add a History
CTRL + H
Dashboard
CTRL + F7
Previous Layout
F6
Add a Note
CTRL + N
Go Back
ALT + Left Arrow
Key
Attach a file
CTRL + I
Go Forward
ALT + Right Arrow
Task List
Key
Group List
F10
Weekly Calendar F3
Groups/
Companies tab
CTRL + F9
Work Week
Calendar
Refresh
F5
F7
CTRL + F3
For Act! v18
Attach a shortcut to a file from the
History tab
Scheduling activities and tasks
Schedule a Call
CTRL + L
Schedule a Meeting
CTRL + M
Schedule a To-Do
CTRL + T
Getting Help
Clear a selected Activity
CTRL + D
Featured Videos: On the Help menu, click Feature Tours.
Reschedule an Activity
CTRL + SHIFT + D
Tip: To close a menu or dialog box without saving any selections, press
ESC.
Help: On the global toolbar, click Help Topics.
Quick Start Guide: On the Help menu, under Online Manuals, click Act! New
User Quick Start Guide.
Access Service and Support, the Knowledgebase, and Links to
Communities: On the Help menu, click Online Support > select an option.
© 2015 Swiftpage ACT! LLC. All Rights Reserved. Swiftpage, Act!, and the Swiftpage
product and service names mentioned herein are registered trademarks or trademarks of
Swiftpage ACT! LLC, or its affiliated entities.
Communicating with contacts, groups, and companies
Write an Email Message
ALT + I, then CTRL + E
Send an Emarketing Campaign
ALT + M, then CTRL + S
Write a Letter
ALT + I, then CTRL + L
Write a Fax Cover Page
ALT + I, then CTRL + F
Write a new Document (word processor)
ALT + I, then CTRL + N
Print Labels and Envelopes
ALT + F, then CTRL + P
Tip: Help lists keyboard shortcuts for all areas of the application.
Searching and viewing information
Search
1. In the Search text box, type your search term or
terms. Click Go.
2. Select or clear Show Only and Last Edited filters
to narrow your search.
3. To go to an item in the search results, click the
hyperlink.
4. To create a lookup of the search results, click
Create Lookup.
•
Use the Back and
Forward buttons to
navigate through
views
On the global toolbar, click the Back button to go
back to previous views.
• Click the Forward button to go forward in views.
• Your current view is underlined and bold in the
list.
To see a list of your most recently accessed views:
1. Click the drop-down arrow on the Back button.
2. Select an item in the list to go to that view.
Create a list of
favorite reports
1. On the Navbar, click Reports.
2. Select the Favorites Reports check box next to
the report.
Filter histories by
type in the History
List
1. On the Navbar, click History List.
2. From the Types list, you can:
• Click the plus sign to expand the category to
view the associated types.
• Clear the check box to clear a history type.
Tip: Clearing the top-level category clears all types in
that category.
• Select None to clear all types and categories.
• Select a check box to select individual types.
• Select the top-level category to select all types
in the category.
Find contact and
company information
on the web
1. On a Contact or Company Detail view, click the
Web Info tab.
2. Select a site from the list on the left, and the web
page for the selected site displays on the right.
1. On the Navbar, click Marketplace.
Find solutions* to
2. Click a solution to learn more.
help your productivity
*Requires Internet access.
Working effectively and sharing information
Duplicate a Contact
Expand the dropdown list
F2
Export list data to
Excel®
Insert a note for
multiple contacts
SHIFT + F8, select contacts, CTRL + N.
Locate, open, and
share a database
1. On the File menu, click Open/Share Database.
2. To open a listed database, select it, and click
Open Database.
3. To share* a database, click Share.
*Requires Act! Admin or Mgr role.
Open and use the
Act! Scratchpad
1. Double-click the desktop shortcut, or on the Tools
menu, click Act! Scratchpad.
2. Place your cursor in a line and begin typing. Click
the tools to reorder, bold, italicize, and more.
3. Click Send to Act! and select to create a note,
history, or activity.
Print selected records
Select records, then on the File menu, click Quick
Print Selected.
Run a Smart Task for
a contact
1. On the Schedule menu, select Run Smart Task.
2. Select a Smart Task from the list.
3. Click Run.
Schedule a meeting
with multiple contacts SHIFT + F8, select contacts, then CTRL + M
(in the Contact List)
Send a contact’s
vCard
1. Open a Contact Detail view, or from the Contact
List, select multiple contacts.
2. On the Contacts menu, click Send vCard.
Synchronize calendar
with Outlook® or
Google™
On the Schedule menu, click Synchronize Calendar
with Outlook or Synchronize Calendar with Google.
Update contact with
company info
View (access) a
previous contact
lookup
1. On the Navbar, click Contacts.
2. On the Lookup menu, click Previous.

