Flip Video Camera
advertisement
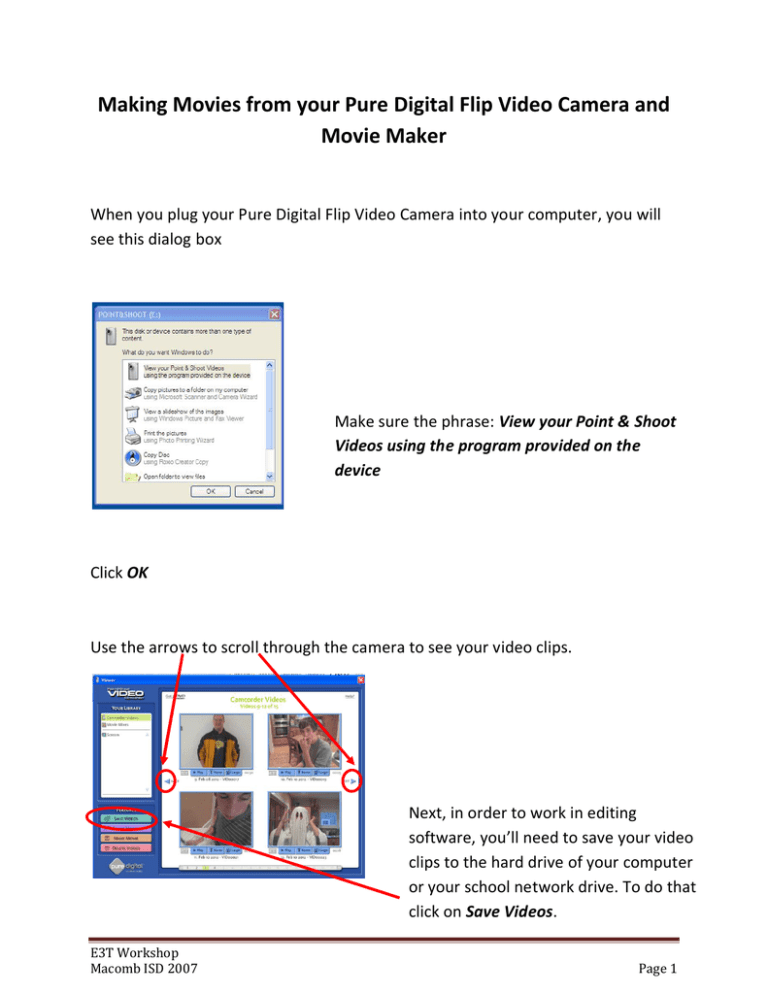
Making Movies from your Pure Digital Flip Video Camera and Movie Maker When you plug your Pure Digital Flip Video Camera into your computer, you will see this dialog box Make sure the phrase: View your Point & Shoot Videos using the program provided on the device Click OK Use the arrows to scroll through the camera to see your video clips. Next, in order to work in editing software, you’ll need to save your video clips to the hard drive of your computer or your school network drive. To do that click on Save Videos. E3T Workshop Macomb ISD 2007 Page 1 Click on the video clips you want to save. Choose Save to Computer. Click Save again. Enter a name for your album and click OK. E3T Workshop Macomb ISD 2007 Page 2 It will look like this: You can close the video player software. Pure Digital stores the files in your “MY DOCUMENTS” folder. You’ll find them in a folder named “MY ALBUMS” or “My Flip Video Library”. You can leave the files here or store them anywhere you choose. Copy it to the network or onto your flash drive. (If you copy clips onto your flash drive, you will need to have the flash drive plugged in anytime you are working on your movie.) Open Movie Maker from the Program Menu E3T Workshop Macomb ISD 2007 Page 3 For a brief introduction to the Movie Maker program, click on the Atomic Learning Video Tutorial named “Getting to Know the Interface” at (section A): http://movies.atomiclearning.com/k12/moviemaker2/ Importing video clips into Movie Maker Under Capture Video in the Movie Tasks Window, click Import Video. E3T Workshop Macomb ISD 2007 Page 4 Click the drop down arrow and select My Documents. Your clips will be in the folder name “My Albums” or “My Flip Video Library”. Be sure the checkbox marked Create clips for video files is selected. Click on the folder that contains the Album you just created, in this example it’s called Sue’s new Album folder. Select the video. Click Import. E3T Workshop Macomb ISD 2007 Page 5 Once you have the video in the Preview Pane, Click on the video clip and drag it into the Storyboard. Repeat until all of your clips are in Movie Maker. Toggle between Storyboard and Timeline views to see the difference. Click here to toggle back and forth. In Storyboard view, you can quickly add transitions and get a quick sense of the direction of your movie. E3T Workshop Macomb ISD 2007 Page 6 In Timeline you have a detailed look at video, transitions, audio, music and time. You’ll use this view for editing clips. Editing your clips: One way to trim a video clip is to click on the edge of it in Timeline view. Drag the edge toward to left to cut off the end of the clip. Watch what happens to your video clip in the preview window. E3T Workshop Macomb ISD 2007 Page 7 To see more information about editing a clip, check out the links in the Movie Tasks window. For more on editing clips, click on the Atomic Learning Video Tutorial named “Trimming Clips in the Preview Monitor ” at (section E): http://movies.atomiclearning.com/k12/moviemaker2/ Adding a Title Slide Click on Make Titles or Credits link in the Movie Tasks Window E3T Workshop Macomb ISD 2007 Page 8 Decide where you want your title to go and click that link. In this case the title will go at the beginning of the movie. Type your title into the text box. It will appear in the Preview Window. To change the font style, color or background color click Change the Text Font and Color. To change the way the title moves click Change the title animation. Click Done when you are finished editing your title slide. This will put the slide in your Timeline. For more information on changing title slides, click on the Atomic Learning Video Tutorial “Manipulating Title Clips” at (section H) http://movies.atomiclearning.com/k12/moviemaker2/ E3T Workshop Macomb ISD 2007 Page 9 Creating Transitions between Clips To create a bridge between clips that helps hold the movie together, you can add a transition. The easiest way to add transitions to your movie is while you’re in Storyboard view. To see Transition options click on View Video Transitions in the Movie Tasks Window. Choose the transition you like and click and drag it into the box positioned between the two clips. For more information on Transitions, click on the Atomic Learning Video Tutorial “Manipulating Transitions” at (section G) http://movies.atomiclearning.com/k12/moviemaker2/ E3T Workshop Macomb ISD 2007 Page 10 Adding Background Music Music can only be added in Timeline view. Click on Import Audio or Music from the Movie Task Window. Find the music you want to use on your computer and Click Import. E3T Workshop Macomb ISD 2007 Page 11 Click on the music clip you just imported in the Collections pane and drag it onto the Timeline into the bar marked Audio/Music. Make sure you place it in the spot where you would like the music to begin. To edit the length of the clip, click on the end of the music and drag it back toward the left. To adjust the volume of the clip, Right Click on the track. Click Volume in the pop-up menu. E3T Workshop Macomb ISD 2007 Page 12 Move the slide bar to the desired volume. Save your Movie to Share When you are finished editing your movie project, it’s time to save it as a movie. Click the link text Save to my Computer E3T Workshop Macomb ISD 2007 Page 13 Name your video and choose the folder you would like to store the video in. Click Next. This dialogue box will open. Click the circle next to Other Settings. Open the drop down box and choose a description. The formats are described in terms of how they will be used. For our purposes today, select Video for LAN (1.0 Mbps). This creates a good quality video that is pretty quick to upload. For more information on File Saving, click on the Atomic Learning Video Tutorial “Saving a Movie File Part 1 & 2” at (section J) http://movies.atomiclearning.com/k12/moviemaker2/ E3T Workshop Macomb ISD 2007 Page 14 Uploading Your Video to Share To upload video to TeacherTube, you must have an account. If you don’t have one already, please take a minute to sign up. Look for the FREE Sign Up link in the upper right hand corner of the screen. Click the tab along the top marked Upload. Follow the steps to upload your video. You need to fill out the form completely to upload your video. Click Continue. E3T Workshop Macomb ISD 2007 Page 15 Click the Browse button to find the movie file you just created. You can decide to make your movie public or private. If you choose private, you can still put a link to your video or embed the code into your blog, but others cannot search for your video. Click Upload to complete the process. To Add your Video to your Blog/Protopage Click on your Video in TeacherTube. If you scroll down your page a bit, you’ll see a section called Embed Video, it looks like this. Next to the word Embeddable, is a box of code. Click in this box. With the text highlighted, right click on your mouse and choose copy. This is the code you’ll paste in your blog or Protopage. E3T Workshop Macomb ISD 2007 Page 16 Open your internet site. If you’re using a Visit My Class blog, create a new post. Title it and select a category for your video. Then click on the HTML icon on the toolbar along the text box. It will open a blank box. That looks like this: Right click in the box and choose Paste. E3T Workshop Macomb ISD 2007 Page 17 It should look a bit like this: Click Update. Click Submit. E3T Workshop Macomb ISD 2007 Page 18 Click on the post to view the video. Extending the Learning You can add narration to your video using Movie Maker. For information on Narrating your Video, click on the Atomic Learning Video Tutorial “Narrating your Movie Project” at (section I) http://movies.atomiclearning.com/k12/moviemaker2/ Add cool effects to video clips like slow motion, sepia tone, age the film. To add effects click the View Video Effects link in the Movie Tasks Window. For information on Adding Effects, click on the three Atomic Learning Video Tutorials in the section “Applying Video Effects” (section F) http://movies.atomiclearning.com/k12/moviemaker2/ E3T Workshop Macomb ISD 2007 Page 19
