InstructionSheet
Part No. . . . . . . . . . . . . . . . . . . . . . . . . . . . . . . . .93017297
IMPORTANT SAFETY INFORMATION. READ AND FOLLOW ALL SAFETY INSTRUCTIONS. Follow label information
and instructions concerning Wet or Damp Locations, installation near combustible materials, insulation, building materials,
and proper lamping. Do not install in areas subject to combustible vapors or gases. Before wiring to power supply and
during servicing or relamping, turn off power at fuse or circuit breaker. All servicing or relamping must be performed
by qualified service personnel. Product must be grounded to avoid potential electric shock or other potential hazard. Product must be mounted in locations and at heights and in a manner consistent with its intended use, and
in compliance with the National Electrical Code and local codes. The use of accessory equipment not recommended
by the manufacturer or installed contrary to instructions may cause an unsafe condition. Do not block light emanating from
product in whole or part, as this may cause an unsafe condition. Do not allow items such as drapes, curtains, screens or
the like to come into contact with the product or to block light from the product, as this may cause an unsafe condition.
INSTALLATION INSTRUCTIONS
RECESSED LED AISLE LIGHT SLLED2
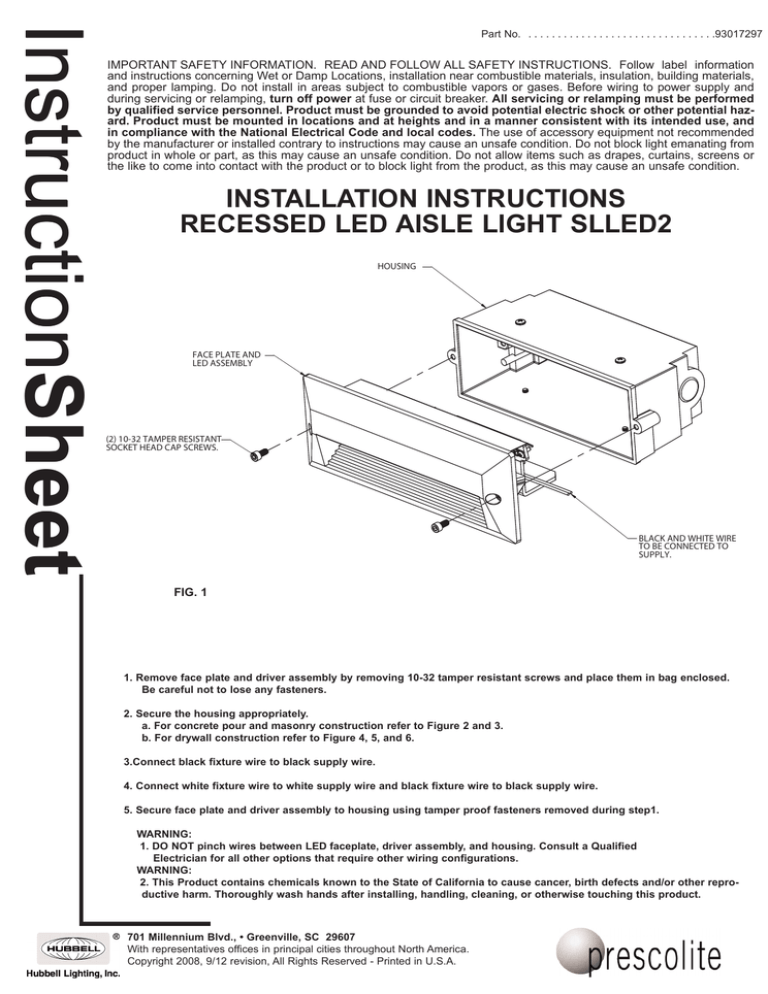
HOUSING
FACE PLATE AND
LED ASSEMBLY
(2) 10-32 TAMPER RESISTANT
SOCKET HEAD CAP SCREWS.
BLACK AND WHITE WIRE
TO BE CONNECTED TO
SUPPLY.
FIG. 1
1. Remove face plate and driver assembly by removing 10-32 tamper resistant screws and place them in bag enclosed.
Be careful not to lose any fasteners.
2. Secure the housing appropriately.
a. For concrete pour and masonry construction refer to Figure 2 and 3.
b. For drywall construction refer to Figure 4, 5, and 6.
3.Connect black fixture wire to black supply wire.
4. Connect white fixture wire to white supply wire and black fixture wire to black supply wire.
5. Secure face plate and driver assembly to housing using tamper proof fasteners removed during step1.
WARNING:
1. DO NOT pinch wires between LED faceplate, driver assembly, and housing. Consult a Qualified
Electrician for all other options that require other wiring configurations.
WARNING:
2. This Product contains chemicals known to the State of California to cause cancer, birth defects and/or other reproductive harm. Thoroughly wash hands after installing, handling, cleaning, or otherwise touching this product.
701 Millennium Blvd., • Greenville, SC 29607
With representatives offices in principal cities throughout North America.
Copyright 2008, 9/12 revision, All Rights Reserved - Printed in U.S.A.
InstructionSheet
Part No. . . . . . . . . . . . . . . . . . . . . . . . . . . . . . . . .93017297
Installation Instructions Recessed LED Aisle Light- SLLED2
For Concrete Installation (Housing Installation)
FIG. 2
(For wet or drywall installation see figure 4)
NOTE: IT IS RECOMMENDED THAT THE ALUMINUM HOUSING BE
COATED WITH AN ASPHALT PAINT CONTAING ALUMINUM PIGMENT.
For Concrete Installation
1. Select a threaded hole in housing to
be used for supply wire access.
Insert plugs into threaded holes not
being used.
2. Attach housing with conduit mounted
to concrete form, housing flange face
must be flush with concrete surface.
3. Run supply wires in accordance with
local and national electrical codes.
GASKET
TYPICAL
For Masonry Installation
1. Select a threaded hole in housing to be used for
supply wire access. Insert plugs into threaded holes
not being used.
2. Remove one masonry brick from the wall at the
desired location for the fixture.
3. Insert the fixture housing into the wall and secure in
place with mortar. Front surface of housing must be
flush with masonry surface.
HOUSING
CONCRETE
FIG. 3
NOTE: PRESCOLITE CONCRETE MOUNTING BOX P/N: SLD12CMB IS TO BE USED WITH SLLED1 OR
SLLED2 HOUSINGS ONLY.
701 Millennium Blvd., • Greenville, SC 29607
With representatives offices in principal cities throughout North America.
Copyright 2008, 09/12 revision, All Rights Reserved - Printed in U.S.A.
CONDUIT
CONNECTION
InstructionSheet
Part No. . . . . . . . . . . . . . . . . . . . . . . . . . . . . . . . .93017297
Installation Instructions Recessed LED Aisle Light- SLLED2
For Wet or Drywall Installation (Housing Installation)
SUPPORT FRAME
(BY OTHERS)
3.87
HANGER
BARS
CONDUIT
(BY OTHERS)
HOUSING
FIG. 4
BRACKET
MOUNTING SCREWS
FIG. 5
(For concrete installation see figure 2)
For Wet or Drywall Installation
1. Use the hanger bar bracket which is sold seperately as
SLMB.
2. Remove screws from housing and use them to secure
brackets to housing shown in FIG 4.
3. Slip bar hangers into brackets.
4. Hold housing in desired position and drive barbs into
studs. If needed reinforce with nails or screws.
5. If desired brackets can be mounted directly to framing
members as shown in FIG 5.
6. Run supply wires in accordance with local and national
electical codes.
GASKET
TYPICAL
DRY CONSTRUCTION
HOUSING
SCREWS TO MOUNT
HANGER BAR BRACKETS
FACE OF HOUSING MUST BE
FLUSH OR PROTRUDE SLIGHTLY
FROM WALL FOR PROPER SEAL.
FIG. 6
701 Millennium Blvd., • Greenville, SC 29607
With representatives offices in principal cities throughout North America.
Copyright 2008, 09/12 revision, All Rights Reserved - Printed in U.S.A.
CONDUIT
CONNECTION


