L
Technical
Information
From Input
to Output
When scanning line art, halftones, or continuous tone images, the question
often arises: At what resolution should I scan? To answer this question it is
important to understand what happens between image input and final output.
This article will investigate the process from beginning to end, to see how different steps along the way influence the quality of the resulting job. Some of
the issues which will be discussed here have been addressed in greater
detail in the technical information pieces on Line Art and Scanned File Size.
Scanner Resolution
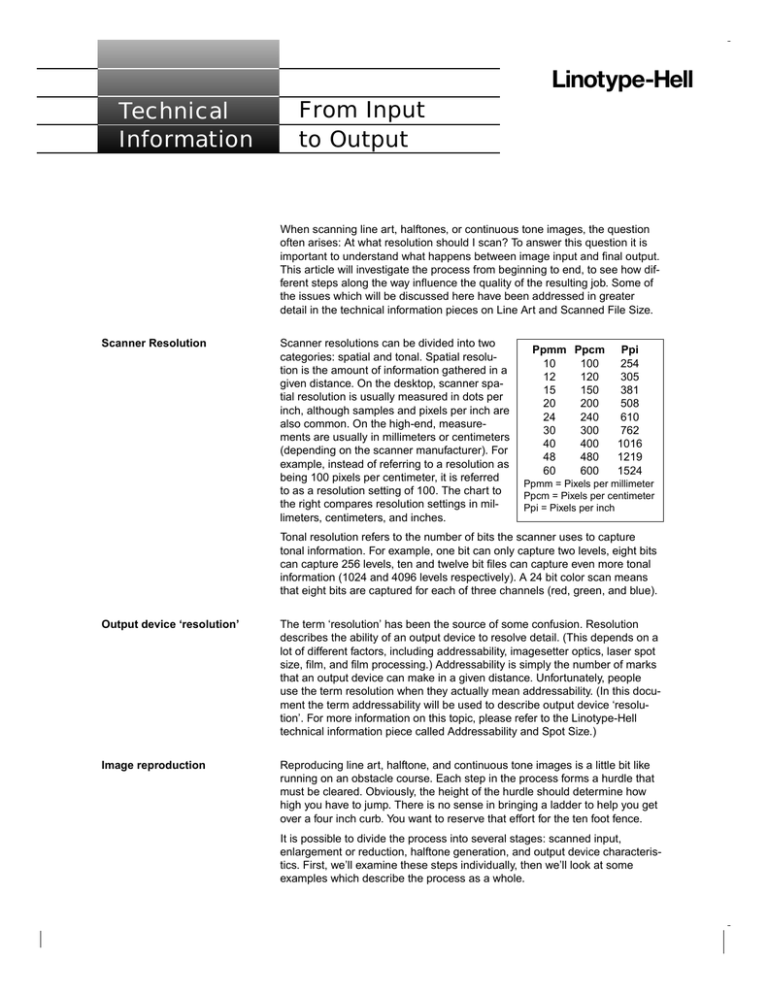
Scanner resolutions can be divided into two
categories: spatial and tonal. Spatial resolution is the amount of information gathered in a
given distance. On the desktop, scanner spatial resolution is usually measured in dots per
inch, although samples and pixels per inch are
also common. On the high-end, measurements are usually in millimeters or centimeters
(depending on the scanner manufacturer). For
example, instead of referring to a resolution as
being 100 pixels per centimeter, it is referred
to as a resolution setting of 100. The chart to
the right compares resolution settings in millimeters, centimeters, and inches.
Ppmm Ppcm
10
100
12
120
15
150
20
200
24
240
30
300
40
400
48
480
60
600
Ppi
254
305
381
508
610
762
1016
1219
1524
Ppmm = Pixels per millimeter
Ppcm = Pixels per centimeter
Ppi = Pixels per inch
Tonal resolution refers to the number of bits the scanner uses to capture
tonal information. For example, one bit can only capture two levels, eight bits
can capture 256 levels, ten and twelve bit files can capture even more tonal
information (1024 and 4096 levels respectively). A 24 bit color scan means
that eight bits are captured for each of three channels (red, green, and blue).
Output device ‘resolution’
The term ‘resolution’ has been the source of some confusion. Resolution
describes the ability of an output device to resolve detail. (This depends on a
lot of different factors, including addressability, imagesetter optics, laser spot
size, film, and film processing.) Addressability is simply the number of marks
that an output device can make in a given distance. Unfortunately, people
use the term resolution when they actually mean addressability. (In this document the term addressability will be used to describe output device ‘resolution’. For more information on this topic, please refer to the Linotype-Hell
technical information piece called Addressability and Spot Size.)
Image reproduction
Reproducing line art, halftone, and continuous tone images is a little bit like
running on an obstacle course. Each step in the process forms a hurdle that
must be cleared. Obviously, the height of the hurdle should determine how
high you have to jump. There is no sense in bringing a ladder to help you get
over a four inch curb. You want to reserve that effort for the ten foot fence.
It is possible to divide the process into several stages: scanned input,
enlargement or reduction, halftone generation, and output device characteristics. First, we’ll examine these steps individually, then we’ll look at some
examples which describe the process as a whole.
Scanned input
The first thing to consider is the type of image. Scanned line art, halftones
and continuous tone images all have fundamentally different requirements.
Scanned line art refers to images that include only black and white with no
intermediate shades of gray. One bit of information (i.e., either black or white)
is captured when these types of images are scanned. For scanned line art,
ideally the resolution of the image should be equal to the addressability of the
output device. This would give you one piece of information for every laser
mark that the output device will reproduce. But this is not always practical. In
many cases the scan resolution may be below the output device addressability without any noticeable problem. (Examples of this are shown in the Line
Art technical information piece.)
As an example, many people are happy to output their text at an addressability of 1270. It is true that type output at 2540 is finer, but the difference may
not be noticeable enough to make a significant quality difference (particularly
once it is printed). This holds true for line art as well. Although theoretically
you might want to match the addressability of your output device, realistically
there may be no compelling reason to do it. You may get perfectly acceptable
results at lower resolutions (and in fact, because of scanner resolution limits,
and storage issues for scanned files, you might prefer the lower resolution.)
Halftone dot
Halftone cell
Laser spot
Figure 1 - Digital halftone dot
shown with the halftone cell
boundary and an individual
laser spot.
D
D
D
D
D
D
D
D
D
D
D
D
D D D D D D D D
D D D D D D D D
D D D D D D D D
D D D D D D D D
D D D D D D D D
D D D D D D D D
Figure 2 - (Top) spatial resolution equals the screen ruling
(i.e., one piece of data per
halftone cell). (Bottom) spatial
resolution is two times the
screen ruling( i.e., four pieces
of data per halftone cell).
The levels of gray in a scanned halftone are reproduced by evenly spaced
halftone dots of different sizes. To do an adequate reproduction of a scanned
halftone you have to supply enough information for each halftone dot. (When
an imagesetter creates halftone dots, each halftone dot is made up of many
laser spots, see Figure 1. For more information, please refer to the LinotypeHell technical piece entitled Digital Halftone Dots.)
With scanned halftones, both the spatial resolution and the tonal resolution of
the scan come into play. Tonal resolution is usually determined for you by the
scanner that you are using. (For example, you may only be able to choose
between one and eight bits.) Screen ruling is the primary factor for determining the scanner’s spatial resolution because by choosing a screen ruling you
are actually determining how widely spaced the halftone dots will be.
With halftones, you should supply information for each halftone dot, not for
each laser spot (the way you would with line art). If the spatial resolution was
equal to the screen ruling, you would have one piece of information for every
halftone dot. This is the bare minimum. And, mathematicians have calculated
that there is little benefit in using more than four pieces of information for
each halftone dot (two in each direction, see Figure 2). There is no reason,
however, for the screen ruling and spatial resolution to match exactly or even
to be multiples of each other. Halftoning algorithms can make adjustments for
variations between the two.
While it is generally recommended that spatial resolution be set at no more
than twice the screen ruling1, you may get reasonable results with less data.
For an example of this, see the Linotype-Hell technical information sample
entitled How Do You Keep File Size Low While Maintaining Quality?
1
Using the high-end terminology, a 150 line per inch halftone would usually be
scanned at a 120 resolution setting (as long as the halftone isn’t going to be enlarged
or reduced). The chart on page one shows that a 120 resolution setting results in just
over 300 ppi., (i.e., two times 150).
With tonal resolution, you may also find that there is an upper limit. For example, with current PostScript technology there is a limit of 256 levels of gray for
each plane (or separation) in a file. That means that supplying more than
eight bits (256 levels of gray) is a waste.3
3
Some scanners that capture 10 or 12 bits may downsample to 8. For example, you
might capture 10 bits of information and somehow select 256 values out of the 1024
at hand. Having the ability to do this could result in a better scan.
A continuous tone image is a scanned image that contain numerous levels
of gray or color. If you intend to output a continuous tone image to a 35mm
slide recorder, the choice of spatial resolution should come as close as possible to the output device addressability. The reason for this is that a slide
recorder does not require halftoning. Therefore, like line art, you want to scan
so that each output pixel has at least one piece of data. (Although depending
on your quality requirements, you may be able to get away with less.)
Because 35mm slides are very small, it is not too difficult to match the output
device addressability, particularly if the original scan can be reduced.
Enlargement or reduction
The recommendations mentioned above would be a lot simpler if people
didn’t have to reduce and enlarge images. Because unfortunately, doing
reduction and enlargement actually changes the effective resolution of the
image. For example, if you scan a 1 inch square image at 300 dpi (dots per
inch), that means there are 300 samples in every linear inch. If you then blow
that scan up to a two inch square, you still only have 300 samples, but they
are stretched over 2 inches, making the effective resolution 150 dpi.
It is possible to calculate what the effective resolution will be if you know both
the scanned resolution and the enlargement or reduction percentage. (For
more information on this topic, please refer to the Linotype-Hell technical
information piece entitled Scanned File Size.) If, for example, you know you
are going to enlarge an image by 200%, to determine the effective resolution,
just divide the scanned resolution by 2. If you were going to decrease by
50%, divide it by .5. Therefore a 300 dpi scan enlarged by 200% becomes a
150 dpi scan, while the same 300 dpi scan reduced by 50% becomes a
600 dpi scan.4
Enlargement or reduction does not affect tonal resolution.
4
Halftone generation
As we have seen, line art and continuous tone images do not need to be
halftoned. This is a major difference which ultimately means that halftones
require much less spatial resolution (since they do not require information for
each laser spot.) This is somewhat balanced by the fact that halftones
require more tonal resolution than line art. Continuous tone images have the
worst of both worlds since they require not only the spatial resolution of line
art, but also the tonal resolution of halftones.
Output device characteristics
Your output device addressability should be chosen based upon the halftone
screen ruling, or your quality requirements for type. With halftones, you will
want to keep the following factors in mind. You will probably want to be sure
that at least 256 levels of gray can be achieved at the screen ruling and
imagesetter addressability that you have selected. You can make an estimate
for gray levels by dividing the addressability by the screen ruling and squaring
the resulting number. For example, 2540 dpi divided by 150 lpi (lines per
inch) is equal to 16.93, squaring this number results in approximately 286
levels of gray. (For more information, please refer to the Linotype-Hell technical information piece entitled Resolution and Screen Ruling.)
If you consider the entire process, you will want to evaluate not only how the
film output looks, but also how that output will look when printed or displayed.
For example, if you are printing on newsprint instead of coated stock, you
may not be as concerned with maintaining the highest levels of resolution
because newsprint cannot hold as much detail as coated stock. On the other
hand, if you intend to project a slide on the side of a building, the input scan
resolution and the output device addressability will play very key roles and
both must be very high.
Production examples
Planning Chart - Line Art
Input spatial
600 dpi
resolution
Enlargement
or reduction
200%
Effective
resolution
300 dpi
Screen ruling
NA
Output device
addressability
1270 dpi
Levels of gray
NA
As an example, imagine the following situations. You have a 600 dpi scanner
that can scan 11” x 17” originals with up to 600 dpi of spatial resolution. It
also can capture tonal information at one or eight bits per pixel. Your output
device is an imagesetter with two addressabilities: 1270 and 2540 dpi.
Consider how you would handle the following situations.
Line art - The line art original you have is 4” x 5”, you want to enlarge it to 8”
x 10” and print it on a coated stock of paper. In this case, the first hurdle you
face is the resolution of the scanner. Your top resolution is 600 dpi. If you
scan a 4” x 5” image at 600 dpi and enlarge it by 200% to 8” x 10” you are
effectively cutting the resolution of the scanned image down to 300 dpi. Since
300 dpi may not be enough to meet your quality levels, what can you do? You
have two choices.
• You could photographically enlarge your original and scan from that. If you
enlarged the image to 8” x 10”, you wouldn’t have to resize the scan at all.
That would give you 600 dpi of spatial resolution (which would probably be
enough). If you photographically enlarged the original further (for this original the largest size that the 11” x 17” scanner bed would accommodate is
11” x 13.75”) you could reduce the scan later. This would actually increase
the resolution. In this case, an 11” x 13.75” scan reduced to 8” x 10” would
increase a 600 dpi scan to 825 dpi.
• Another option would be to redraw the image in an illustration program.
This would release you from the resolution bind because a vector image
can be enlarged without being affected by resolution.
If you choose to enlarge the image photographically and scan at same size
(which would give you 600 dpi in spatial resolution), remember that there is
not much sense in outputting it at 2540 dpi.5
Planning Chart Halftone
Input spatial
50 dpi
resolution
Enlargement
or reduction
25%
Effective
resolution
200 dpi
Screen ruling
85
Output device
addressability
1270 dpi
You must consider all elements on the page. If you have a halftone or a blend on the
same page as the line art, you might benefit from a higher addressability. That would
depend on the number of levels of gray that the screen ruling can produce.
4
Halftone - You have an 8” x 10” photograph that you would like to reproduce
as a 2” x 2.5” (a reduction of 25%). The halftone will be printed on newsprint
at an 85 lpi screen ruling. You should first consider your output device. At
1270 dpi addressability, an 85 lpi screen ruling can produce 223 levels of
gray (1270/85 = 14.9, 14.9 squared = 223). Though this is less than 256 it is
probably sufficient for newsprint. Tonal resolution should be set at 8 bits per
pixel. To determine spatial resolution, double the screen ruling. This gives
you 170. However, since you know that you will be reducing your image by
25%, you could actually set the spatial resolution of the scan at 50 dpi and
still get an effective resolution of 200 dpi once the image is reduced (50/.25 =
200). An effective resolution of 200 dpi would be more than enough in this
instance. You could even set the spatial resolution somewhat lower. Please
note that all of these decisions involve quality assessments that must be
based on your own production standards.
Some programs will do the above calculations for you, but still, you should
know how the process works. The charts to the right can be used as templates for your own situations.
Comments
Please direct any questions or comments to:
Jim Hamilton, Marketing Department
Linotype-Hell Company
425 Oser Avenue
Hauppauge, NY 11788
Part Number 3310, 5/92
© 1992 Linotype-Hell Company. All rights reserved.
All company and product names are trademarks or registered trademarks of their respective owners.


