SINGER® Flat Iron or Curling Iron Case
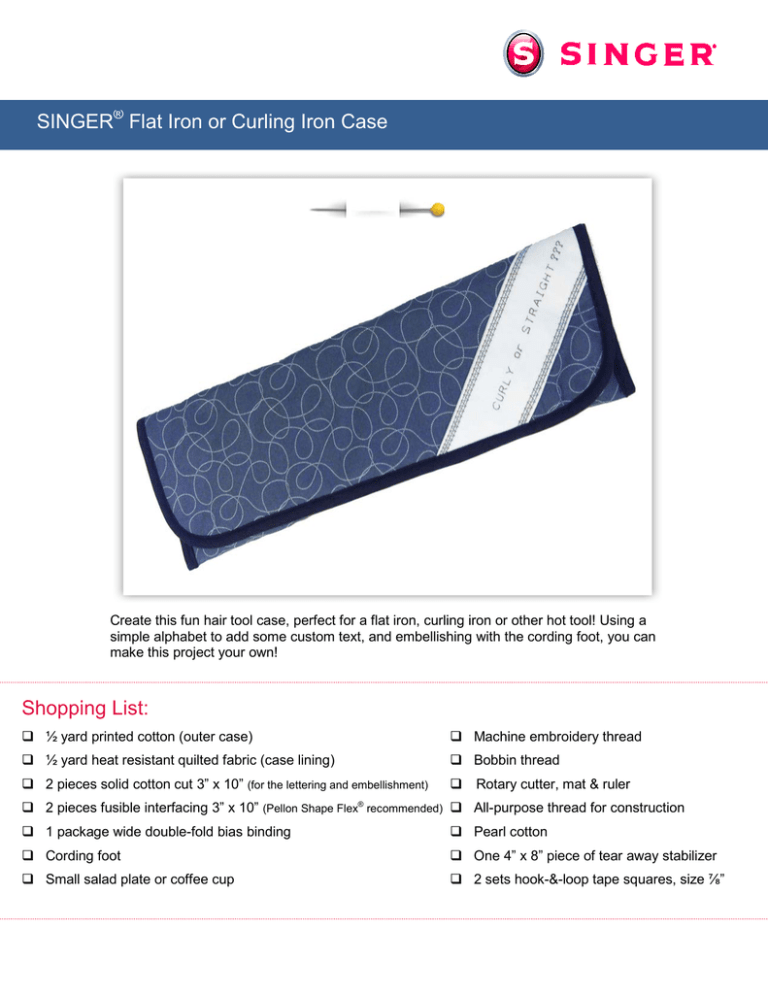
Create this fun hair tool case, perfect for a flat iron, curling iron or other hot tool! Using a
simple alphabet to add some custom text, and embellishing with the cording foot, you can
make this project your own!
Shopping List:
½ yard printed cotton (outer case)
Machine embroidery thread
½ yard heat resistant quilted fabric (case lining)
Bobbin thread
2 pieces solid cotton cut 3” x 10” (for the lettering and embellishment)
Rotary cutter, mat & ruler
2 pieces fusible interfacing 3” x 10” (Pellon Shape Flex recommended) All-purpose thread for construction
®
1 package wide double-fold bias binding
Pearl cotton
Cording foot
One 4” x 8” piece of tear away stabilizer
Small salad plate or coffee cup
2 sets hook-&-loop tape squares, size ⅞”
Fabric Preparation:
1. From the printed cotton (outer case) and the heat
resistant quilted fabric (case lining), cut a 14” long x
16” wide piece.
2. To prepare the solid fabric for stitching the alphabet
and decorative embellishing, fuse a 3” x 10” piece of
interfacing to the wrong side of each 3” x 10” piece
of solid fabric, and mark the center, lengthwise,
down the whole strip.
Mark center of the solid fabric
Sew:
3. Select the desired letters for your case by programming them into your machine. Sew a
test stitch-out of the lettering to determine how much space the phrase will take up. Sew
the phrase onto one of the solid strips, centered in the length and width. (Use the center
crease - marked in step 2 - to align the lettering.) Clip any unwanted threads. (The sample
shown in the photo used the following phrase: “CURLY or STRAIGHT ???”)
4. Sew the embellished solid fabric strip to the plain solid fabric strip along each long side
using a ¼” seam allowance. Turn right side out and press flat.
5. Sew one soft hook-and-loop tape square to the right side of the cotton fabric ¾” from the
lower right corner and 2” from the lower edge. Sew the other soft hook-and-loop tape
square to the lower left corner ¾” from the left side and 2” from the lower edge.
Outer Fabric
6. Sew one firm hook-and-loop tape square to the right side of the heat resistant fabric ¾”
from the upper right hand side and 1” from the upper edge. Sew the remaining hook-andloop tape square ¾” from the upper left hand side and 1” from the upper edge.
Heat-Resistant Lining
2
7. Mark the upper corners of the cotton fabric to create curved edges by placing the small
plate or coffee cup in the corner and mark a curve from one side of the corner to the other,
curving the pointed corner. Lay the cotton fabric wrong sides together onto the quilted heat
resistant fabric and trim both layers along the curved marked lines at the upper corners.
Trace curve of plate or cup
8. Attach the cording foot to the machine. Thread the machine with embroidery thread and a
bobbin wound with bobbin thread. Thread three strands of pearl cotton into the cording foot
and pull about 2” of pearl cotton behind the foot. Select a multi-stitch zig-zag stitch, with
the width set wide enough to sew over all three cords.
9. Pin the solid fabric strip, to the right side of the cotton fabric, diagonally across one of the
curved corners so that the lower finished edge of the strip is 2” from the corner, and the text
is face up, and place the tear away stabilizer under the section where the solid fabric will be
sewn, against the wrong side of the outer bag fabric.
Place 2” from corner
10. Sew, feeding the three pearl cotton strands through the foot as you sew, through the solid
fabric, outer bag fabric and stabilizer along the long finished edges of the solid fabric strip.
Trim the solid fabric strip in line with the sides of the case.
11. Thread the top of the machine and the bobbin with all-purpose thread.
12. Lay the cotton fabric and the heat resistant fabric wrong sides together, aligning the curved
edges. Baste the two layers together along all of the cut edges.
3
13. Finish the 16” straight edge of the case with bias binding.
14. Fold the straight finished end of the case up 3” with heat resistant fabric touching heat
resistant fabric to create the main pocket. Pin in place.
Fold up 3”
15. Finish the outer edge of the case with bias binding. Begin at one folded lower edge and
end at the opposite folded lower edge, following the curves of the case as you sew.
Start here
Finish here
16. Press upper edge down over the case so that the hook-and-loop tape squares align.
Press.
Get more sewing ideas at singerco.com
SINGER, the Cameo “S” Design and SINGER is SEWING MADE EASY are exclusive trademarks of The Singer Company Limited S.à r.l. or its Affiliates.
© 2012 The Singer Company Limited S.à r.l. or its Affiliates. All rights reserved.
4


