MED-DCL400
Installation Sheet
54W LED
Flood Light
IMPORTANT: Read below safety instructions carefully before installing fixture. Keep document for future reference.
Thoroughly wash hands after installing, handling or cleaning this product.
SAFETY PROCEDURE:
Before starting the installation, disconnect the power by turning off the circuit breaker. Turning the power off by using the light
switch is not sufficient to prevent electrical shock. This floodlight is for outdoor use and should not be used in areas of limited
ventilation or high‐ambient temperature. All work should be done by a qualified electrician. The fixture is intended to be used
for general lighting in a normal open – air ambient, do not install in closed ceiling,
dead air, buried or boxed in locations. It is not intended to be used in potential dangerous locations such as flammable
or explosive atmospheres.
WARNING: Risk of Fire. Risk of Electrical Shock. Disconnect Power at fuse or circuit breaker panel or fuse box before
installing or servicing. All work should be done by a qualified electrician.
INSTALLATION:
1. Attached fixture to the outdoor box cover.
2. With the power of, connect the hot supply wire to the hot fixture wire and the common supply wire to the common fixture
wire. These connections should be done using wiring nuts or other approved connectors. The bare copper wire coming from
the fixture is the grounded wire and should be fastened to the junction box with grounding screw, per NEC.
3. Attach the cover and the fixture to the box, making sure that all wires are contained inside the box and the cover is properly
gasketed to prevent entrance of moisture.
4. Aim fixture by loosening arm and bolt and positioning to desired location, tighten the bolt to maintain position.
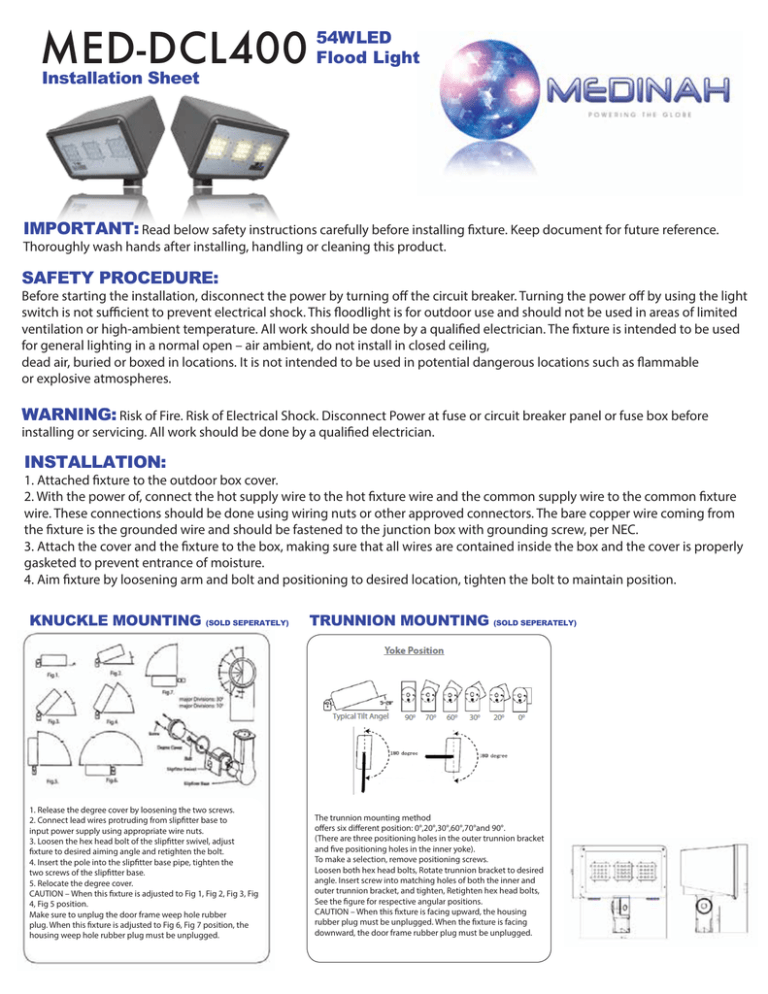
KNUCKLE MOUNTING (SOLD SEPERATELY)
1. Release the degree cover by loosening the two screws.
2. Connect lead wires protruding from slipfitter base to
input power supply using appropriate wire nuts.
3. Loosen the hex head bolt of the slipfitter swivel, adjust
fixture to desired aiming angle and retighten the bolt.
4. Insert the pole into the slipfitter base pipe, tighten the
two screws of the slipfitter base.
5. Relocate the degree cover.
CAUTION – When this fixture is adjusted to Fig 1, Fig 2, Fig 3, Fig
4, Fig 5 position.
Make sure to unplug the door frame weep hole rubber
plug. When this fixture is adjusted to Fig 6, Fig 7 position, the
housing weep hole rubber plug must be unplugged.
TRUNNION MOUNTING (SOLD SEPERATELY)
The trunnion mounting method
offers six different position: 0°,20°,30°,60°,70°and 90°.
(There are three positioning holes in the outer trunnion bracket
and five positioning holes in the inner yoke).
To make a selection, remove positioning screws.
Loosen both hex head bolts, Rotate trunnion bracket to desired
angle. Insert screw into matching holes of both the inner and
outer trunnion bracket, and tighten, Retighten hex head bolts,
See the figure for respective angular positions.
CAUTION – When this fixture is facing upward, the housing
rubber plug must be unplugged. When the fixture is facing
downward, the door frame rubber plug must be unplugged.
Warranty
Notice: Please retain invoice or receipt when making a warranty claim. Please
go to www.medinahpower.com for up to date warranty contact information.
When properly installed per specific Medinah installation sheet, qualified electrician, and maintained under
normal conditions of use Medinah warrants products to be free from defects in material and workmanship for
the period stated below from the date of sale.
LED 5 years/50000 hours*
*LED failure is defined as having 10% of LEDʼs not being illuminated OR 30% total lumen loss.
Medinah does not assume any responsibility for damage to people, property, apparatus or otherwise resulting
from improper installation or maintenance of its products. Warranty coverage shall not apply to any
equipment of another manufacturer used in conjunction with Medinah products. Warranty does not apply to
damages caused by improper installation, abuse, fire or acts of God. Medinahʼs only obligation under this
limited warranty is to repair or replace any defective parts or products, at its discretion, providing such defective parts or products are brought to the attention of Medinah or place of purchase within the specified warranty time period and claim is made in writing within thirty (30) days of discovery.
Medinah may repair or replace any Product(s) covered by this warranty at its sole discretion and in accordance with its procedure. The exclusive remedy for warranty claims shall be to furnish parts of products to
replace defective items. Any unauthorized return, repair, replacement or modification of the Product(s) shall
void this warranty. This warranty applies only to proper use of the Product(s) as intended by Medinah and
does not cover any misapplication or misuse of said Product(s), or installation in hazardous or corrosive
environments or areas with other than normal temperatures and environmental conditions per application
specifications.
All other warranties, expressed or implied, including warranties of merchantability or warranties of fitness
for any particular purpose we hereby disclaim.
Copyright 2014 Medinah. All rights reserved.
Custom manufactured in China.
12065 Clark Street
Santa Fe Springs, CA 90670
www.medinahpower.com


