®
Frost Fighter
Technical Bulletin
Bulletin 116
World leader in after market vehicle defroster solutions
Repairing broken rear window defroster tabs
and missing defroster pulled off by tab.
When a metal tab separates from the defroster it can pull away some of
the defroster coating from the glass. Sometimes the tab breaks leaving
the base of the tab still attached to the defroster.
Fortunately this damage is easy to repair and something you can do
yourself to save the high cost of glass replacement.
Repair missing defroster pulled off by tab
It is common for some of the defroster coating to be pulled off with the
tab as it separates from the defroster. In these cases the damaged area
can be repaired and the tab re attached using the 2000 Tab Bonding
Kit’s highly conductive silver adhesive.
This type of damage is especially common if multiple repair attempts
using solder or Brand X repair kit.
The first step is to create a small
pad of conductive coating over the
damaged area on the defroster.
First clean up and smooth the
damaged area. A screw driver can
be used to scrape the area and
then sandpapered for a relatively
smooth surface. The goal is a good
conductive bond between the
defroster and the replacement tab.
Using masking tape mask off an area
that covers the damaged area on
the defroster and incorporates some of the undamaged defroster. Add
a second layer of tape on top of the original making tape so there are
TWO tape thicknesses around the bonding site.
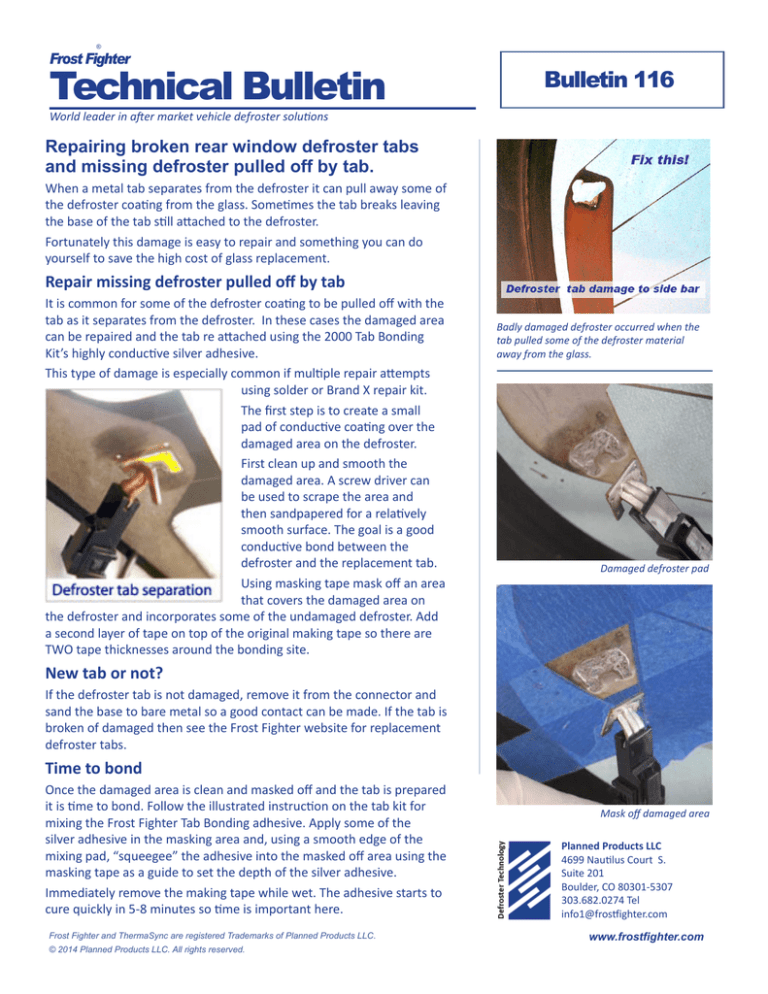
Badly damaged defroster occurred when the
tab pulled some of the defroster material
away from the glass.
Damaged defroster pad
New tab or not?
If the defroster tab is not damaged, remove it from the connector and
sand the base to bare metal so a good contact can be made. If the tab is
broken of damaged then see the Frost Fighter website for replacement
defroster tabs.
Time to bond
Once the damaged area is clean and masked off and the tab is prepared
it is time to bond. Follow the illustrated instruction on the tab kit for
mixing the Frost Fighter Tab Bonding adhesive. Apply some of the
silver adhesive in the masking area and, using a smooth edge of the
mixing pad, “squeegee” the adhesive into the masked off area using the
masking tape as a guide to set the depth of the silver adhesive.
Immediately remove the making tape while wet. The adhesive starts to
cure quickly in 5-8 minutes so time is important here.
Frost Fighter and ThermaSync are registered Trademarks of Planned Products LLC.
© 2014 Planned Products LLC. All rights reserved.
Mask off damaged area
Planned Products LLC
4699 Nautilus Court S.
Suite 201
Boulder, CO 80301-5307
303.682.0274 Tel
info1@frostfighter.com
www.frostfighter.com
®
Frost Fighter
Bulletin 116
Time to bond, Continued
Make sure the bonding pad is smooth and even and then dip the tab base
in the adhesive and position it on top of the bonding area while wet. Be
sure to check the orientation of the tab so it can be re-reconnected to the
connector when the time comes.
Cure and done!
Next, hold the connector in place (light pressure with screw driver or
pliers) and using a hair dryer, heat lamp or other heater warm up the
bond site for several minutes until the adhesive starts to lock down. Then
keep the area warm (100-130 F) for at least 30 minutes and your back on
the road with a working defroster.
What if the defroster tab is bent or broken?
If the tab is damaged beyond repair the first step is to get a new tab.
See the Frost Fighter website for Uni-Clip tabs and Uni-Con Connectors
as factory replacements which work with all vehicle defrosters and
connectors including Ford, Honda, Toyota, Nissan, Subaru, GM, Chrysler
and almost any other make, model or manufacturer.
If the tab base is still on the defroster there
are two options. If there is enough defroster
material around the tab it is appropriate to
bond the new tab to the defroster close by the
broken tab base.
The other option is to remove the tab base and
bond the replacement tab in its place.
There are several techniques for removing the tab base. Since most tabs
are soldered in place it is relatively easy to re-flow the solder and remove
the tab using a soldering iron. Be careful not to break the glass when
soldering or applying spot heat to rear windows. A wet towel on the
outside of the window can help reduce over heating.
Damage repaired
More defroster damage
Removing the tab base
A screw driver blade, pliers or a dremel tool can be used to remove the
tab base. Do not worry about causing additional damage to the defroster
as it can be repaired using the technique shown above.
Silver makes the difference bonding rear window
defroster tabs
The 2000 Tab Bonding kit is a highly conductive two part silver adhesive
that cures quickly, bonds aggressively and forms the electrical and
structural connection to the defroster in one simple operation.
The adhesive’s high sliver loading provides maximum electrical
conductivity ideal for the high amperage bonds needed in defroster tab
repair.
Frost Fighter and ThermaSync are registered Trademarks of Planned Products LLC.
© 2014 Planned Products LLC. All rights reserved.
2000 Tab Bonding Kit
Planned Products LLC
4699 Nautilus Court S.
Suite 201
Boulder, CO 80301-5307
303.682.0274 Tel
info1@frostfighter.com
www.frostfighter.com


