RS Enclosure instruction manual
RS Door reversal hinge kit
This section covers the methods required to remove, reverse swing and change and
install handles on doors.
Available in Left Hand Swing Kit #RSHINGEKITL or
Right Hand Swing Kit # RSHINGEKITR
2
LH or RH Swing Kits include:
A
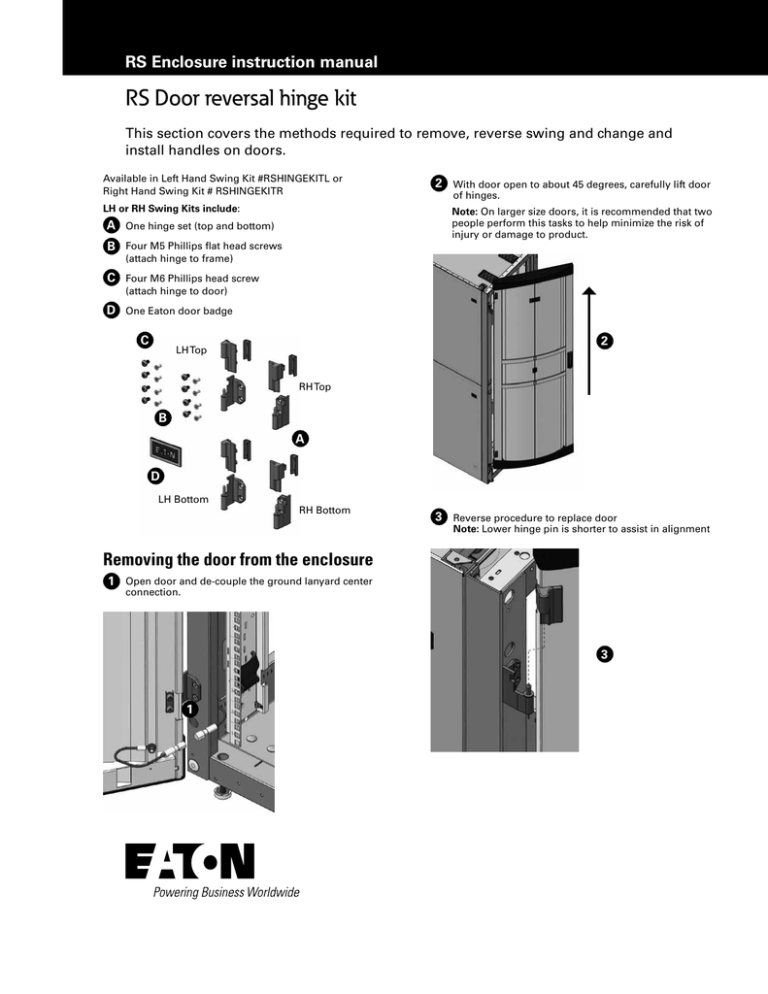
One hinge set (top and bottom)
B
Four M5 Phillips flat head screws
(attach hinge to frame)
C
Four M6 Phillips head screw
(attach hinge to door)
D
One Eaton door badge
C
With door open to about 45 degrees, carefully lift door
of hinges.
Note: On larger size doors, it is recommended that two
people perform this tasks to help minimize the risk of
injury or damage to product.
2
LH Top
RH Top
B
A
D
LH Bottom
RH Bottom
3
Reverse procedure to replace door
Note: Lower hinge pin is shorter to assist in alignment
Removing the door from the enclosure
1
Open door and de-couple the ground lanyard center
connection.
3
1
RS pdu Door reversal hinge kit
Reversing the swing of the door
1
Remove existing logo badge
Remove existing hinges from both door and frame, by
removing screws.
•
Reverse existing door handle (refer to installing
door handle section).
•
Install new side hinge kit, using screws provided.
1
Pinch center barbs to remove. (A replacement badge
is provided in the event the existing gets damaged
during removal.)
•
Locate badge on opposite end of newly oriented
door. Center on door and align with top of hinge.
•
Push plastic barbs through hex perf until fully
engaged.
1
1
DISCLAIMER OF WARRANTIES AND LIMITATION OF LIABILITY
The information, recommendations, descriptions and safety notations in this document are based on Eaton Corporation’s (“Eaton”) experience and judgment
and may not cover all contingencies. If further information is required, an Eaton sales office should be consulted. Sale of the product shown in this literature is
subject to the terms and conditions outlined in appropriate Eaton selling policies or other contractual agreement between Eaton and the purchaser.
THERE ARE NO UNDERSTANDINGS, AGREEMENTS, WARRANTIES, EXPRESSED OR IMPLIED, INCLUDING WARRANTIES OF FITNESS FOR A PARTICULAR
PURPOSE OR MERCHANTABILITY, OTHER THAN THOSE SPECIFICALLY SET OUT IN ANY EXISTING CONTRACT BETWEEN THE PARTIES. ANY SUCH
CONTRACT STATES THE ENTIRE OBLIGATION OF EATON. THE CONTENTS OF THIS DOCUMENT SHALL NOT BECOME PART OF OR MODIFY ANY
CONTRACT BETWEEN THE PARTIES.
In no event will Eaton be responsible to the purchaser or user in contract, in tort (including negligence), strict liability or otherwise for any special, indirect,
incidental or consequential damage or loss whatsoever, including but not limited to damage or loss of use of equipment, plant or power system, cost of capital,
loss of power, additional expenses in the use of existing power facilities, or claims against the purchaser or user by its customers resulting from the use of the
information, recommendations and descriptions contained herein. The information contained in this manual is subject to change without notice.
Eaton
1000 Eaton Boulevard
Cleveland, OH 44122
United States
Eaton.com
© 2016 Eaton
All Rights Reserved
Printed in USA
Publication No. IL159018EN
June 2016
Eaton is a registered trademark.
All trademarks are property
of their respective owners.
Follow us on social media to get the
latest product and support information.


