Copper.org: Copper Tube Handbook: VII. Soldered Joints - Applying Solder
Page 1 of 2
COPPER.org
Soldered Joints:
Applying Solder
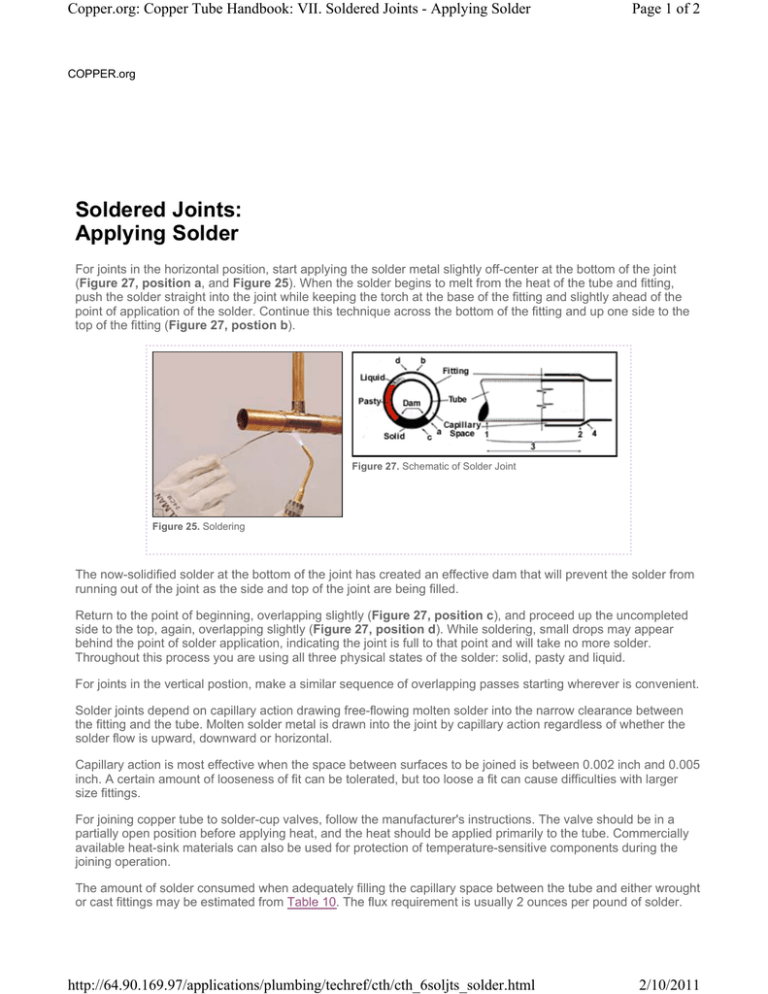
For joints in the horizontal position, start applying the solder metal slightly off-center at the bottom of the joint
(Figure 27, position a, and Figure 25). When the solder begins to melt from the heat of the tube and fitting,
push the solder straight into the joint while keeping the torch at the base of the fitting and slightly ahead of the
point of application of the solder. Continue this technique across the bottom of the fitting and up one side to the
top of the fitting (Figure 27, postion b).
Figure 27. Schematic of Solder Joint
Figure 25. Soldering
The now-solidified solder at the bottom of the joint has created an effective dam that will prevent the solder from
running out of the joint as the side and top of the joint are being filled.
Return to the point of beginning, overlapping slightly (Figure 27, position c), and proceed up the uncompleted
side to the top, again, overlapping slightly (Figure 27, position d). While soldering, small drops may appear
behind the point of solder application, indicating the joint is full to that point and will take no more solder.
Throughout this process you are using all three physical states of the solder: solid, pasty and liquid.
For joints in the vertical postion, make a similar sequence of overlapping passes starting wherever is convenient.
Solder joints depend on capillary action drawing free-flowing molten solder into the narrow clearance between
the fitting and the tube. Molten solder metal is drawn into the joint by capillary action regardless of whether the
solder flow is upward, downward or horizontal.
Capillary action is most effective when the space between surfaces to be joined is between 0.002 inch and 0.005
inch. A certain amount of looseness of fit can be tolerated, but too loose a fit can cause difficulties with larger
size fittings.
For joining copper tube to solder-cup valves, follow the manufacturer's instructions. The valve should be in a
partially open position before applying heat, and the heat should be applied primarily to the tube. Commercially
available heat-sink materials can also be used for protection of temperature-sensitive components during the
joining operation.
The amount of solder consumed when adequately filling the capillary space between the tube and either wrought
or cast fittings may be estimated from Table 10. The flux requirement is usually 2 ounces per pound of solder.
http://64.90.169.97/applications/plumbing/techref/cth/cth_6soljts_solder.html
2/10/2011
Copper.org: Copper Tube Handbook: VII. Soldered Joints - Applying Solder
Page 2 of 2
Copyright © 2011 Copper Development Association Inc. All Rights Reserved.
Affiliated with the International Copper Association, LTD.
TM
Copper Connects Life
http://64.90.169.97/applications/plumbing/techref/cth/cth_6soljts_solder.html
2/10/2011


