68-72 Floor Pan Installation
advertisement

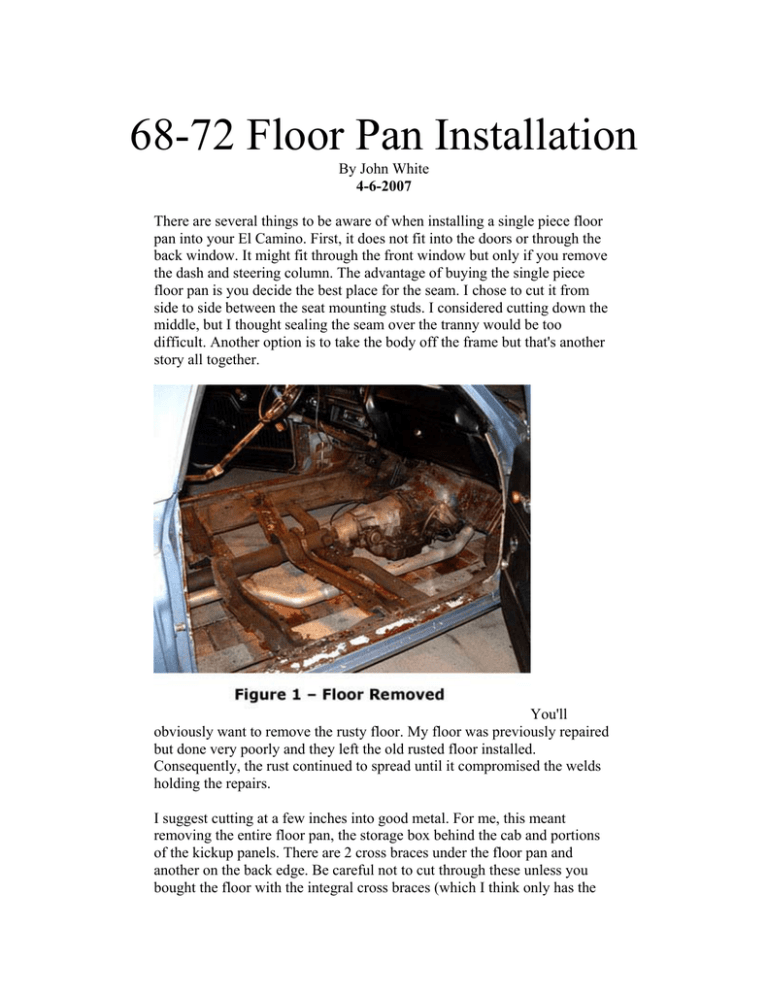
68-72 Floor Pan Installation By John White 4-6-2007 There are several things to be aware of when installing a single piece floor pan into your El Camino. First, it does not fit into the doors or through the back window. It might fit through the front window but only if you remove the dash and steering column. The advantage of buying the single piece floor pan is you decide the best place for the seam. I chose to cut it from side to side between the seat mounting studs. I considered cutting down the middle, but I thought sealing the seam over the tranny would be too difficult. Another option is to take the body off the frame but that's another story all together. You'll obviously want to remove the rusty floor. My floor was previously repaired but done very poorly and they left the old rusted floor installed. Consequently, the rust continued to spread until it compromised the welds holding the repairs. I suggest cutting at a few inches into good metal. For me, this meant removing the entire floor pan, the storage box behind the cab and portions of the kickup panels. There are 2 cross braces under the floor pan and another on the back edge. Be careful not to cut through these unless you bought the floor with the integral cross braces (which I think only has the two braces in the middle). Figure 1 shows what about 3 or 4 hours with a plasma cutter will do to an El Camino floor. Notice I cut a little more than an inch inside the original floor to rocker panel seam. Next I stripped the paint from where I expected the new pan and panels to fit, prepped the metal with acid and used POR-15 over all the surfaces. I figured that burning through the POR-15 and dealing with contamination in the welds is easier than dealing with rust in the areas where the metal overlaps and where seam seal may not be easily applied. Others have different ideas of how to prevent ongoing rusting. I'll just recommend using your best judgment knowing that there will be some overlapped areas that might trap moisture. I cut the kick up panels to fit, allowing a couple of inches of overlap to the existing. The kick up panels have a flange on the outside. On my car, the right hand flange was about ¾" short of the metal behind the kick panel. I cut the flange off and welded to the flange I left remaining (above I asked you to note where I cut the floor). On the drivers side, the panel fit perfectly, and I welded the top of the flange to the metal behind the kick panel. I installed the rear floor pan (the one that fits behind the cab but under the front part of the bed) first. The front of this rests on a cross brace that also supports the back of the original cab floor. Figure 2 shows the back of the cab. Notice the downward brace on the passenger side. This was attached to the original cab floor pan where the pan ends up just in time to bend over the cross brace. If you have the original floor, you'll see that this bracket comes forward of the back panel about 1½ inches. I point this out because I was surprised to learn my floor pan was about 3 or 4 inches shorter than the original. From my measurements, I found the dimensions from the back of kickup panels to the front and middle cross member seem correct. However, the distance of the pan from the second to the last cross member is short. There are a number of ways to compensate. If you want as close to original as possible, you could splice in some rear floor panels locating the new panels correctly to the brace or you could cut the floor behind the seat and add a 3 inches strip to the pan. I opted for adding a 1½ X 3 inch channel over the rear support. I should mention that I did this to reinforce that part of the body because I planned to cut the bottom of the back cab panel away so I had access to the storage box from the cab. Figure 3 shows my configuration. Once I got the floor pan in place I secured it with about 25 or 30 sheet metal screws to what was left of the existing floor and to the bottom flange on the kickup panels. After I was satisfied with the placement, I wire brushed the areas I was going to weld and then welded it in place. By the way, even though I removed the paint where I could see it, there was still enough burnt paint to give me a horse voice and sort throat. I quickly got a fan to suck the fumes from the car. Some might criticize my full seam welds instead of stitch welds. I'm OK with that. However, I'll recommend you use your best judgment keeping in mind that the floor becomes a shear panel when the frame starts twisting. The frame might twist because it's old or because you are using smaller profile tires with tighter suspension or you've put in a 550HP mill with 4.54 gears and a posi. I figure my time is cheap as is wire and Argon/CO2 mix. Again I say, be sure to think about how you want to manage the frame energy, especially if you're making performance modifications. To attach the floor to the cross brace, I crawled under the car with a 0.09" drill. I drilled through both the front and back cross brace flanges and through the floor pan where the cross brace bent forward or back. From the top, I opened the holes in the floor pan to 0.19 and used screws to draw the floor to the cross braces. Afterward I drilled ¼" holes between the screws in straight lines knowing the screws represented the cross brace bends. I opened the ¼" holes to ½" in the floor pan (not the cross brace flanges) and rosette welded the pan to the cross member from the top. You can see this in Figure 4. There is still some unfinished business as shown in Figure 3. I will cut the vertical support running front to back and install a web across the front that picks up this support and ties the existing back panel to the new channel. Each side will receive a similar treatment. These webs will provide shear support from the floor to the original panel. By tying it into the vertical support, I'll support up and down forces and distribute them over a larger area. It also will keep things in the back from sliding side to side. The final step is to apply suitable rust protection and seam sealing. For areas that will not be painted, PL polyurethane, which can be bought at the local hardware store, can be used; it is softer and therefore easier to apply… especially to that seam that is between the rocker panel and the frame. Undercoating seems to stick to this product but it is too soft to hold paint.


