Lamination Techniques
Laminating and Mounting Techniques
By Al Boese
Albert B Boese is manager
of The Post Print Finishing Alliance, which operates under the umbrella of
the Specialty Graphic Imaging Association (SGIA).
The Alliance is dedicated
to expanding the awareness and application
of print finishing and supporting providers of
print finishing services. Finishing includes but
is not limited to: lamination, mounting, cutting,
routing, seaming, vinyl welding, grommeting
and sewing.
T
he title of this article is correct to a
point, however, before we get into
the “How-To” aspects of this piece, let’s
consider the “Why” aspects. After all,
if an endeavor like learning lamination
techniques is to be considered worthy
of one’s time and attention one should
know why. The answer may surprise you
because it is not about you. It is about
your customer.
CUSTOMER FIRST
It all begins when your customer
comes to you to produce a print. What
the customer really wants is actually a
product. Further, he wants a finished,
usable product that can be immediately
put to use — not just a print.
So, why should you learn more about
laminating? Well, I’ll jut tick off some of
the more salient reasons: your customer
wants a finished product, lamination is
a key element of the finishing processes
which provides value-added service, it’s
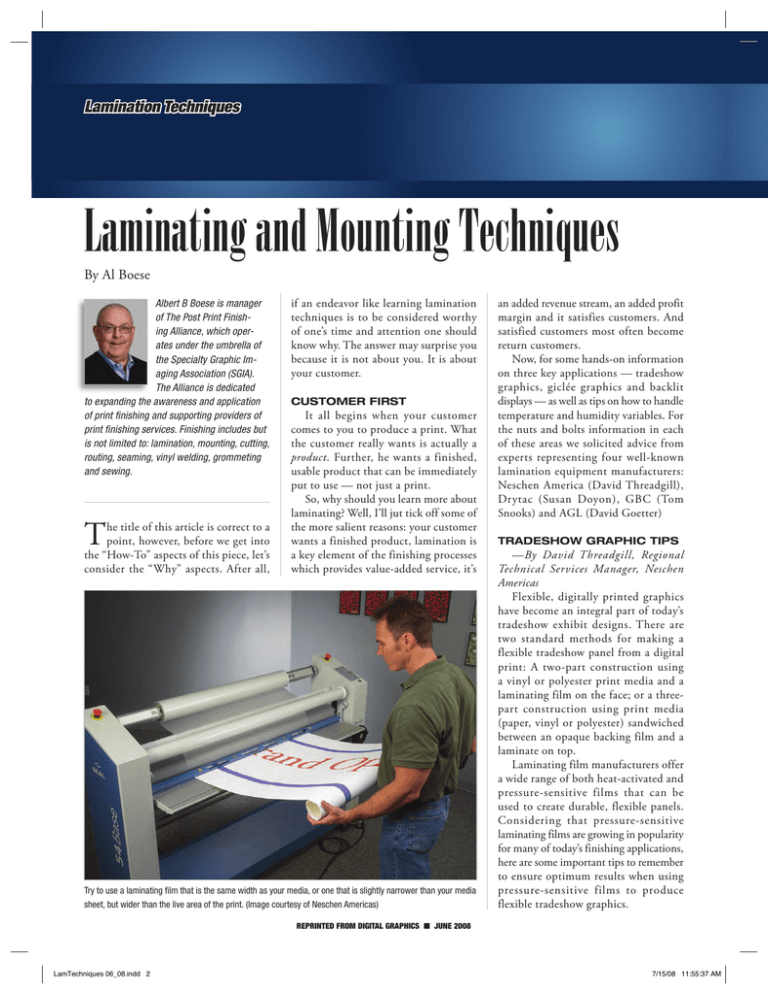
Try to use a laminating film that is the same width as your media, or one that is slightly narrower than your media
sheet, but wider than the live area of the print. (Image courtesy of Neschen Americas)
an added revenue stream, an added profit
margin and it satisfies customers. And
satisfied customers most often become
return customers.
Now, for some hands-on information
on three key applications — tradeshow
graphics, giclée graphics and backlit
displays — as well as tips on how to handle
temperature and humidity variables. For
the nuts and bolts information in each
of these areas we solicited advice from
experts representing four well-known
lamination equipment manufacturers:
Neschen America (David Threadgill),
Drytac (Susan Doyon), GBC (Tom
Snooks) and AGL (David Goetter)
TRADESHOW GRAPHIC TIPS
—By David Threadgill, Regional
Technical Services Manager, Neschen
Americas
Flexible, digitally printed graphics
have become an integral part of today’s
tradeshow exhibit designs. There are
two standard methods for making a
flexible tradeshow panel from a digital
print: A two-part construction using
a vinyl or polyester print media and a
laminating film on the face; or a threepart construction using print media
(paper, vinyl or polyester) sandwiched
between an opaque backing film and a
laminate on top.
Laminating film manufacturers offer
a wide range of both heat-activated and
pressure-sensitive films that can be
used to create durable, flexible panels.
Considering that pressure-sensitive
laminating films are growing in popularity
for many of today’s finishing applications,
here are some important tips to remember
to ensure optimum results when using
pressure-sensitive films to produce
flexible tradeshow graphics.
RepRinted fRom digital gRaphics n June 2008
LamTechniques 06_08.indd 2
7/15/08 11:55:37 AM
• Use your printer’s take-up roller —
Be sure to use your printer’s take-up shaft
to wind-up the output to keep it from
pooling on the floor where it can pick
up dust. Dust on the face of your print
can get trapped under the laminate and
ruin the job.
• Use your laminator’s lower unwind
shaft to feed prints (if available) — If you
are using the two-part construction of
media and laminate, use the lower unwind
shaft on your laminator to feed the print.
Web the media as if you were loading a
laminating film (image side facing up as
it enters the rollers). This will minimize
handling of the media by the operator, and
reduce the chance of dust or a mis-feed.
• Line up your media and laminate
— With the two-part process, try to use
a laminating film that is the same width
as your media, or one that is slightly
narrower than your media sheet, but
wider than the live area of the print.
Since you are not encapsulating in this
application, there is no requirement for
the laminate to extend beyond the edge of
the media. You can use a laminate that is
slightly wider than your media, but extra
care should be taken to prevent the excess
laminating film from contacting the exit
table or wrapping around the rollers as
it leaves the laminator. For short prints,
hold the materials up as they exit. For
longer prints, experienced operators often
feed a thin “sled” material, such as Kraft
paper, under the print media as it enters
the rollers.
• Mind the brakes — Supply-shaft
brake tension is particularly important in
the three-layer process where a laminate
is being applied to the front and back
of the print. Too much tension, and the
laminating film will stretch. Once the
stretched film is applied to the media it
will want to return to its original shape
and cause the finished graphic to curl. In
an application where laminating films are
applied to both sides, varying tensions on
the opposing laminates can cause a variety
of curling or warping issues. When this
happens, the very advantage of flexible
graphics –– the ability to roll them for
easy shipping and then have them lay
flat in application –– has been defeated.
The solution, in all applications, is to use
minimum brake tension to get a smooth
finish exiting the laminator.
• Heat improves performance, but
watch your tension — Experienced
operators know that applying a little heat
to pressure-sensitive laminating films can
prevent silvering and improve lay-down
performance. It is especially important to
use minimum brake tension on the supplyshafts when running pressure-sensitive
films with heat-assist. The combination
of heat and excessive tension can magnify
curl.
GICLÉE GRAPHIC TIPS
—By Susan Doyon, Product Manager
of the Framing Division, Drytac
In the first few years of fine art,
or digital giclée printing, options for
protection consisted of applied liquid
coatings, brushed on or spayed on
with an aerosol can. However, there is
a host of problems: uneven coatings,
incompatibility of aqueous coatings with
ink, health concerns about solvent sprays
and the tendency for many clear coatings
to crack when stretched over stretcher
bars.
Instead, try applying a thin (2-mil)
conformable clear protective film over the
canvas image using a heated vacuum or
dry-mount press. This approach creates
a virtually invisible moisture barrier of
a uniform thickness that enhances the
underlying canvas texture and gloss levels
(depending on the finish type). In addition
to providing significant UV protection,
dry mounted film defends against damage
from moisture and scratches (Drytac offers
a product called ArtShield designed for
this application).
Mounting prints to display board
is also common with fine art displays,
but remember that mounting adhesives
are intended to be permanent. While
some mounting adhesive products are
“removable”, in most applications, prints
mounted with these products are usually
only removed from a board in the event
of a problem, only to be remounted to
another surface. Removal is achieved
by reheating the adhesive and carefully
removing the print from the mount board
which takes some skill and practice.
It is good to realize that many
“removable” mounting adhesives, or
products used to remove mounting
adhesives (solvents), may leave behind
some residue on the back of the print.
We do not recommend applying an
adhesive (permanent or “removable”)
to any print, photo, painting, drawing,
image, etc. which one knows in advance
will need to be removed at sometime in
the future or which value is solely based
on its original state.
Similar to dry-mounting, laminating
an original work of art, limited edition,
collectable posters, etc. likely will decrease
its value, but laminating increases the
value of commercial posters, inkjet prints,
Sometimes clear coatings used on a giclée can crack
when stretched over stretcher bars. An alternative is
to dry mount a thin (2-mil) conformable clear protective film over the canvas image using a heated vacuum or dry-mount press. (Image courtesy of Drytac)
Reprinted from Digital Graphics n June 2008
LamTechniques 06_08.indd 3
7/15/08 11:55:38 AM
Lamination Techniques
photos for display purposes. Why this
difference?
Collector items are valued based on
their “original state” and laminating
changes the original state permanently.
However, for most other items — such
as posters, photos, inkjet giclée output,
signs, etc. — an film laminate with UV
protection will increase longevity and
enhance aesthetics.
Most laminates at some point will
show signs of aging. Generally, acrylic
adhesives will outperform rubber-based
and hot-melt adhesives; and higherquality PVC vinyls incorporating UV
stabilizers and absorbers will outlast some
of the cheaper vinyls on the market. That
being said, depending on the location and
the exposure of the print output, many
professionally mounted and laminated
prints will last well in excess of 30 years,
and possibly many years longer than an
un-mounted, un-laminated print.
INDOOR BACKLIT
DISPLAY TIPS
—By Tom Snooks, Field Support
Manager, GBC
Diversifying your portfolio with simpleto-create applications is an excellent way
to increase profitability. Backlit graphics
are an affordable solution with high
profit potential. Today, any sign shop or
quick printer with an inkjet printer and
a laminator can create graphics to use in
backlit displays.
Backlit construction — Let’s focus
on two methods of creating indoor
backlit displays. The first is
constructed by inserting or
sandwiching a graphic. The
second uses a face-mounted
graphic. In both methods,
the graphic is viewed behind
a clear substrate like glass or
acrylic with a light behind it
to illuminate the image.
For both types, an image
printed on translucent media
is laminated to protect the
ink surface from damage.
This can be a done with
a pressure-sensitive film
(10 mil is recommended)
applied only to the image
side. Or, the image can be
laminated with thick thermal
laminates on both sides to
add protection and rigidity
allowing the graphics to be
easily slipped into the light
box or slid between sheets
of acrylic or glass. This
method is excellent for menu
boards, mall signage, and
other displays that require
frequent changes.
Three different approaches to creating an indoor backlit display. (Illustration
When creating a mounted
courtesy of GBC)
backlit graphic, an image is printed on
translucent media and run through a
laminator to apply a mount adhesive to
the image side. To avoid the loss of image
quality, an optically clear mounting adhesive
is recommended. Next, the graphic is
mounted onto the glass or acrylic with a roll
laminator to ensure a smooth, bubble-free
graphic. The mount adhesive’s release liner
is removed during the mounting process.
Finally, the mounted graphic is placed in
the light box.
Since a mounted graphic is a more
permanent solution than an inserted/
sandwiched graphic, it is ideal for use in
long-term displays like directories, gaming
machines and retail displays.
Choosing materials — In choosing the
right materials, it is important to evaluate
the requirements of the job to determine
the proper combination of materials.
There are many choices of media, laminate
finishes, and mounting adhesives for
creating backlit displays. Manufacturers
and distributors can help determine the
best solution for various applications.
Important details — If backlit graphics
are printed on an aqueous inkjet printer,
pigmented inks should be chosen since
they are more resistant to premature
fading.
Cleanliness is extremely important
when creating backlit graphics. Be sure
to use a cleaning roller or tack cloth to
remove any dust or particles from the print
and substrate prior to finishing.
GARBAGE IN, GARBAGE OUT
—By David Goetter, Director of Concept
Development, AGL
Many novice lamination technicians
are quick to blame the equipment when
prints get ruined during the lamination
process. I wish they’d stop. One must, at
some point, take ownership for garbage-in
garage-out. Let me explain.
Living in Florida, I’ve learned quite
a bit about humidity and its effects on
paper flatness.
Reprinted from Digital Graphics n June 2008
LamTechniques 06_08.indd 4
7/15/08 11:55:39 AM
So, if you’re struggling with getting
prints through your laminator without
flexing and buckling and ending up in
the trash, read on.
We first have to understand a little
about temperature and humidity. For the
record, we have lots of both where I live
(want some?). Temperature is a way of
measuring the excitement of gas molecules.
Raise the temperature and they expand,
and so does their respective volume.
Humidity present in the air or water
vapor is measured several ways. But let’s
focus on the most important one: relative
humidity. At a specific temperature, air can
only hold so much water vapor. But when
the temperature goes up, so can the relative
humidity. Come to Florida in August if
you want a live demonstration.
But what does this have to do with the
waves, wrinkles; and the way the laminator
keeps eating prints? Many people fail
to recognize the dramatic swings in
temperature and relative humidity in their
own production facility and its impact
on paper prints, and even on pressuresensitive vinyl release liners.
To keep this short and simple, paper
contains a fair percent of wood fibers and
is, by nature, very porous. Like a sponge,
paper aspires to receive surrounding
moisture. Think about it. Why do your
rolls of paper come in a plastic bag?
Higher quality photo base papers are PE
coated to resist moisture and help the large
sheets lay flatter. Unfortunately, there are
too many cheaper papers out there that
say “alternative photo base”, or worse, say
“photo base” and they aren’t!
• Proper climate control and quality
photo base imaging media can save you
thousands of dollars and countless doovers. Instead of blaming the laminator,
look around and be observant. Do you bag
your media after changing from one roll
to another? Do you control the humidity
and temperature in your production space
independently? Consider the changes in
“conditioned air” that happen from winter
to summer. Heaters in cold months have
a dryer, lower humidity, whereas air
conditioning is pulling out moisture and
lowering the temperature.
• Do you still leave prints laying out
flat on a table to dry—only to find out
that because of the high humidity or dryer
air, your prints are now looking like the
rolling sand dunes of the Sahara desert?
Don’t expect the laminator to “iron” out
those waves. This will only have the image
buckling up and down prior to entering
the nip (rollers point of contact), no
matter how hard you try and hold them
back, resulting in air entrapment (bubbles)
under the overlaminate, or worse, wrinkles.
So, your savings of a few dollars on cheap
paper just turned into hundreds in the
dumpster. Of course, you can do the same
with improper pressure on crowned rollers,
but that’s another story.
To see this for yourself, take a roll of
fresh inkjet paper and roll it out onto a 4' x
8' table. Cut off a 4' x 8' sheet and let it rest
(acclimate) to your relative humidity and
temperature in your shop. The greater the
difference between the moisture content
of the fresh paper, your temperature, and
relative humidity, the less time it will take
to see the two reactions.
Both of these will inevitably make
it more difficult to process through the
laminator. Remember this: a quality
authentic photo base paper with instant
dry properties gives you a longer window
in which the paper will stay flat prior to
finishing. Or you’ll have to invest in
better climate controls, both for temp and
relative humidity. Or continue to print
two just to keep one, a costly way to run a
business.
Reaction one, as illustrated above shows “tight edges”— the result of edge drying in a low-humidity (dry)
environment.
Reaction two, as illustrated above shows “wavy edges” — the absorption of moisture in a high humidity
(wet) environment.
Depending on humidity and temperature levels in your shop, fresh paper will react in one of two ways (Illustration
courtesy of AGL)
Reprinted from Digital Graphics June 2008
© 2008 National Business Media, Inc. all rights reserved
Please visit Digital Graphics Magazine web site
Reprinted from Digital Graphics n June 2008
LamTechniques 06_08.indd 5
7/15/08 11:55:40 AM

