Step One—Assembly NEVER EXCEED THE WEIGHT LIMIT OF 300
advertisement
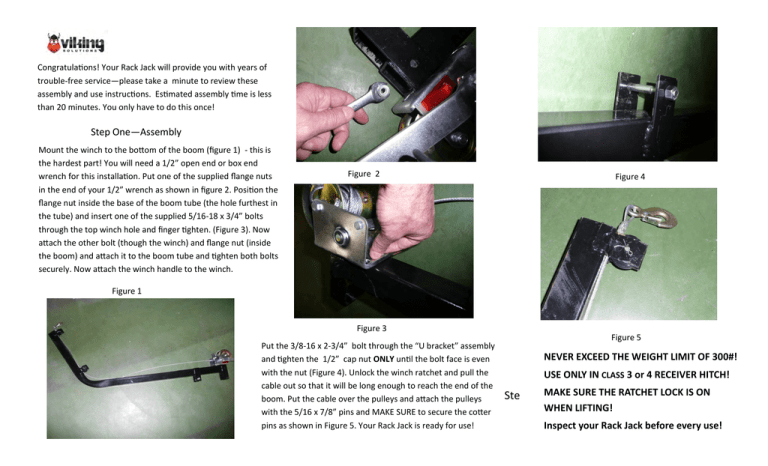
Congratulations! Your Rack Jack will provide you with years of trouble-free service—please take a minute to review these assembly and use instructions. Estimated assembly time is less than 20 minutes. You only have to do this once! Step One—Assembly Mount the winch to the bottom of the boom (figure 1) - this is the hardest part! You will need a 1/2” open end or box end wrench for this installation. Put one of the supplied flange nuts in the end of your 1/2” wrench as shown in figure 2. Position the flange nut inside the base of the boom tube (the hole furthest in the tube) and insert one of the supplied 5/16-18 x 3/4” bolts through the top winch hole and finger tighten. (Figure 3). Now attach the other bolt (though the winch) and flange nut (inside the boom) and attach it to the boom tube and tighten both bolts securely. Now attach the winch handle to the winch. Figure 2 Figure 4 Figure 1 Figure 3 Put the 3/8-16 x 2-3/4” bolt through the “U bracket” assembly and tighten the 1/2” cap nut ONLY until the bolt face is even with the nut (Figure 4). Unlock the winch ratchet and pull the cable out so that it will be long enough to reach the end of the boom. Put the cable over the pulleys and attach the pulleys with the 5/16 x 7/8” pins and MAKE SURE to secure the cotter pins as shown in Figure 5. Your Rack Jack is ready for use! Figure 5 NEVER EXCEED THE WEIGHT LIMIT OF 300#! USE ONLY IN CLASS 3 or 4 RECEIVER HITCH! Ste MAKE SURE THE RATCHET LOCK IS ON WHEN LIFTING! Inspect your Rack Jack before every use!
