WINDOWS LIve MOvIe MAKeR : BASIC eDITING
advertisement

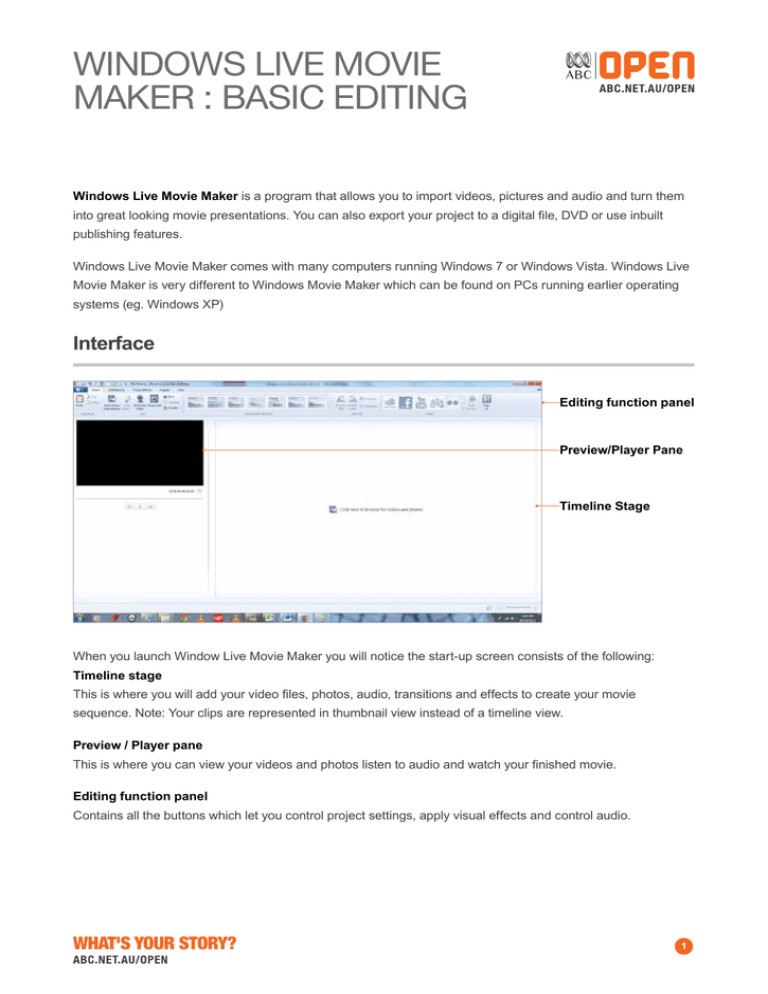
WINDOWS Live MOVIE MAKER : BASIC EDITING Windows Live Movie Maker is a program that allows you to import videos, pictures and audio and turn them into great looking movie presentations. You can also export your project to a digital file, DVD or use inbuilt publishing features. Windows Live Movie Maker comes with many computers running Windows 7 or Windows Vista. Windows Live Movie Maker is very different to Windows Movie Maker which can be found on PCs running earlier operating systems (eg. Windows XP) Interface Editing function panel Preview/Player Pane Timeline Stage When you launch Window Live Movie Maker you will notice the start-up screen consists of the following: Timeline stage This is where you will add your video files, photos, audio, transitions and effects to create your movie sequence. Note: Your clips are represented in thumbnail view instead of a timeline view. Preview / Player pane This is where you can view your videos and photos listen to audio and watch your finished movie. Editing function panel Contains all the buttons which let you control project settings, apply visual effects and control audio. What's Your Story? 1 WINDOWS Live MOVIE MAKER : BASIC EDITING Getting Started 1.First make sure your project is widescreen. Select Project > Widescreen 16:9 2.Select the Windows Live Movie Maker dropdown Select Save Project As. Name your project and Save. Adding Video Clips and Photos 1.There are two ways to add your visuals. a.Go to tab, click on “Add videos and photos” and then browse to find your personal folder with your saved images and videos. Click on the images and videos you want to add and select open. b.Add your media by clicking in the Timeline Stage area on “Click here to browse for videos and photos” then find your personal folder with your saved images. If the file you want to add does not show up it might be in the wrong format. Here is a list of the files that you can use: http://explore.live.com/windows-livemovie-maker-file-types-faq You can change your files into a suitable format by using free transcoding software like Mpeg stream-clip for Mac and Windows. You can download this application for free from http://www.squared5.com/ What's Your Story? 2 WINDOWS Live MOVIE MAKER : BASIC EDITING Adding Video Clips and Photos (cont.) 2. Imported pictures will appear on the Timeline stage as thumbnails. 3.Click and drag the Now line over the thumbnails and notice your images update in the Preview / Player pane. 4.Order your images and movies where you want them to appear in the sequence by clicking and dragging each thumbnail into the right order. The default duration for photos is 5 sec. You can adjust this if you click on the Tab. Highlight the clips you want to change and then change the value in the duration box What's Your Story? 3 WINDOWS Live MOVIE MAKER : BASIC EDITING Splitting 1.You may find the some of the video clips you have added are a little longer than you need. Adjust the duration of your video by selecting the clip you would like to Tab. trim then click on the You should see your selected clip in the Preview / Player pane. You can split your clip by using the Preview Pane to play it up until the point that you wish to split it. Next press the pause button and then select the Split button located to the left of the editing panel. 2.The video thumbnails will then split. 3.You can now remove any of these movie clip sections by Right Mouse Click on the movie clip and then selecting Don’t forget to regularly save your project by clicking CTLR-S. It can be devastating if your computer crashes and you lose your work. What's Your Story? 4 WINDOWS Live MOVIE MAKER : BASIC EDITING Trimming 1.Trimming is another way to shorten your clips. It allows you to be more precise with your start and end points. To use the trim tool select the clip you would like to trim then select the trim tool in the Editing panel. This will open Trim options. 2.Move the cursor to where you would like your clip to start then click you will notice a little rectangle bar will jump to where the cursor is. To set the end point move your cursor to where you would like your clip to end, click rectangle notice that the little jumps to your cursor. You can also click and drag the little rectangles to where you would like you clip to start. You can also type in numerical values for the start and end point of your clip. What's Your Story? 5 WINDOWS Live MOVIE MAKER : BASIC EDITING Trimming (cont.) 3.Once you are happy with your trimmed clips select the Save trim. Adding Sound You will only be able to add one track of sound to your movie. This means you must choose narration or music. If you’d like to add a mix of music and narration you will need to pre-mix this audio in an audio editing application like Audacity. Available for free at http://audacity.sourceforge.net/ Adding Narration 1.You first need to record your narration in Sound recorder. Click on the windows start icon at the bottom left of the screen. In the search field type in sound recorder. Select Sound recorder option from programs. This will launch the program. Record your narration. When you press Stop you will be prompted to save the file and give it a name. Save this file in your own personal folder (where images are kept) 2.Return to Windows Live Movie Maker to import your narration.Click Find your narration and add it to your timeline sequence. Don’t forget to regularly save your project by clicking CTLR-S. What's Your Story? 6 WINDOWS Live MOVIE MAKER : BASIC EDITING Adding Music 1.To add music click on the Tab and look for the musical note that says When you add music you will see a bar added on top of you clip in the Timeline Stage. 2.Control the mix volume between the video clips and music by clicking on the tab and adjusting the audio mix slider . will preference video clip audio. preferences the music. 3.‘Fit to music’ button will adjust the durations of clips, photos and text in the sequence to fit the length of the music selected. 4.You can adjust the audio properties like fade in fade out times, music volume and start and end points by double clicking the bar and adjusting the settings in the panel that appears. If you have added any effects, music or text to your clips you will see tabs that correspond as you move the Now line cursor over your clips. Use these tabs to edit the properties of each component. What's Your Story? 7 WINDOWS Live MOVIE MAKER : BASIC EDITING Adding Visual Effects Now the video clips / photos are in order, durations modified and either a music track or a narration added you may want to include some effects. 1.Select a clip to apply an effect. Click on the Tab for transitions, pans & zooms or the Tab for adding video effects to clips and photos. Click the button to reveal more effects and hover over thumbnails to preview an effect or transition in the Preview / player pane. Click to add effects to all clips. A Transition happens in between two clips A Video Effect effects a clip only Pan & Zoom effects movement of photos. 2.The Timeline will then display each of the visual elements of your movie. What's Your Story? 8 WINDOWS Live MOVIE MAKER : BASIC EDITING Adding Visual Effects (cont.) 3.There are Video effects that you can select from. As you hover over each effect you will see a preview result of each effect in Preview / player pane. 4.Scenes that have an effect added will show four boxes in the top left corner. To check the effect that has been added you only need to hover your mouse over the boxes. You can check the effect in the Preview / player pane. What's Your Story? 9 WINDOWS Live MOVIE MAKER : BASIC EDITING Adding Visual Effects (cont.) 5.You may also wish to add transitions. Select the clip you would like to transition to. In the Tab select the transition you would like to add. Windows Live Movie Maker will give you a preview of the transition. The transition duration can also be controlled from the Animations Tab. Next to the stopwatch type in or select the amount of time you would like your transition to take. Click to add the transition to all clips. 6.When the Transition is added a diagonal line is added to the clip. If things don’t go quite to plan don’t forget the Undo/Redo arrows on the Top panel What's Your Story? 10 WINDOWS Live MOVIE MAKER : BASIC EDITING Adding Text 1.Windows Live Movie Maker offers 3 types of titles. Adds text to the start • of the sequence. Adds text on top of • the Photo / video clip. • Adds text to the end of the sequence 2.To add a tile, caption or credit to your sequence simply click on the tab then select the type of text you would like to add. When you select one of the title options text box will be added to the timeline and in the Preview / player pane. Format options will appear. Click to animate show your text appears and disappears. If you hover over the text on the Timeline stage you will see a preview of how your text will animate. View on Preview/player pane View on Timeline Stage What's Your Story? 11 WINDOWS Live MOVIE MAKER : BASIC EDITING Adding Text (cont.) 3.To make changes to the title, animation, text font, transparency, colour or duration of your text double click the text box in the time line stage or click the tab when your now line is over the text box Another way to enter text changes is directly in the Preview / player pane by clicking the text to change. Watch your movie and make changes to titles, transitions, durations or clips. Once you are satisfied save your movie. If you are in a hurry try the new AutoMovie option. Simply import all the clips you want in your movie select the type of AutoMovie style you would like and Windows live movie maker will add the Text transitions and animations for you. What's Your Story? 12 WINDOWS Live MOVIE MAKER : BASIC EDITING Exporting your movie 1.Now you are happy with your movie you need to export it. First create a custom setting file for export. Click next to button then select create custom setting at the bottom of the dropdown menu. Name your custom setting Enter the following video settings • Width 1280 pixels • Height 720 pixels • Bit rate 5000 kbps • Frame rate 25 fps Under Audio settings, choose 128 kbps, 48kHz, stereo The final video file size should be approx. 37MB per minute of video. Click Save to give this custom setting a name, so that you can use it again. 2.Once you have created a custom setting and the movie is completed, it’s time to export your movie. Click next to button and select your custom setting file for export. What's Your Story? 13 WINDOWS Live MOVIE MAKER : BASIC EDITING Exporting your movie (cont.) 3.You will be asked to Enter a file name for your saved movie as well as Choose a place to save your movie. Once you have chosen the Movie Setting and selected The location for your movie Click The movie will now Render. 4.Once the movie has been saved you will be asked if you wish to play your movie or open the folder it is in. 5.Select and Windows Media Player will open and display your movie. Watch the movie to make sure that you are happy with it. Congratulations! You have created a movie with Windows Live Movie Maker! What's Your Story? 14

