Using Standalone for JWF. There is no separate standalone
advertisement

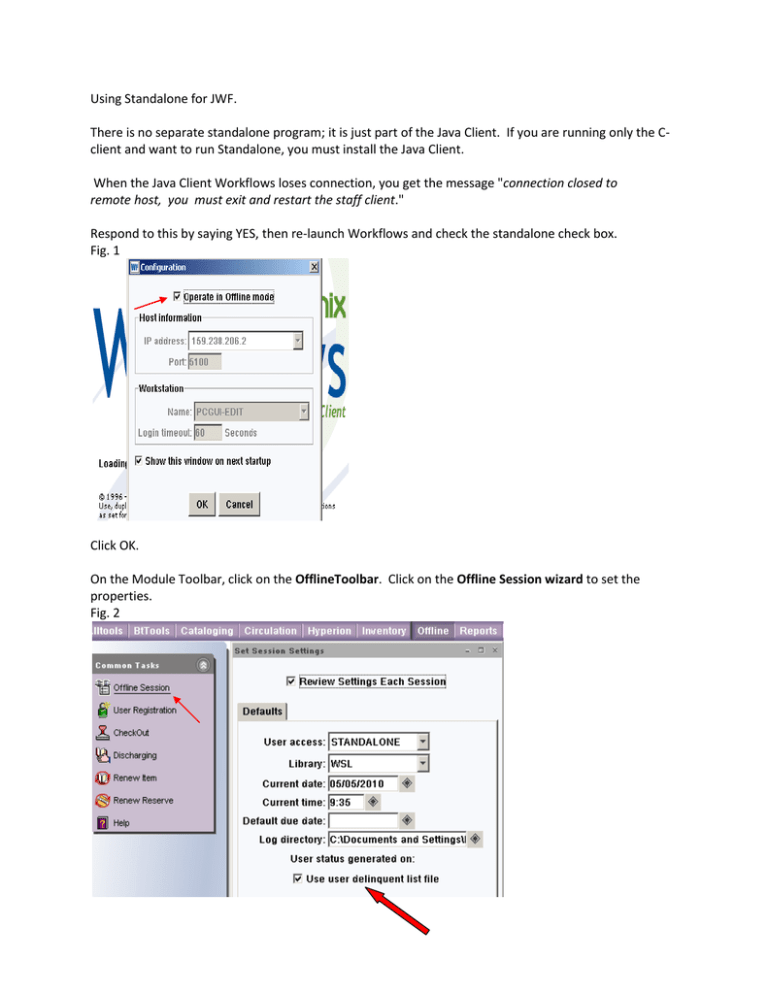
Using Standalone for JWF. There is no separate standalone program; it is just part of the Java Client. If you are running only the Cclient and want to run Standalone, you must install the Java Client. When the Java Client Workflows loses connection, you get the message "connection closed to remote host, you must exit and restart the staff client." Respond to this by saying YES, then re-launch Workflows and check the standalone check box. Fig. 1 Click OK. On the Module Toolbar, click on the OfflineToolbar. Click on the Offline Session wizard to set the properties. Fig. 2 **Note: If you are using the Classic Theme you will right click to find the Offline toolbar. The offline session wizard is the first icon on the left side of the toolbar. The User Access should be set to STANDALONE. The library should be set to your library. The current date and time are taken from the clock on your pc, so be sure this is set correctly. You may select to have a default due date for all items, or if you leave this field blank the system will use the circmap to determine the due date. Take note of the Log directory where you’ll save the offline file on your pc. It defaults to the Workflows directory under Documents and Settings\[Windows user logon name]\Sirsi\Workflows\LOG. The system creates a list of delinquent, barred and blocked patrons which is downloaded to the workstation each time you login. This file can be used to refuse charges to patrons that meet these criteria. You cannot override the block, so if you do not want to refuse service to delinquent/barred/blocked patrons while in offline make sure you uncheck the “Use user delinquent list file” box, see big red arrow in fig.2. . When finished click OK to save the settings. Be sure to close workflows to trigger the message to save properties. **Note: While using Standalone you will not be able to use search options that are normally available in Workflows. You can, however, enter patron and item barcodes and set custom checkout and custom discharge periods. When connectivity has been restored, exit Workflows. When you log into the system, Workflows automatically uploads the offline file and then removes it from your workstation. We highly recommend that you make a backup copy of your offline file prior to logging into the server. The file resides in the location you have specified in the “Log Directory” in the Offline sessions wizard. If you have a large file it may take several minutes for workflows to transfer the file to the server. Workflows does not give any indication that the transfer is finished. The only way to know is to look for the file in the log directory, If it is gone you can be assured it finished transferring as workflows does not remove the file until it has completed the transfer. It would be best to ensure the file was completely transferred prior to running the load standalone report. **Note: When you get the Workflows configuration window, be sure to un-check the “Operate in Offline mode” option you selected to go onto Standalone. See Fig. 1.*** There are two ways you can process the offline files: 1) Recommended if you used the Discharge function. Logon all staff workstations that ran Standalone. It is recommended that you logon each workstation that ran Offline in a sequential fashion to ensure there is no possibility of conflict on the server with the file upload. Then on any one pc, go to the Reports Toolbar. Click on the Schedule New Reports wizard. Find the Circcustom tab and select the Load Standalone report. Select the RUN NOW option. Be sure to look at the finished report to see what problems may have occurred that need attention, such as patron or item not in the catalog. 2) Use only if you did not use the Discharge function . Logon one workstation at a time, run the Load Standalone report, wait for it to finish, logon the next workstation, run the report, wait for it to finish, and so on. Your report may not finish immediately. Do not run another report until you see the report in the “Finished reports” list. To see if the report has started to run go to the “Scheduled Reports” wizard and see if the Load standalone report is listed, if it is you know it has not started yet. If it is not listed use the “Display Report Scheduler Status” helper (red arrow in Fig.3) to see if your report is currently running. Fig. 3 What happens behind the scenes? Each workstation’s offline file is uploaded to your library directory on the server and given a unique name. When the report runs, it appends all the files together and sorts them so the transactions are processed in order by date/time. You can practice the whole standalone process anytime, just setup the Standalone properties and actually do some work in the offline wizards, log back into the server and run the report to evaluate the results.


