Massachusetts Institute of Technology Department of Urban Studies and Planning
advertisement
Massachusetts Institute of Technology Department of Urban Studies and Planning 11.204: Planning, Communications & Digital Media
Fall 2004
Lab 1: WWW Portal Page Building
Help Section
1. Start Dreamweaver
To start Dreamweaver, click on the Start menu, and look for Macromedia Dreamweaver MX under Macromedia.
Sometimes it takes a long time (even a few minutes) to start the software on WinAthena machines.
2. Create a "site" within Dreamweaver
z
z
z
z
z
z
z
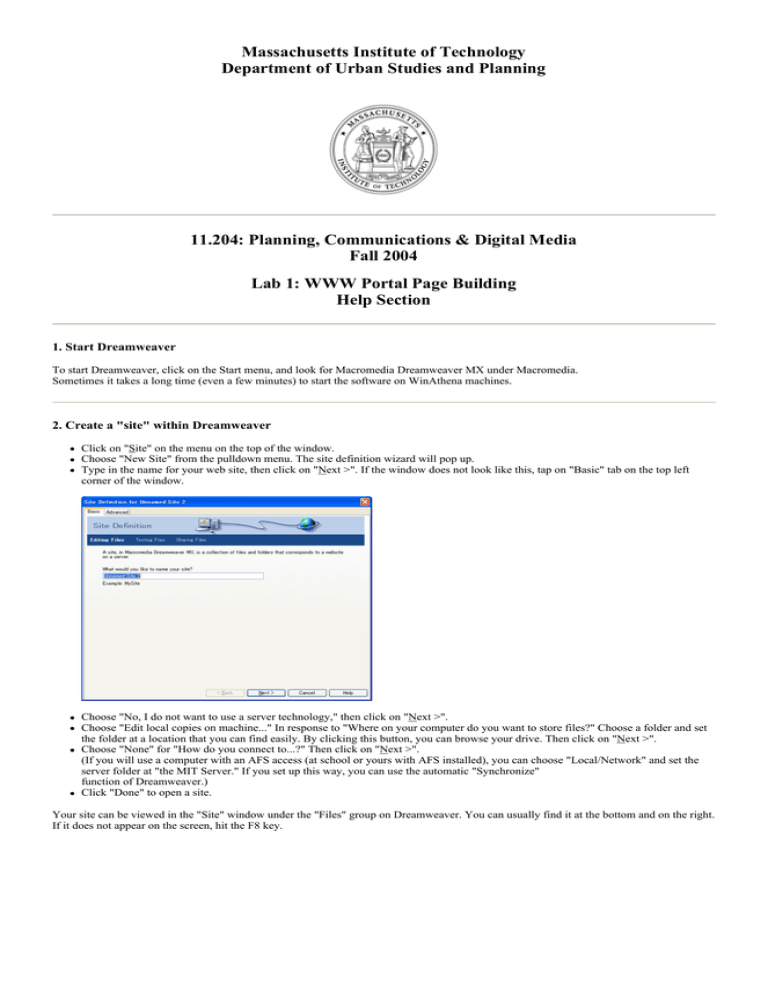
Click on "Site" on the menu on the top of the window.
Choose "New Site" from the pulldown menu. The site definition wizard will pop up.
Type in the name for your web site, then click on "Next >". If the window does not look like this, tap on "Basic" tab on the top left
corner of the window.
Choose "No, I do not want to use a server technology," then click on "Next >".
Choose "Edit local copies on machine..." In response to "Where on your computer do you want to store files?" Choose a folder and set
the folder at a location that you can find easily. By clicking this button, you can browse your drive. Then click on "Next >".
Choose "None" for "How do you connect to...?" Then click on "Next >".
(If you will use a computer with an AFS access (at school or yours with AFS installed), you can choose "Local/Network" and set the
server folder at "the MIT Server." If you set up this way, you can use the automatic "Synchronize"
function of Dreamweaver.)
Click "Done" to open a site.
Your site can be viewed in the "Site" window under the "Files" group on Dreamweaver. You can usually find it at the bottom and on the right.
If it does not appear on the screen, hit the F8 key.
3. Create a web page (i.e. HTML file) as your portal page
z
z
z
z
z
z
z
z
To create a new file, go to the "Site" window on Dreamweaver, RIGHT CLICK over the green folder icon to expand the context menu,
and choose "New File." A new html file will be generated in the folder.
The default file name is "untitled.htm," but change it to "index.html" Keep in mind that you can change the file name anytime by
RIGHT CLICKing over the file, and choosing "Rename."
In the main window (blank area), type in whatever information you want to put on your portal page. At minimum, it should contain
your name. You can change font size, color, typeface, and so on by using the Properties window, which is usually located at the bottom
of the Dreamweaver window.
Think about image size (width/height/file size). Computers at CRN have relatively large screens. Check your pages with other computers to make sure that all images appear. If not, adjust them accordingly. You might want to use "Table" function to create a visual grid to your web page. To do so, create a table (you can merge/split the cell
later on), and set the width and height to "100%." Then you divide the table to create a grid. By using a table, you can place your
images/texts more flexibly.
{ To create a table, go to "Insert" on the top, and choose "Table."
{ Rows: 1, Columns:1, Width: 100%, Border 0. This will create a table with a single cell. You can split/merge the cell(s) by
RIGHT CLICKing on the cell to show a pulldown menu and choosing the operation from the pulldown menu.
{ You can set alignment, width, height, and other properties for each cell.
Add a title to your page (the title will be shown in the window title bar; for example, the title of this page is "Lab 1 Help Section...").
Go to "Modify" on the main menu at the top and choose "Page Properties." Type in the title for the page in the "Title:" text box. You
can also change other properties for your page in this window. Because this is your portal page, the title should include your name.
Save the file by hitting "Ctrl" and "S" key or by choosing "Save" from the File menu.
While you are editing, you can see how your page will look in a web browser by hitting the F12 key.
4. Prepare an image file for your portal page
If you are familiar with Adobe Photoshop and other image processing software...
z
z
z
Save your image in the JPEG/JPG or GIF format. TIFF, BMP, and other formats are not suitable for dissemination on the web.
The file should be saved within the folder for your web site, which you designated when you created a "site" on Dreamweaver in Step
2.
You can create a new folder within that folder in order to save image files or you can save the image file directly under the folder.
If you are unfamiliar with Adobe Photoshop and other image processing software...
z
z
z
Choose one of the image files available at the MIT Server\Data\Images\ Copy it onto the folder for your web site, which you designated when you created a "site" on Dreamweaver in Step 2. You can create a new folder within the folder in order to save image files or you can save the image file directly under the folder. Alternatively, you might want to download a MIT icon file from the graphic identity web site. This site is worth bookmarking; it has
letterhead templates and other useful things.
5. Embed the image file on your portal page
z
z
z
z
Go back to Dreamweaver. To open your portal page on Dreamweaver, go to the Site window and double click on "index.html". To embed the image, click on "Insert" in the main menu and choose "Image." Choose the image file in the "Select Image Source" window. Make sure to choose "Document" for the "Relative to:" option. Otherwise, the image will not appear once you publish your web pages.
Strongly recommended: Click over the image once to active the image. In the Properties window, type a very short description (1-5
words) for the image in the ALT text box. This will allow visually impaired people to recognize the contents in the image.
6. Create one or two additional pages within your site
Repeat what you did in creating the portal page. This time, the file name(s) should be anything other than "index.html", but should end with
".html" You can also use ".htm" as the suffix for your additional pages. In most cases, ".html" and ".htm" are considered identical. However,
your portal page [index.html] should end with ".html". MIT web server recognizes only "index.html" as the default HTML file for a file
folder.
7. Create hyperlinks on the portal page to additional pages
z
Open the portal page.
z
If it is already open, you can choose "index.html" from the tab just below the main window. If it is not, double click on "index.html" in
the Site window.
z
Type in the text that you want to function as a hyperlink. Alternatively, you can also assign hyperlinks to images.
z
Go to the Properties window, click on the target symbol
and drag it on to the target file in the Site window. After this action, the
text will be underlined and the color will be blue (if you did not assign a specific color).
If you are assigning a hyperlink to an image, choose the image by clicking the image once and dragging the target symbol (located next
to the "Link" text box in the Properties window) to the target file in the Site window.
z
z
You can check if this hyperlink works by hitting [F12] to open the file in web browser, then clicking on the text.
8. Create a hyperlink to MIT web site on your portal page. MIT web site should open in a separate window
z
z
z
z
Type in "MIT" or "Massachusetts Institute of Technology" (or whatever you deem appropriate) on the portal page. You may also
choose to embed a MIT logo image, which is available from the graphic identity web site.
Choose the text to highlight and go to the Properties window.
Type in "http://web.mit.edu/" in the "Link" box.
Choose "_blank" for the "Target" option. By doing so, the MIT web site will open in a new window when the hyperlink is clicked in
the browser. You can test this by hitting [F12] to open the file in web browser, and clicking on the link.
