IMPORTANT SAFETY INSTRUCTIONS: ASSEMBLY AND HEIGHT ADJUSTMENT INSTRUCTIONS
ASSEMBLY AND HEIGHT ADJUSTMENT INSTRUCTIONS
For the Con-Tech Lighting Track Mount Compact Fluorescent Pendants (TMCFP series)
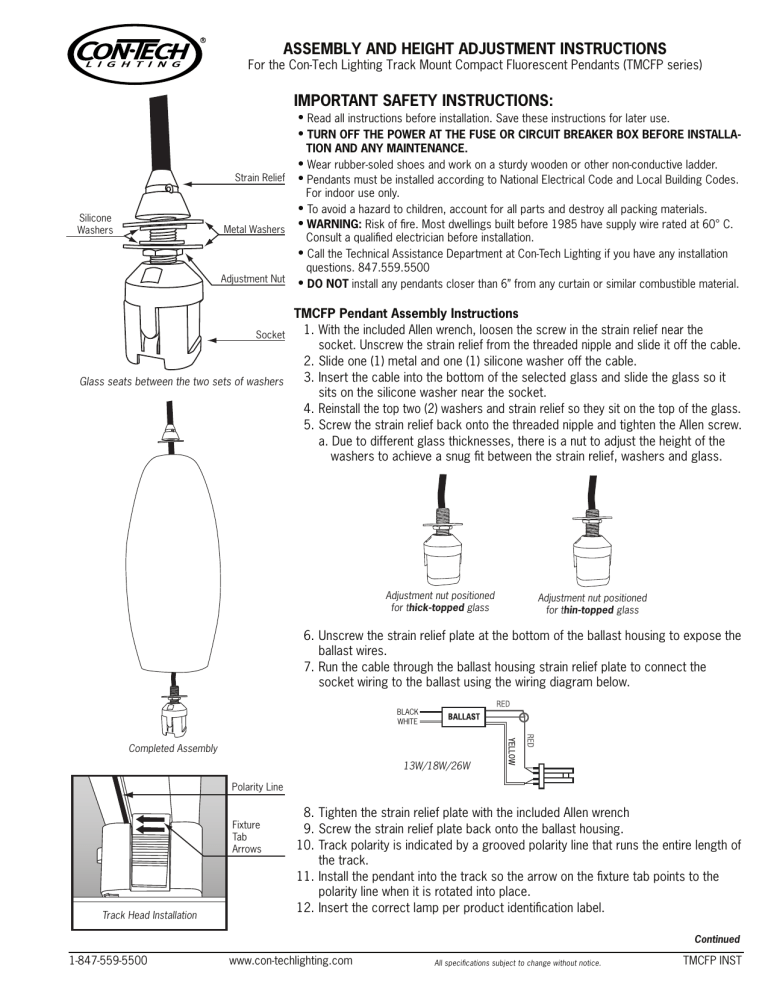
Silicone
Washers
Strain Relief
Metal Washers
Adjustment Nut
IMPORTANT SAFETY INSTRUCTIONS:
Read all instructions before installation. Save these instructions for later use.
TURN OFF THE POWER AT THE FUSE OR CIRCUIT BREAKER BOX BEFORE INSTALLA-
TION AND ANY MAINTENANCE.
Wear rubber-soled shoes and work on a sturdy wooden or other non-conductive ladder.
Pendants must be installed according to National Electrical Code and Local Building Codes.
For indoor use only.
To avoid a hazard to children, account for all parts and destroy all packing materials.
WARNING: Risk of fire. Most dwellings built before 1985 have supply wire rated at 60° C.
Consult a qualified electrician before installation.
Call the Technical Assistance Department at Con-Tech Lighting if you have any installation questions. 847.559.5500
DO NOT install any pendants closer than 6” from any curtain or similar combustible material.
Socket
Glass seats between the two sets of washers
TMCFP Pendant Assembly Instructions
1. With the included Allen wrench, loosen the screw in the strain relief near the socket. Unscrew the strain relief from the threaded nipple and slide it off the cable.
2. Slide one (1) metal and one (1) silicone washer off the cable.
3. Insert the cable into the bottom of the selected glass and slide the glass so it sits on the silicone washer near the socket.
4. Reinstall the top two (2) washers and strain relief so they sit on the top of the glass.
5. Screw the strain relief back onto the threaded nipple and tighten the Allen screw.
a. Due to different glass thicknesses, there is a nut to adjust the height of the washers to achieve a snug fit between the strain relief, washers and glass.
Adjustment nut positioned for t hick-topped glass
Adjustment nut positioned for t hin-topped glass
6. Unscrew the strain relief plate at the bottom of the ballast housing to expose the ballast wires.
7. Run the cable through the ballast housing strain relief plate to connect the socket wiring to the ballast using the wiring diagram below.
BLACK
WHITE
Completed Assembly
Track Head Installation
1-847-559-5500
13W/18W/26W
Polarity Line
Fixture
Tab
Arrows
8. Tighten the strain relief plate with the included Allen wrench
9. Screw the strain relief plate back onto the ballast housing.
10. Track polarity is indicated by a grooved polarity line that runs the entire length of the track.
11. Install the pendant into the track so the arrow on the fixture tab points to the polarity line when it is rotated into place.
12. Insert the correct lamp per product identification label.
www.con-techlighting.com
All specifications subject to change without notice.
Continued
TMCFP INST
Silicone
Washers
ASSEMBLY AND HEIGHT ADJUSTMENT INSTRUCTIONS
For the Con-Tech Lighting Track Mount Compact Fluorescent Pendants (TMCFP series)
Strain Relief
Metal Washers
Adjustment Nut
Socket
Glass seats between the two sets of washers
TMCFP Pendant Height Adjustment
1. Unscrew the strain relief plate at the bottom of the ballast housing.
2. Disconnect the ballast from the pendant wiring.
3. Loosen the Allen screw on the strain relief near the ballast housing.
4. Loosen the Allen screw on the strain relief near the socket and unscrew the strain relief from the threaded nipple.
5. Pull the bicycle cable off of the pendant.
6. Cut the bicycle cable to the desired length making sure to remove any sharp edges on the inside of the bicycle cable with a small round file.
7. Insert the pendant black and white wires back into the bicycle cable, and slide the bicycle cable through the strain relief and into the threaded nipple near the socket.
8. Screw the strain relief to the threaded nipple for a snug fit between the strain relief, washers and glass.
9. Tighten the Allen screw in the strain relief.
10. Cut the white and black pendant wires, allowing enough length to insert into the ballast housing and to wire to the ballast.
11. Insert the bicycle cable through the strain relief plate and rewire the ballast using the wiring diagram below.
13W/18W/26W
12. Tighten the strain relief plate with the included Allen wrench
13. Screw the strain relief plate back onto the ballast housing.
14. Track polarity is indicated by a grooved polarity line that runs the entire length of the track.
15. Install the pendant into the track so the arrow on the fixture tab points to the polarity line when it is rotated into place.
16. Insert the correct lamp per product identification label.
1-800-728-0312 www.con-techlighting.com
All specifications subject to change without notice.
CMCFP INST

