INSTALLATION PROCEDURES EX2H
advertisement
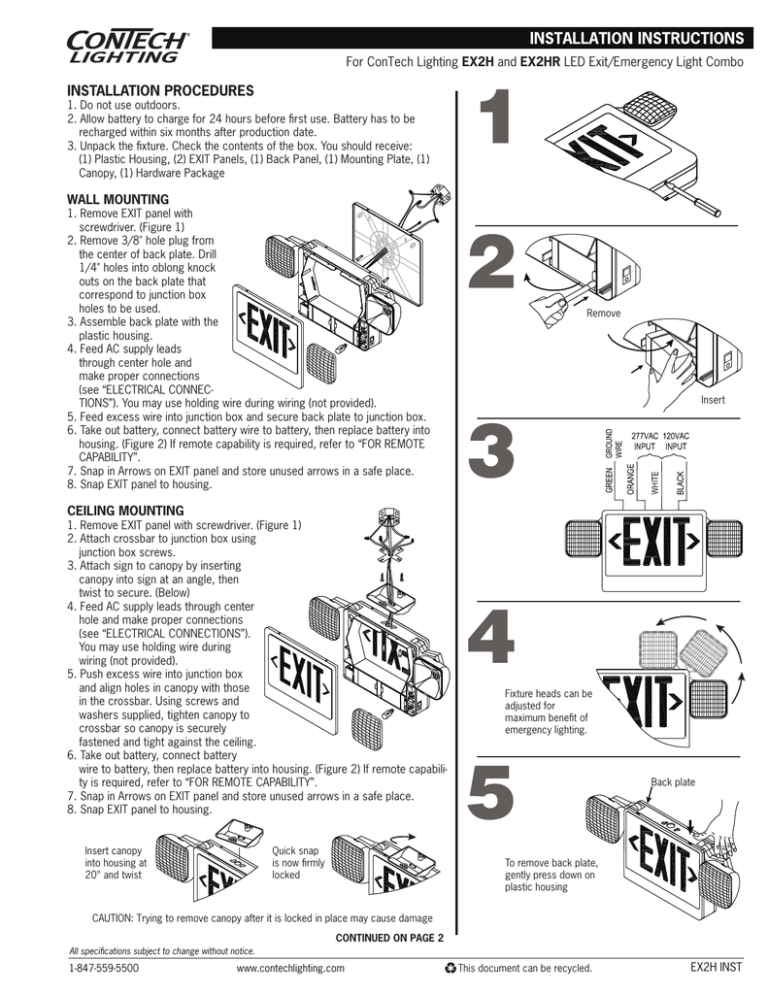
For ConTech Lighting EX2H and EX2HR LED Exit/Emergency Light Combo INSTALLATION PROCEDURES 1. Do not use outdoors. 2. Allow battery to charge for 24 hours before first use. Battery has to be recharged within six months after production date. 3. Unpack the fixture. Check the contents of the box. You should receive: (1) Plastic Housing, (2) EXIT Panels, (1) Back Panel, (1) Mounting Plate, (1) Canopy, (1) Hardware Package WALL MOUNTING 1. Remove EXIT panel with screwdriver. (Figure 1) 2. Remove 3/8" hole plug from the center of back plate. Drill 1/4" holes into oblong knock outs on the back plate that correspond to junction box holes to be used. 3. Assemble back plate with the plastic housing. 4. Feed AC supply leads through center hole and make proper connections (see “ELECTRICAL CONNECTIONS”). You may use holding wire during wiring (not provided). 5. Feed excess wire into junction box and secure back plate to junction box. 6. Take out battery, connect battery wire to battery, then replace battery into housing. (Figure 2) If remote capability is required, refer to “FOR REMOTE CAPABILITY”. 7. Snap in Arrows on EXIT panel and store unused arrows in a safe place. 8. Snap EXIT panel to housing. Remove Insert CEILING MOUNTING 1. Remove EXIT panel with screwdriver. (Figure 1) 2. Attach crossbar to junction box using junction box screws. 3. Attach sign to canopy by inserting canopy into sign at an angle, then twist to secure. (Below) 4. Feed AC supply leads through center hole and make proper connections (see “ELECTRICAL CONNECTIONS”). You may use holding wire during wiring (not provided). 5. Push excess wire into junction box and align holes in canopy with those in the crossbar. Using screws and washers supplied, tighten canopy to crossbar so canopy is securely fastened and tight against the ceiling. 6. Take out battery, connect battery wire to battery, then replace battery into housing. (Figure 2) If remote capability is required, refer to “FOR REMOTE CAPABILITY”. 7. Snap in Arrows on EXIT panel and store unused arrows in a safe place. 8. Snap EXIT panel to housing. Insert canopy into housing at 20° and twist Quick snap is now firmly locked Fixture heads can be adjusted for maximum benefit of emergency lighting. 5 Back plate To remove back plate, gently press down on plastic housing CAUTION: Trying to remove canopy after it is locked in place may cause damage CONTINUED ON PAGE 2 All specifications subject to change without notice. 1-847-559-5500 www.contechlighting.com This document can be recycled. EX2H INST For ConTech Lighting EX2H and EX2HR LED Exit/Emergency Light Combo PENDANT MOUNTING 1. Extension pole with threaded end (3/8" Max.) for pendant mounting is not supplied. 2. Take out LED strips carefully, put extension pole with threaded end into center hole on the top of housing, fasten pole to housing using nut (not provided). Insert the LED strips back to the slot after fastening pole. (Figure 6) 3. Connect and trim input wires to unit wires at upper left corner of housing. (Figure 7) For proper wire connection, see “ELECTRICAL CONNECTIONS”. 4. Take out battery, connect battery wire to battery, then replace battery into housing. (Figure 2) If remote capability is required, refer to “FOR REMOTE CAPABILITY” below. 5. Snap in arrows on EXIT panel and store unused arrows in a safe place. 6. Snap EXIT panel to housing. ELECTRICAL CONNECTIONS 1. Make the proper supply lead connections. 2. If using 120VAC, connect the black and white leads to the building utility. 3. If using 277VAC, connect the orange and white leads to the building utility. 4. Cap off unused wires. In all cases, use standard wire nuts to connect leads. 6 Stem Mount (not provided) Nut (not provided) LED Strips 7 8 Place connected wires at this position FOR REMOTE CAPABILITY 1. In order to use additional remote head (6V 12W Max), Prepare additional battery and extra wire for remote capability if one battery was assembled. And Make the proper head connection with remote head wires (not supplied) at junction box using extra head wires in the sign (Figure 9) 2. Connect additional 6V 4.5Ah battery (not supplied) to extra battery connector on the supplied battery, (Figure 10) Then place supplied battery at right battery case an additional battery at left battery case. (Figure 11). To take out and to insert battery, refer to Figure 2. 3. Extra wire for remote capability is not supplied for one battery assembled by manufacturer 4. Extra wires for remote capability is supplied for two batteries assembled by manufacturer. IMPORTANT SAFETY INSTRUCTIONS: • Read all the instructions before installation. Save instructions for later use. • Before starting the installation, disconnect the power by turning off the circuit breaker or by removing the appropriate fuse at the fuse box. Turning the power off sing the light switch is not sufficient to prevent electrical shock. • Product must be grounded to avoid potential electric shock and any other potential hazards. • Product must be mounted in locations and at heights and in a manner consistent with its intended use, and in compliance with National Electrical Code and local codes. Use of accessory equipment is not recommended. • Installing contrary to instructions may cause unsafe conditions. • Do not block light from the trim aperture, in whole or in part, as this may cause unsafe conditions. Do not mount near gas or electric heaters. • Use caution when servicing batteries. Battery acid can cause burns to skin and eyes. If acid is spilled on skin or in eyes, flush with fresh water and contact a physician immediately. • Equipment should be mounted in location and at heights where it will not readily be subject to tampering by unauthorized personnel. • Warning: Risk of fire. Most dwellings built before 1985 have supply wire rated at 60°C. Supply conductors (power wires) connecting the fixture must be rated at minimum of 90°C. Consult a qualified electrician before installation. • To avoid hazards to children, account for all parts and properly dispose of all packing materials. • Call the Technical Support department at ConTech Lighting with any installation questions: 847.559.5500. 9 Extra wire for remote capability. (Not provided for one battery) 10 Extra battery Extra battery terminal Connect additional battery wire using extra battery terminal 11 Additional battery Supplied battery All specifications subject to change without notice. 1-847-559-5500 www.con-techlighting.com This document can be recycled. EX2H INST
