MICROSOFT OFFICE 2013 – ADDING A CUSTOM TAB Objectives
advertisement

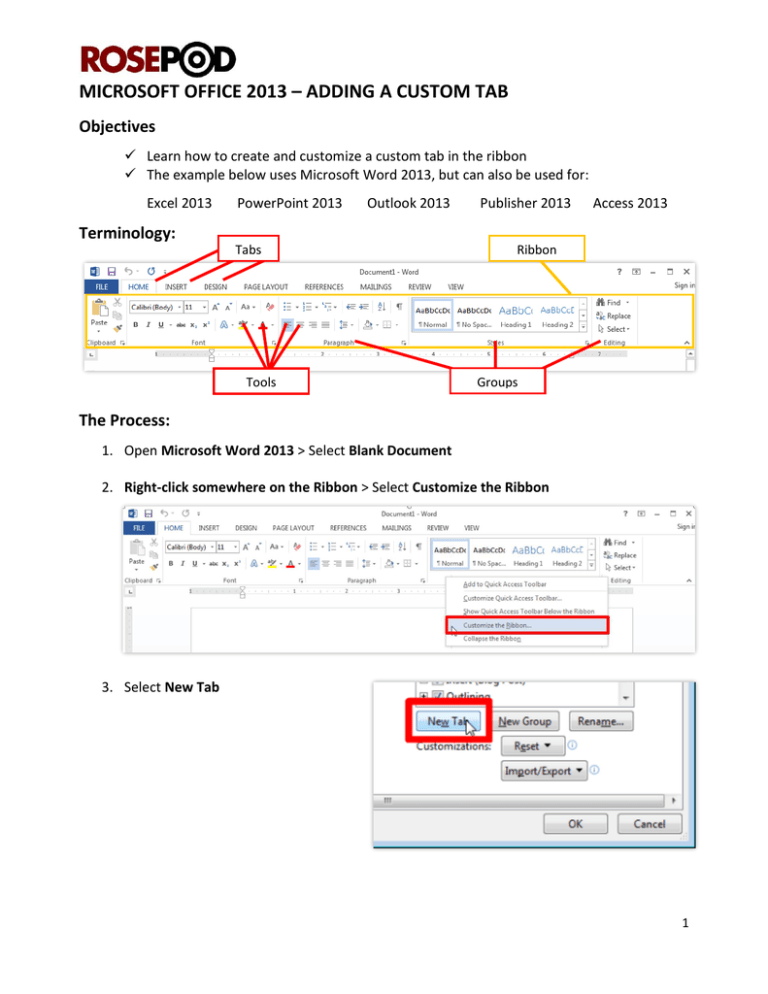
MICROSOFT OFFICE 2013 – ADDING A CUSTOM TAB Objectives Learn how to create and customize a custom tab in the ribbon The example below uses Microsoft Word 2013, but can also be used for: Excel 2013 PowerPoint 2013 Outlook 2013 Publisher 2013 Access 2013 Terminology: Tabs Tools Ribbon Groups The Process: 1. Open Microsoft Word 2013 > Select Blank Document 2. Right-click somewhere on the Ribbon > Select Customize the Ribbon 3. Select New Tab 1 4. STEP 4: Click on New Tab (Custom) in the right column > Select Rename This will be the name of the tab as it appears along the top of your program (HOME, INSERT, DESIGN, PAGE LAYOUT, ETC). Using all capital letters will make your custom tab name appear with the same formatting as the other tabs 5. STEP 5: Click on New Group (Custom) in the right column, just below the tab name you just entered > Select Rename This is the name of the group of tools you are creating and appears below the tools (CLIPBOARD, FONT, PARAGRAPH, STYLES, ETC) 6. Use the “Choose commands from” dropdown above the left column to select a group of tools to choose from (shown to the right). To select from the default tabs you see in Word, select Main Tabs You can also choose from other popular commands. 7. Drag-and-Drop the tools you want from the left column to your newly created group in the right column. You can also use the Add button located between the columns to add the tool to the right and Remove to remove any selected tool from the right column. 2 8. To re-order your tools, drag them up/down into a new position (shown to the right) 9. (Optional) To create another group in your tab > Select New Group in the right column. Go back and continue from STEP 5 to rename it and add the tools you need. 10. Click OK If you have any questions, please contact pod@rose-hulman.edu for assistance. 3


