Activity 8 Drawing Isobars Level 2
advertisement
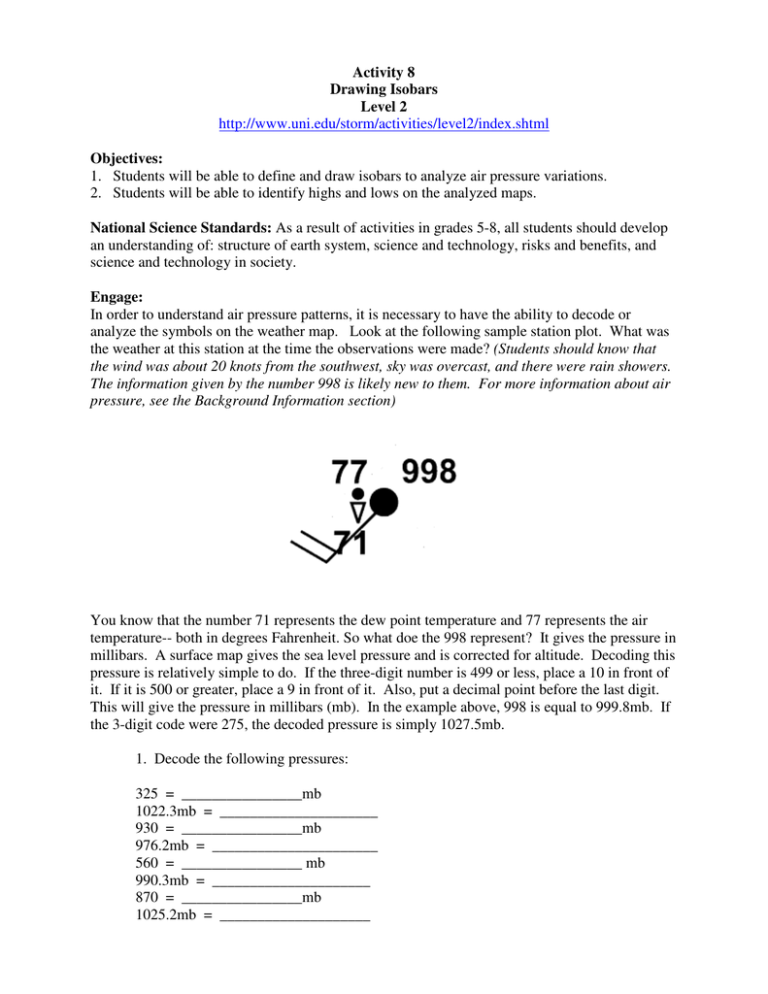
Activity 8 Drawing Isobars Level 2 http://www.uni.edu/storm/activities/level2/index.shtml Objectives: 1. Students will be able to define and draw isobars to analyze air pressure variations. 2. Students will be able to identify highs and lows on the analyzed maps. National Science Standards: As a result of activities in grades 5-8, all students should develop an understanding of: structure of earth system, science and technology, risks and benefits, and science and technology in society. Engage: In order to understand air pressure patterns, it is necessary to have the ability to decode or analyze the symbols on the weather map. Look at the following sample station plot. What was the weather at this station at the time the observations were made? (Students should know that the wind was about 20 knots from the southwest, sky was overcast, and there were rain showers. The information given by the number 998 is likely new to them. For more information about air pressure, see the Background Information section) You know that the number 71 represents the dew point temperature and 77 represents the air temperature-- both in degrees Fahrenheit. So what doe the 998 represent? It gives the pressure in millibars. A surface map gives the sea level pressure and is corrected for altitude. Decoding this pressure is relatively simple to do. If the three-digit number is 499 or less, place a 10 in front of it. If it is 500 or greater, place a 9 in front of it. Also, put a decimal point before the last digit. This will give the pressure in millibars (mb). In the example above, 998 is equal to 999.8mb. If the 3-digit code were 275, the decoded pressure is simply 1027.5mb. 1. Decode the following pressures: 325 = ________________mb 1022.3mb = _____________________ 930 = ________________mb 976.2mb = ______________________ 560 = ________________ mb 990.3mb = _____________________ 870 = ________________mb 1025.2mb = ____________________ Explore: Access the activity website: http://www.uni.edu/storm/activities/level2/act8.shtml. Click on the Surface Pressures link. Then click on the next link. Carefully observe each of the pressure maps that are available. Write down similarities and differences that you detect between the maps. Have students share their individual observations with others in the class. (You may choose to do small groups or the class as a whole. The first map shows pressures in millibars, and the second shows isobars drawn on the map in four-millibar intervals. Isobars connect areas of similar barometric pressure.) Explain: Tell students that the second pressure map website shows bands of pressures within 4-mb intervals. Isobar is the name given to the lines on the map. “Iso” means same, and “therm” can be interpreted as temperature. Therefore Isotherm means same temperature. Isotherms drawn on temperature maps connect equal temperatures. Here are some helpful hints: 1. Isobars are drawn in 4-millibar intervals. 2. Always label the isobar value. 3. Pressures lower than the isobar value are always on one side of the isobar and higher pressures are consistently on the other side. 4. Draw an isobar until it reaches the end of the plotted data or closes off a loop as it encircles data. (The map shows students an example of a closed-loop isobar) 5. Neighboring isobars tend to take similar paths. 6. Isobars never cross and never split or fork. 7. Do not skip isobar values if they fall within the pressure range on the map. 8. When the highest or lowest pressure values reported on the map are equal to an isobar value, do not draw the isobar. If a pressure value appears abnormally out of place, just circle that value. 9. More than one isobar of the same value can appear on a map. Tell students they will draw isobars to analyze pressure variations on surface temperature map from July 8, 2008. Help your students understand how the sample isobars were drawn and assist them as needed with the rest of the process. 1. The attached image is a plot of Surface Pressures for 1800Z, July 6, 2008. You are going to do an analysis of the pressures on this map. The first step in this analysis is to find the lowest and highest reported pressure values. Lightly place a circle around each highest and lowest pressure value. The lowest pressure shown on the map is _____mb and the highest is _____mb. 2. Using a 4 mb interval for the analysis, complete the sequence of isobars (line of equal pressure) that would appear at least once on the pressure plot: 1004, 1008, _____, _____, _____. 3. Two examples of isobars appear on the map. In the Southwestern United States, and in the Great Lakes area, 1004 mb isobar show example of closed loop isobars. The second example is the 1020 mb isobar along the Atlantic Coast. 4. Draw more isobars to show pressure patterns at map time. Work through the following steps to complete a temperature analysis on the surface temperature plot. 5. Label the highest-pressure area on the map with a large capitol “H”. 6. Label the lowest pressure area on the map with a large capitol “L”. Extend: Using similar procedures draw isobars on a map provided by your teacher. EVALUATE: Student progress must be closely monitored while completing the practice maps. It is easy for them to become frustrated on this. Their maps must be analyzed and graded with an open mind until they have mastered drawing isobars. Final maps and worksheets will be graded. Here is a sample analysis of the map provided to the students: For Further Inquiry: How do pressure patterns change during a five-day period? Challenge students to design an investigation to answer this or any other question they have about pressure and isobars. Science Background: The particles that make up the various layers in the atmosphere are always moving in random directions. Despite their tiny size, when they strike a surface they exert pressure. Each particle is too small to feel and only exerts a tiny bit of pressure. However, when we add up the all the pressures from the large number of particles that strike a surface each moment, then the total pressure is considerable. This is air pressure. As the density of the air increases, then the number of strikes per unit of time and area also increases. Since the particles move in all directions, they can even exert air pressure upwards as they smash into object from underneath. Air pressure can be exerted in all directions. As elevation above Earth’s surface increases, the number of particles decreases and the density of air therefore is less, meaning a decrease in air pressure. In fact, while the atmosphere extends more than 15 miles (24 km) up, one half of the air particles in the atmosphere are contained within the first 18,000 feet (5.6 km). Because of this decrease in pressure with height, it makes it very hard to compare the air pressure at one location to another, especially when the elevations of each site differ. Therefore, to give meaning to the pressure values observed at each station, we need to convert the station air pressures reading to a value with a common dominator. The common dominator we use is the sea level. At observation stations around the world, through a series of calculations, the air pressure reading, regardless of the station elevation, is converted a value that would be observed if that instrument were located at sea level. In the International Space Station, the density of the air is maintained so that it is similar to the density at the earth's surface. Therefore, the air pressure is the same in the space station as the earth's surface (14.7 pounds per square inch). The two most common units in the United States to measure the pressure are "Inches of Mercury" and "Millibars". The term “Inches of mercury” refers to the height of a column of mercury measured in hundredths of inches. This is what you will usually hear from the NOAA Weather Radio or from your favorite weather or news source. At sea level, standard air pressure in inches of mercury is 29.92. Millibar comes from the original term for pressure "bar". Bar is from the Greek "báros" meaning weight. A millibar is 1/1000th of a bar and is approximately equal to 1000 dynes (one dyne is the amount of force it takes to accelerate an object weighing one gram, one centimeter, in one second). Millibar values, used in meteorology, range from about 100 to 1050. At sea level, standard air pressure in millibars is 1013.2. Weather maps showing the pressure at the surface are drawn using millibars. Although the changes are usually too slow to observe directly, air pressure is almost always changing. This change in pressure is caused by changes in air density, and air density is related to temperature. Warm air is less dense than cooler air because the particles in warm air have a greater velocity and are farther apart than in cooler air. So, while the average altitude of the 500-millibar level is around 18,000 feet (5,600 meters) the actual elevation will be higher in warm air than in cold air. The most basic change in pressure is the twice daily rise and fall in due to the heating from the sun. Each day, around 4 a.m./p.m. the pressure is at it’s lowest and near its peak around 10 a.m./p.m. The magnitude of the daily cycle are greatest near the equator decreasing toward the poles. On top of the daily fluctuations are the larger pressure changes as a result of the migrating weather systems. Weather systems are identified by the blue H's and red L's drawn on weather maps. The H's represent the location of the area of highest pressure. The L's represent the position of the lowest pressure. Activity 8 Drawing Isobars Student Sheets Engage: In order to understand air pressure patterns, it is necessary to have the ability to decode or analyze the symbols on the weather map. Look at the following sample station plot. What was the weather at this station at the time the observations were made? You know that the number 71 represents the dew point temperature and 77 represents the air temperature-- both in degrees Fahrenheit. So what doe the 998 represent? It gives the pressure in millibars. A surface map gives the sea level pressure and is corrected for altitude. Decoding this pressure is relatively simple to do. If the three-digit number is 499 or less, place a 10 in front of it. If it is 500 or greater, place a 9 in front of it. Also, put a decimal point before the last digit. This will give the pressure in millibars (mb). In the example above, 998 is equal to 999.8mb. If the 3-digit code were 275, the decoded pressure is simply 1027.5mb. 1. Decode the following pressures: 325 = ________________mb 1022.3mb = _____________________ 930 = ________________mb 976.2mb = ______________________ 560 = ________________ mb 990.3mb = _____________________ 870 = ________________mb 1025.2mb = ____________________ Explore: Access the activity website: http://www.uni.edu/storm/activities/level2/act8.shtml. Click on the Surface Pressures link. Then click on the next link. Carefully observe each of the pressure maps that are available. Write down similarities and differences that you detect between the maps. Explain: The second pressure map website shows lines of pressures within 4-mb intervals. Isobar is the name given to the lines on the map. “Iso” means same, and “therm” can be interpreted as temperature. Therefore Isotherm means same temperature. Isotherms drawn on temperature maps connect equal temperatures. Here are some helpful hints: 1. Isobars are drawn in 4-millibar intervals. 2. Always label the isobar value. 3. Pressures lower than the isobar value are always on one side of the isobar and higher pressures are consistently on the other side. 4. Draw an isobar until it reaches the end of the plotted data or closes off a loop as it encircles data. (The map shows students an example of a closed-loop isobar) 5. Neighboring isobars tend to take similar paths. 6. Isobars never cross and never split or fork. 7. Do not skip isobar values if they fall within the pressure range on the map. 8. When the highest or lowest pressure values reported on the map are equal to an isobar value, do not draw the isobar. If a pressure value appears abnormally out of place, just circle that value. 9. More than one isobar of the same value can appear on a map. You will now analyze a surface map to reveal surface pressure patterns: 1. The attached image is a plot of Surface Pressures for 1800Z, July 6, 2008. You are going to do an analysis of the pressures on this map. The first step in this analysis is to find the lowest and highest reported pressure values. Lightly place a circle around each highest and lowest pressure value. The lowest pressure shown on the map is _____mb and the highest is _____mb. 2. Using a 4 mb interval for the analysis, complete the sequence of isobars (line of equal pressure) that would appear at least once on the pressure plot: 1004, 1008, _____, _____, _____. 3. Two examples of isobars appear on the map. In the Southwestern United States, and in the Great Lakes area, 1004 mb isobar show example of closed loop isobars. The second example is the 1020 mb isobar along the Atlantic Coast. 4. Draw more isobars to show pressure patterns at map time. Work through the following steps to complete a temperature analysis on the surface temperature plot. 5. Label the highest-pressure area on the map with a large capitol “H”. 6. Label the lowest pressure area on the map with a large capitol “L”. Extend: Using similar procedures, draw isobars on a map provided by your teacher.
