Document 10761890
advertisement
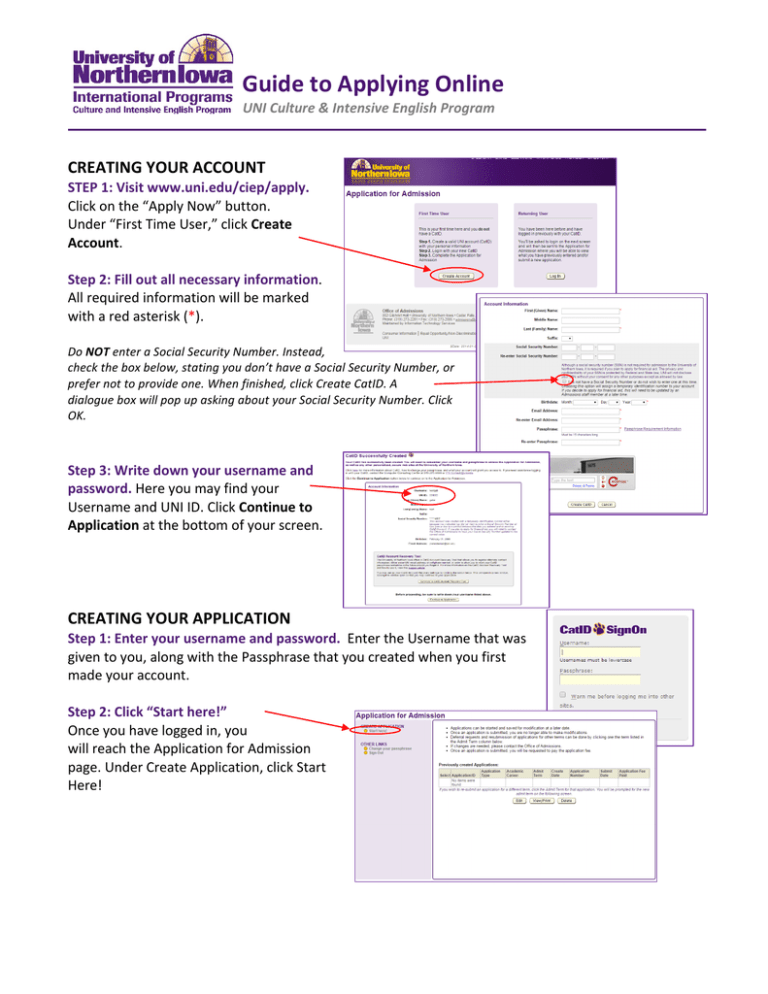
Guide to Applying Online UNI Culture & Intensive English Program CREATING YOUR ACCOUNT STEP 1: Visit www.uni.edu/ciep/apply. Click on the “Apply Now” button. Under “First Time User,” click Create Account. Step 2: Fill out all necessary information. All required information will be marked with a red asterisk (*). Do NOT enter a Social Security Number. Instead, check the box below, stating you don’t have a Social Security Number, or prefer not to provide one. When finished, click Create CatID. A dialogue box will pop up asking about your Social Security Number. Click OK. Step 3: Write down your username and password. Here you may find your Username and UNI ID. Click Continue to Application at the bottom of your screen. CREATING YOUR APPLICATION Step 1: Enter your username and password. Enter the Username that was given to you, along with the Passphrase that you created when you first made your account. Step 2: Click “Start here!” Once you have logged in, you will reach the Application for Admission page. Under Create Application, click Start Here! Step 3: Click Culture and Intensive English Program (CIEP) Student. Answer the remaining questions on this page and click Create Application. Step 4: Select the application term. From the dropdown menu, choose the session that you will begin attending UNI from the dropdown menu. Choose which session you will attend during that term. Once selected, click Save, Go to Next >. COMPLETING YOUR APPLICATION Step 1: Fill out all applicable personal information. Any field marked with * is required. Once you are finished, click Save, Go to Next >. Step 2: Enter your contact information. Under Address for Admission Materials, report your local address (in the U.S). Under Permanent Address, list your address from your home country. When complete, click Save, Go to Next >. Step 3: Enter your Academic Information. Fill out the information under High School/Secondary School Information and Test Scores. If you have attended a post-­‐secondary school, fill out information under the Post-­‐Secondary Level Education Information. To begin, click ‘Add Educational Institution.’ Fill out all required information. When complete, click ‘Save University’. If you attended more than one post-­‐ secondary school, you may click ‘Add Educational Institution’ again to list another school. When you are finished, click Save, Go to Next >. Step 4: Enter Financial Information. In this section, list the amount of funding you have available for your studies. Also list where or who this money is coming from, and provide contact information for that individual, if necessary. When finished, click Save, Go to Next >. Step 5: Enter Additional Information. Select how you heard about CIEP. Check which resources you used to gather more information about CIEP before applying. Use the final dropdown menu to indicate where you plan to live while attending UNI CIEP. When finished, click Save, Go to Next >. Step 6: Add the application attachments. You are required to attach a copy of your passport, along with proof of financial guarantee. You may also upload a copy of your past transcripts or other educational documents, but this is optional. In order to upload a document, first select the document you will be uploading on the dropdown menu under Attachment Type. Once the attachment type is selected, add an Attachment Description. Click Choose File and select a file from your computer to upload. Once the file has been chosen, click Attach File. . Your file should now appear in the attachments table. Repeat this process for each document you wish to upload. When finished, click Go to Next >. REVIEWING & SUBMITTING YOUR APPLICATION Step 1: Review your information for accuracy. Once you reach the bottom of the page, read the information under Submit Application. Select your payment option. Once this is complete, type a capital ‘X’ in the box to agree to your payment. Click Submit Application. Step 2: Choose Payment Method. Once you choose your payment method, you will be brought to a new page. Under Application Fee Payment, select how you will be paying for this fee. You may either select Pay by Credit Card or Pay with Peer Transfer. Note: If you choose to log out before paying your application fee, you will no longer be able to access your application (it has already been submitted). You will still be able to pay the fee by logging into the Application for Admission page and clicking Pay Application Fee under Previously Created Applications. Step 3: Submit Payment. If you choose to pay using a credit card, you will be brought to a new screen. Check that the total amount is correct. Fill out all required information under Payment Information and Billing Information. Enter the Security Code provided under the Security Code section. When finished, click Pay Now. If you choose to pay with peer transfer, you will be brought to a new page. Under Payment, type in the amount of money that you want to pay UNI (in USD). Then select the country you will be paying from in the dropdown menu. To complete your payment, you must either sign in or create a Flywire Account. To do this, follow the instructions under the Flywire Account heading. When complete, click Continue with Payment. Continue to follow the instructions provided on the website to complete your payment. FINISHING YOUR APPLICATION Once you have completed your application and have paid your application fee, it should be visible under the Previously Created Applications heading. A complete application with a paid application fee will have every section of the table filled out, and will appear similar to the image below. Congratulations! Your application is complete! Questions or Concerns? Contact us! Email: ciep@uni.edu Phone: 319-­‐273-­‐2182 Fax: 319-­‐273-­‐3333 1200 W 23rd St. Bartlett Hall Rm. 3025 Cedar Falls, IA 50614-­‐0511

